| | Graupner Krabenkutter TON 12 |  |
|
|
| Author | Message |
|---|
barriew
Captain (moderator)

Posts : 2631
Join date : 2011-11-26
Age : 83
Location : Thaxted, Essex
 |  Subject: Graupner Krabenkutter TON 12 Subject: Graupner Krabenkutter TON 12  Sat Oct 12, 2019 12:49 pm Sat Oct 12, 2019 12:49 pm | |
| 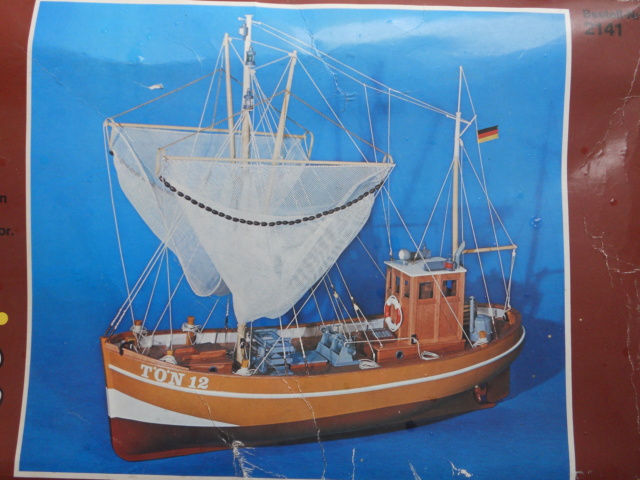 This is my new project. The kit was bought on eBay and is pretty old. Diecut wood and not very good quality by the looks of things. The hull is ABS. The only work that had been done was the hull trimmed to the top line - pretty well - and the rudder and skeg removed from the sheet - not very well. Fist job was to sort out all the paper work. 3 plans - all in German. 2 build booklets - 1 German with photos, 1 English translation of text - no photos. This also includes a translation of the German on the plans. One of the plans is for the RC installation using old Graupner kit. There are also more booklets for the RC. Being German, there are also leaflets telling you what you must not do, including how to avoid shocks from the electric installation. Next was to make a stand. Th two ends have been made from some 6mm MDF, but I need some more timber to make some rails. I am thinking of making a new skeg from wood and I have a brass rudder which is almost the same shape.  Barrie | |
|
  | |
Guest
Guest
 |  Subject: Re: Graupner Krabenkutter TON 12 Subject: Re: Graupner Krabenkutter TON 12  Sat Oct 12, 2019 11:40 pm Sat Oct 12, 2019 11:40 pm | |
| |
|
  | |
barriew
Captain (moderator)

Posts : 2631
Join date : 2011-11-26
Age : 83
Location : Thaxted, Essex
 | |
  | |
Roadrunner
Forum Overlord


Posts : 1715
Join date : 2011-06-10
 |  Subject: Re: Graupner Krabenkutter TON 12 Subject: Re: Graupner Krabenkutter TON 12  Sun Oct 13, 2019 10:14 pm Sun Oct 13, 2019 10:14 pm | |
| You should have little issue with the p38 sticking to abs... but as a rule of thumb rough up the glue surfaces that the p38 is going to be applied to to give it some extra grip... I found when building my sons hard body abs truck that if the surface is mirror smooth one bang or flex the p38 will just crack off, after roughing the surface it took quite a whallop at about 30mph for him to crack the joint when he hit the curb  . Still drop of glue down the seam after fixed it yet again...
_________________
I'm Not Anti-Social, I'm Anti-Stupid.
| |
|
  | |
barriew
Captain (moderator)

Posts : 2631
Join date : 2011-11-26
Age : 83
Location : Thaxted, Essex
 |  Subject: Re: Graupner Krabenkutter TON 12 Subject: Re: Graupner Krabenkutter TON 12  Wed Oct 16, 2019 11:53 am Wed Oct 16, 2019 11:53 am | |
| Finally a little progress. This has been a most frustrating build so far.  It was not possible to fix either the propshaft or rudder until all had been aligned, and that was not easy as the marks for the shaft and rudder tube were in the wrong places  Once the skeg is fitted there is no way to remove the rudder, so that added to the complications. I think I now have it correct - I'll know when the temporary glue has dried and I can make it permanent. There are a couple of holes to fill where I had to move the shaft and tube. Hope fully things will get easier now. This is the rudder built more or less as the plans except I bent the rod (which is inside the tube you see) at the bottom of the tube to ensure it couldn't slip inside the shells. 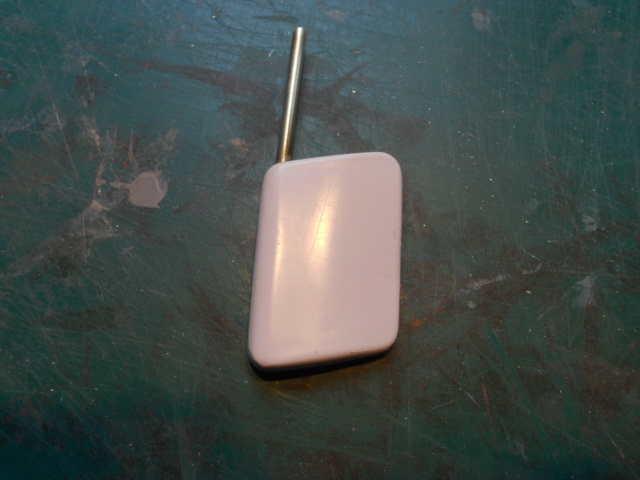 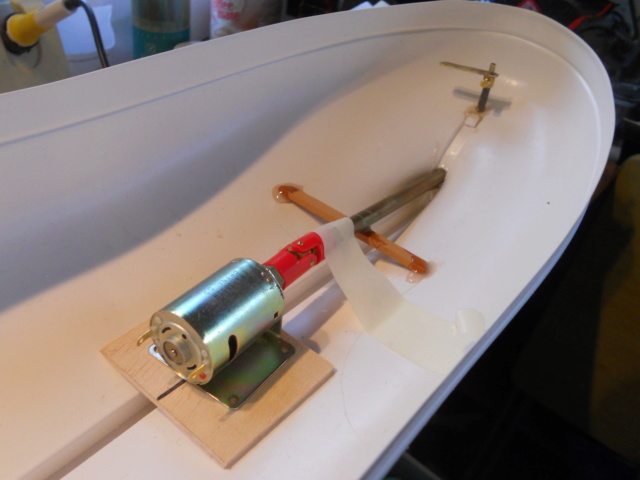 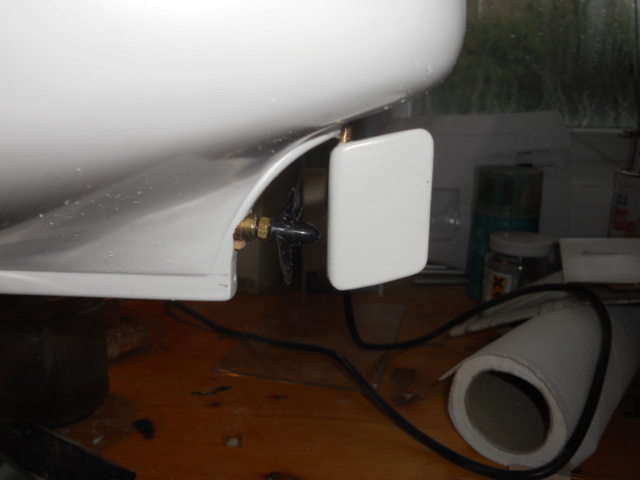 Barrie | |
|
  | |
Guest
Guest
 |  Subject: Re: Graupner Krabenkutter TON 12 Subject: Re: Graupner Krabenkutter TON 12  Wed Oct 16, 2019 10:44 pm Wed Oct 16, 2019 10:44 pm | |
| You don't know how happy that makes me feel, Barrie…………….seeing a motor in it...…..I have a miniature one of these half built at the back of the shed...……….I'll get round to finishing it one day, lol. |
|
  | |
barriew
Captain (moderator)

Posts : 2631
Join date : 2011-11-26
Age : 83
Location : Thaxted, Essex
 |  Subject: Re: Graupner Krabenkutter TON 12 Subject: Re: Graupner Krabenkutter TON 12  Thu Oct 17, 2019 1:39 pm Thu Oct 17, 2019 1:39 pm | |
| | |
|
  | |
Guest
Guest
 |  Subject: Re: Graupner Krabenkutter TON 12 Subject: Re: Graupner Krabenkutter TON 12  Fri Oct 18, 2019 12:18 am Fri Oct 18, 2019 12:18 am | |
| |
|
  | |
barriew
Captain (moderator)

Posts : 2631
Join date : 2011-11-26
Age : 83
Location : Thaxted, Essex
 |  Subject: Re: Graupner Krabenkutter TON 12 Subject: Re: Graupner Krabenkutter TON 12  Sat Oct 19, 2019 1:57 pm Sat Oct 19, 2019 1:57 pm | |
| Started sanding my stand and it fell to pieces     Re-glued and added corner stiffeners. It now feels rigid and has had a quick coat of coloured varnish. It will have a coat of external varnish tomorrow. I then started on the deck. This required the edge sanding down so that it will fit into the moulded rubbing strake. It also comes in two parts to be joined. The parts to join are on one of the diecut sheets. The cutting is not very even. Some parts have fallen out, others require cutting. The material is 1.5 mm solid mahogany, NOT ply. It splits very easily, as did these two parts, so I decided I was doing it my way, and cut two strips of ply. There is a large opening in the hull as you can see. The kit includes some turn-buttons to hold the removable section firmly, but these are very obvious, and I don't like them.  I will find another way of holding it. However, to allow these buttons to be screwed down, they supply some rebated timber to form the ledge to hold the 'lid'. I thought this a little complicated, so used some lime strip from my stocks. There are a number of strengthening pieces under both the deck and the 'lid'. These have been fitted. I can see that as the build progresses I will be making replacement parts if they continue to split when I try to remove them. May Billings aren't so bad after all     Barrie 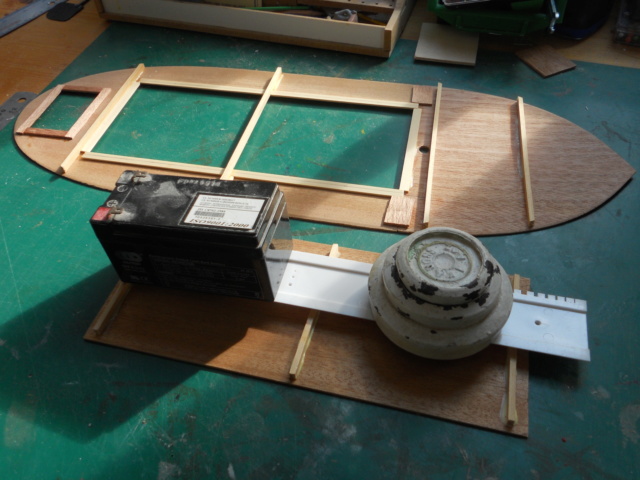 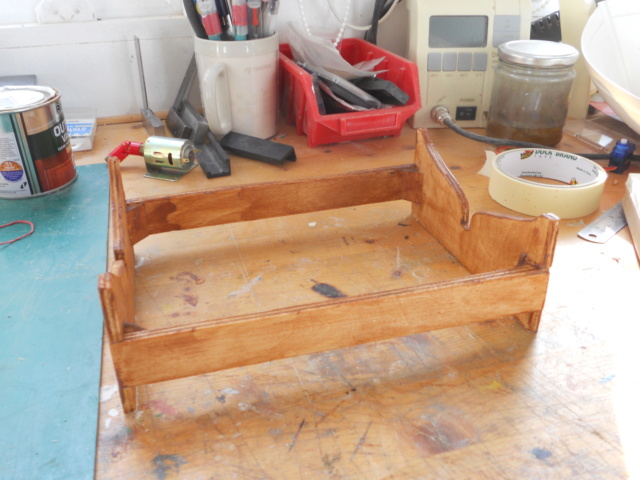 | |
|
  | |
barriew
Captain (moderator)

Posts : 2631
Join date : 2011-11-26
Age : 83
Location : Thaxted, Essex
 |  Subject: Re: Graupner Krabenkutter TON 12 Subject: Re: Graupner Krabenkutter TON 12  Mon Oct 21, 2019 12:46 pm Mon Oct 21, 2019 12:46 pm | |
| 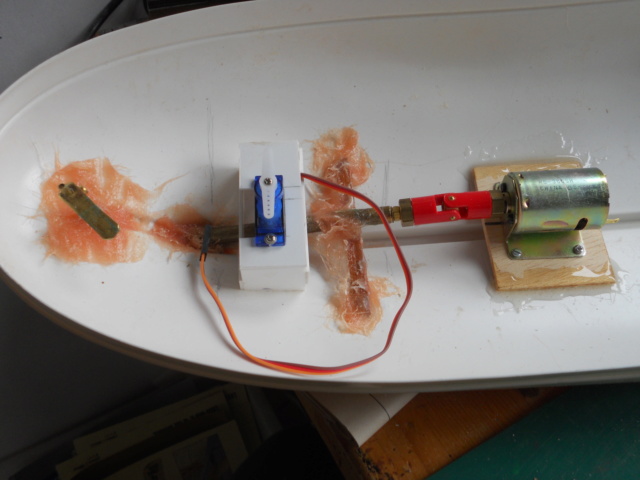 Servo mount constructed and installed. As I've used a small servo, the tiller will be modified so I can use a push-pull linkage. Motor fixed to mounting board and board glued in place. The ESC and Rx will go either side of the motor, with a battery box forward. I have worked out how to hold the large hatch closed with some small magnets - I just need to find some steel strips. I plan to fit the switch under a hatch on the foredeck so the main hatch will only need to be removed to replace the battery  I gave the stand a coat of polyurethane varnish to protect it. I have also given the underside of the deck a coat of sanding sealer - for which the German appears to be porefiller  . I had to replace the joining pieces as the original ones snapped  Barrie | |
|
  | |
barriew
Captain (moderator)

Posts : 2631
Join date : 2011-11-26
Age : 83
Location : Thaxted, Essex
 |  Subject: Re: Graupner Krabenkutter TON 12 Subject: Re: Graupner Krabenkutter TON 12  Thu Oct 24, 2019 2:00 pm Thu Oct 24, 2019 2:00 pm | |
| I decided that the next challenge was getting the deck in place. It is supposed to fit into the moulded rubbing strip, but its quiet a tight fit and the wood is not very flexible. After a lot of sanding and sqeezing I finally got it home. I then had a slightly mad moment and proceeded to apply the glue and fix it in place. Wrong   I should have waited until I had finished the fixings for the large hatch   I started this job two days ago, but didn't have enough magnets. It is still possible to finish the job but it will be more tricky. I had almost made a battery box to go forward of the motor and leave space for some wiring connectors, until I realised the the main mast goes right through to the keel  . So I have now made another to sit between motor and mast. I will have to use a smaller battery, but I never sail my boats for too long anyway. I also found out when I had fixed the deck that mu servo mount was too high, so I had to take a cutting wheel in my Dremel to reduce the height of the support  Next up is to make and fix some bulwark supports so I can add the cappings, as well as modifying the tiller and making the linkages. Barrie Dry fitting of deck. 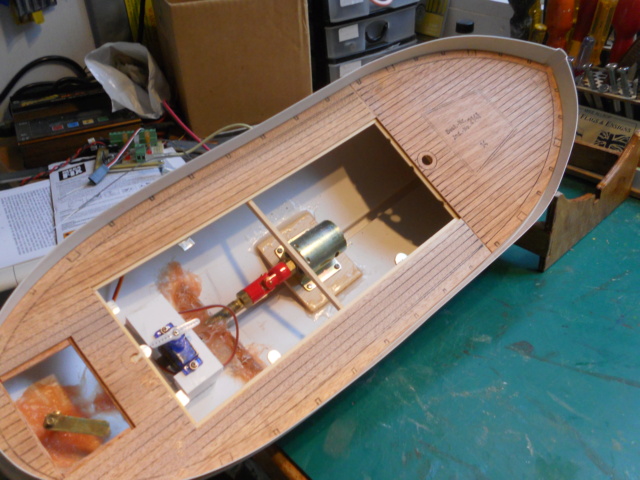 Problem with servo height 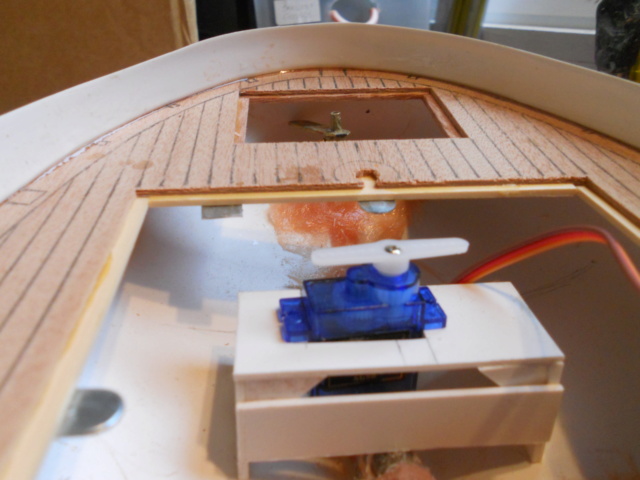 and deck finally glued. 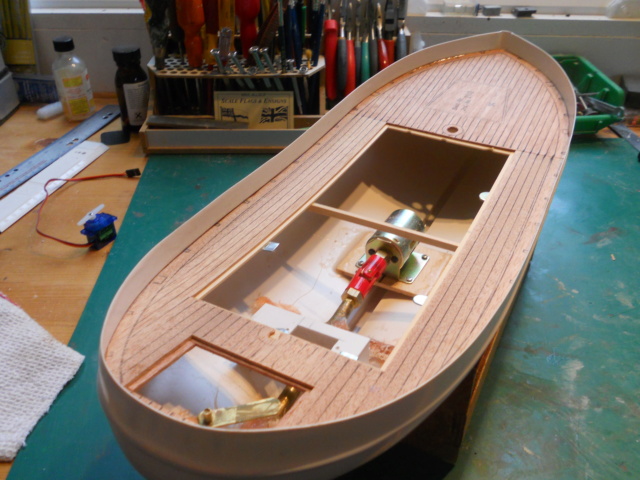 The metal tabs are for the magnets. I would prefer a steel strip, but until I can make up a reasonable order for CMB these will have to do. I do think I may have to use some of the turn buttons in the middle of the hatch as there is quite curve on the deck there. | |
|
  | |
barriew
Captain (moderator)

Posts : 2631
Join date : 2011-11-26
Age : 83
Location : Thaxted, Essex
 |  Subject: Re: Graupner Krabenkutter TON 12 Subject: Re: Graupner Krabenkutter TON 12  Fri Oct 25, 2019 5:38 pm Fri Oct 25, 2019 5:38 pm | |
|  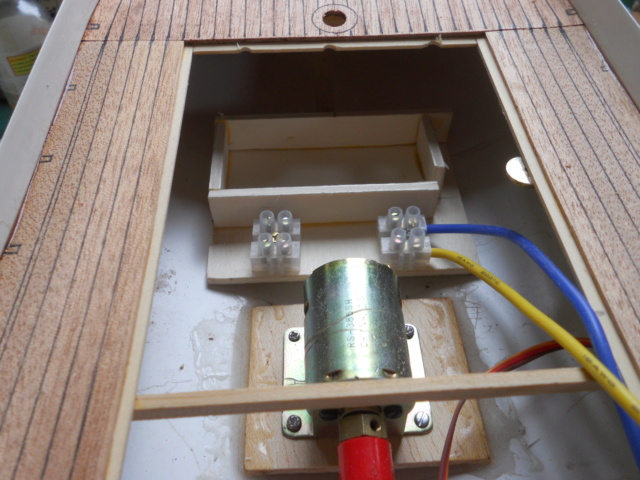 More work on the tiller and battery box today. I found a different tiller which saved me from modifying the one I made  Unfortunately the servo is still too high to use the connectors shown - it catches the hatch - so I have ordered a metal clevis. The battery box is ready to install, but I want to wire it up first and I need another Deans connector which is on order. Tomorrow its definitely the bulwark supports, although the instructions tell you to paint the strip white before cutting to length. Not a bad idea to avoid lots of fiddly cutting in at deck level  . I'm not too happy about the join in the deck, but not sure what I can do to improve it.  Barrie | |
|
  | |
Guest
Guest
 |  Subject: Re: Graupner Krabenkutter TON 12 Subject: Re: Graupner Krabenkutter TON 12  Sat Oct 26, 2019 3:34 am Sat Oct 26, 2019 3:34 am | |
| |
|
  | |
barriew
Captain (moderator)

Posts : 2631
Join date : 2011-11-26
Age : 83
Location : Thaxted, Essex
 |  Subject: Re: Graupner Krabenkutter TON 12 Subject: Re: Graupner Krabenkutter TON 12  Sat Oct 26, 2019 12:31 pm Sat Oct 26, 2019 12:31 pm | |
| The wood for the bulwark supports has been painted white, as has the wood for the stem and stern post. I've also made a jig to cut the strips. Just waiting for the paint to dry. I started on the various structures for the deck - firstly the forward companionway. The wood is terrible    . Even after much sanding its not really flat.It is also quite difficult to sand the edges. Too coarse paper causes it to split, fine paper doesn't have any effect  I want to locate the switch under this structure if I can make it removable. I think that I can start painting the hull now. If I start fixing things to the deck it will become more difficult. Barrie 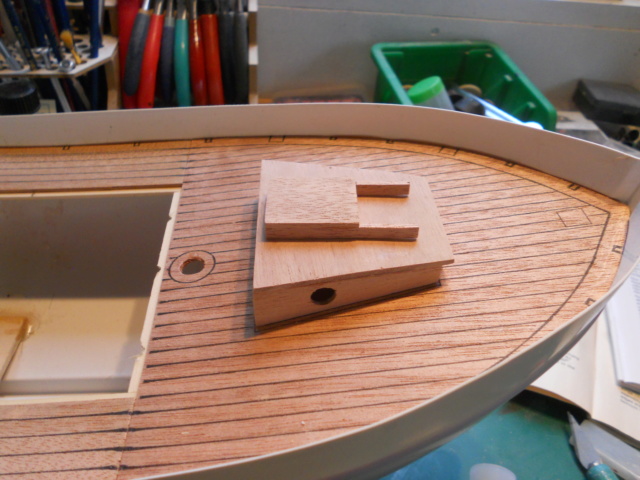 | |
|
  | |
barriew
Captain (moderator)

Posts : 2631
Join date : 2011-11-26
Age : 83
Location : Thaxted, Essex
 |  Subject: Re: Graupner Krabenkutter TON 12 Subject: Re: Graupner Krabenkutter TON 12  Sun Oct 27, 2019 12:55 pm Sun Oct 27, 2019 12:55 pm | |
| | |
|
  | |
barriew
Captain (moderator)

Posts : 2631
Join date : 2011-11-26
Age : 83
Location : Thaxted, Essex
 |  Subject: Re: Graupner Krabenkutter TON 12 Subject: Re: Graupner Krabenkutter TON 12  Tue Oct 29, 2019 2:42 pm Tue Oct 29, 2019 2:42 pm | |
| The new fittings for the servo came so I fitted those today. Much better! I also made the skylight for the deck. This is no quite according to the instructions. As supplied the pieces would have had a solid to onto which you painted a 'window'. The wood was pretty poor, so I made new tops from 0.8 mm ply and cut an opening which will be glazed. after I have stained the wood. That's all I managed today as I had to entertain my Grandson for 3 hours! Barrie 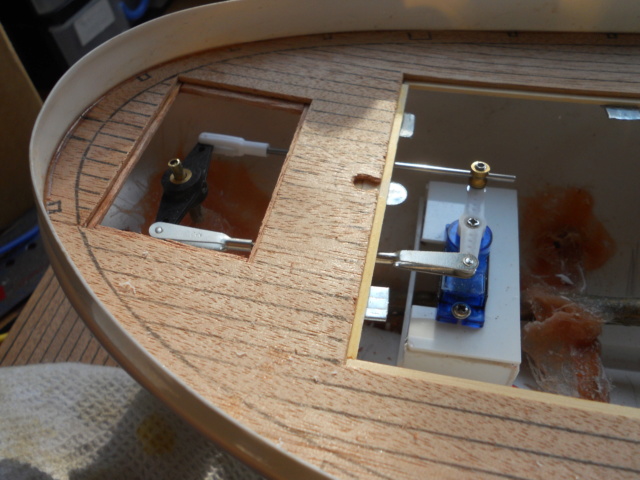 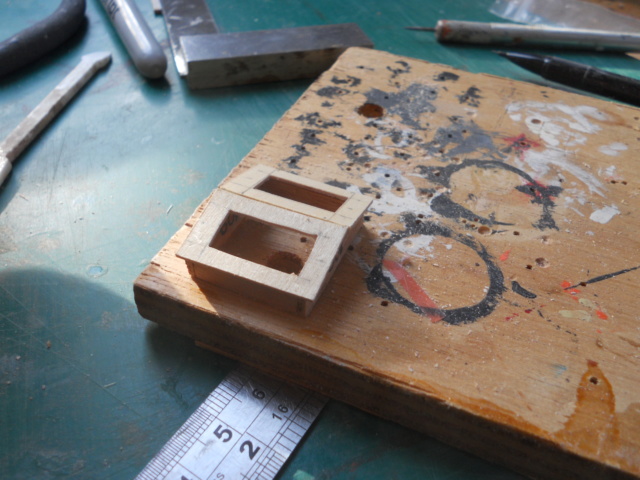 | |
|
  | |
Guest
Guest
 |  Subject: Re: Graupner Krabenkutter TON 12 Subject: Re: Graupner Krabenkutter TON 12  Tue Oct 29, 2019 4:09 pm Tue Oct 29, 2019 4:09 pm | |
| a beautiful build, Barrie.
I was somewhat dubious of you building a "more wooden" fishing boat with so much varnished wood visible...…………...but looking at the model...………..the quality of timber used certainly looks far nicer than the stuff they used to put into their kits 20/30 years ago...……..she really looks very nice indeed.
look forward to seeing her come together. |
|
  | |
barriew
Captain (moderator)

Posts : 2631
Join date : 2011-11-26
Age : 83
Location : Thaxted, Essex
 |  Subject: Re: Graupner Krabenkutter TON 12 Subject: Re: Graupner Krabenkutter TON 12  Tue Oct 29, 2019 5:17 pm Tue Oct 29, 2019 5:17 pm | |
| Neil, I think this kit comes from that era, and the timber is rubbish    Its not helped by being so old and dry, but even after heavy sanding I've not been able to get a reasonable surface. I may still replace some of it with ply when I come to the wheelhouse. The decks have not really been sanded as to do so would remove the markings  Barrie | |
|
  | |
Guest
Guest
 |  Subject: Re: Graupner Krabenkutter TON 12 Subject: Re: Graupner Krabenkutter TON 12  Tue Oct 29, 2019 8:10 pm Tue Oct 29, 2019 8:10 pm | |
| ahh, you have worked it extremely well then, barrie……...thought it was a "new" generation of their kits.
looks good indeed. |
|
  | |
barriew
Captain (moderator)

Posts : 2631
Join date : 2011-11-26
Age : 83
Location : Thaxted, Essex
 |  Subject: Re: Graupner Krabenkutter TON 12 Subject: Re: Graupner Krabenkutter TON 12  Wed Oct 30, 2019 1:23 pm Wed Oct 30, 2019 1:23 pm | |
| The top of the skylight has had some stain added. Its actually teak, but after a couple more coats I think it will be OK. The Bulwark supports have been fitted - it looks as though the top of the hull was not cut at the correct point. There is a 2 mm strip to fit on top of the supports, so that will decide where I need to trim the hull. 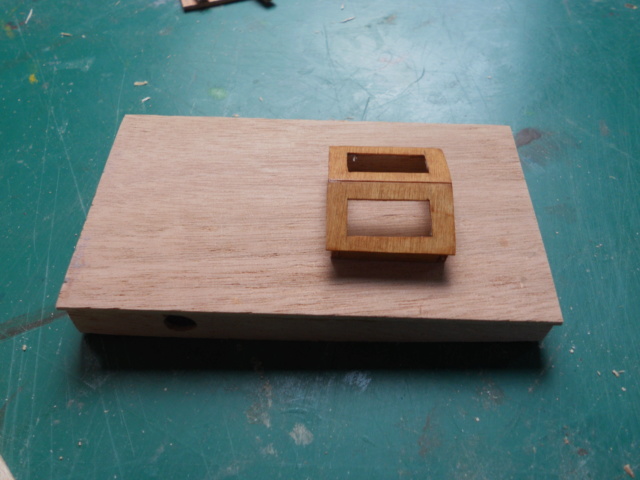 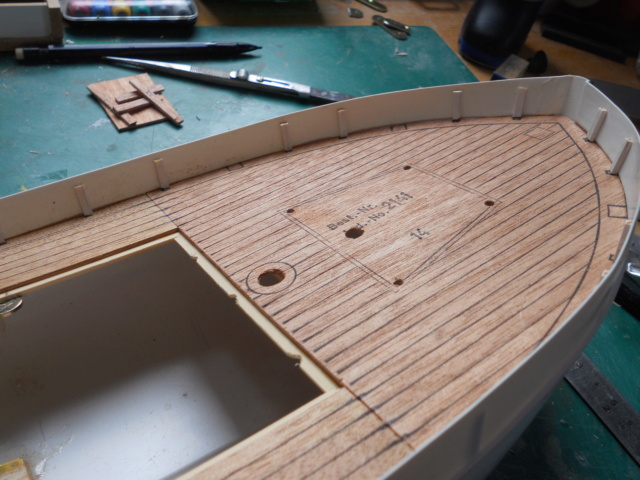 I cut out the components for the wheelhouse and immediately decided to scrap them  They were rubbish  So I have cut a new set from Liteply. These will also need staining so I may have to buy some mahogany stain. 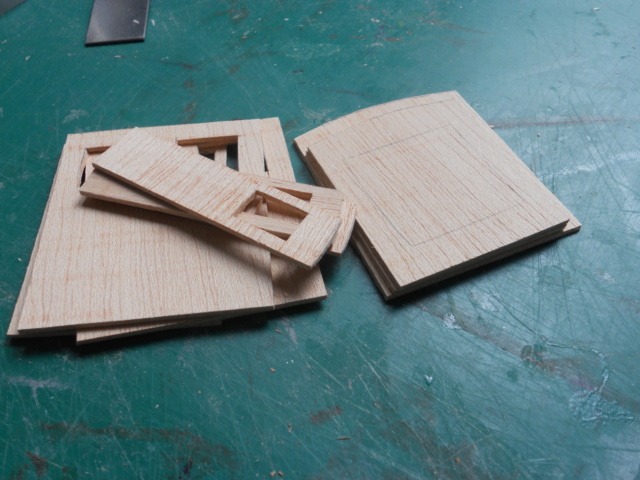 Finally I marked the waterline and gave the underside a first coat of Red/Brown. 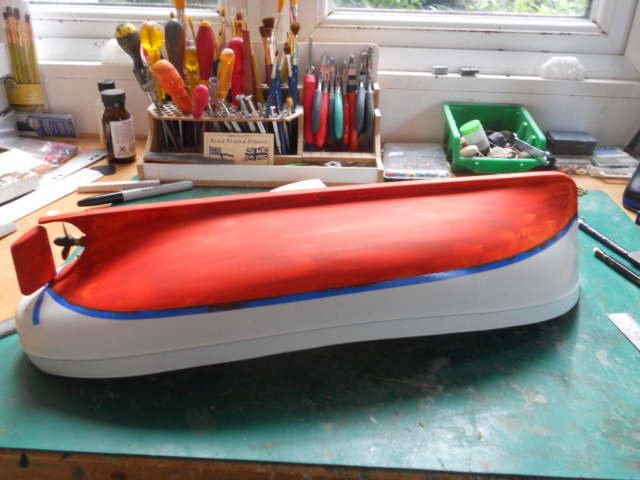 Barrie | |
|
  | |
barriew
Captain (moderator)

Posts : 2631
Join date : 2011-11-26
Age : 83
Location : Thaxted, Essex
 |  Subject: Re: Graupner Krabenkutter TON 12 Subject: Re: Graupner Krabenkutter TON 12  Sat Nov 02, 2019 12:45 pm Sat Nov 02, 2019 12:45 pm | |
| The wheelhouse has now been assembled. Some trimming still required. The original had a floor which I have left out as I want to be able to glaze the windows when I've finished sanding and staining. I could fit it then, but I'm not sure if there's any purpose as the whole unit is glued to the bit that sits on the deck. There is no provision for a door in the original, so I will have to see to making one. It does require some banding to create panels. I think that was to be cut from a sheet of mahogany supplied, but I will use some strip wood that I have.   The skylight has had another coat of stain and now looks quite good. Not far off the colour of the forward companionway. I will continue with the same stain for the wheelhouse. I have fitted glazing and it now needs the protection bars making and adding. These are supposed to be bent from 1 mm brass rod but the chances of me making 10 identical ones are zero, so they will just be straight bars laid on the surface  Another hatch cover has been made ready for sanding when the glue is dry. And finally I gave the hull another coat of paint. I hope this will be sufficient, but will have to wait until its dry.  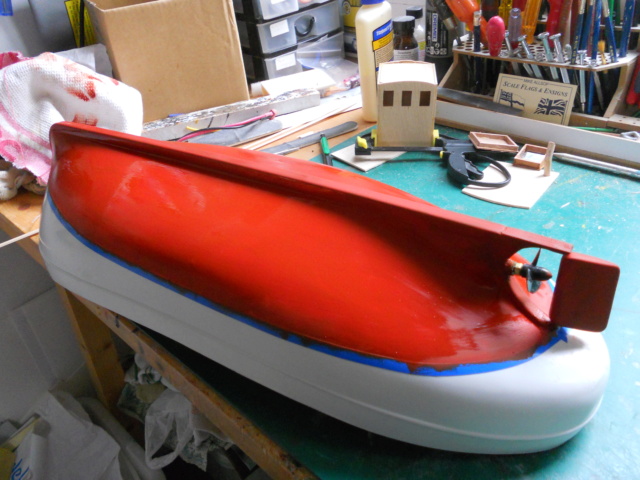 Barrie | |
|
  | |
barriew
Captain (moderator)

Posts : 2631
Join date : 2011-11-26
Age : 83
Location : Thaxted, Essex
 |  Subject: Re: Graupner Krabenkutter TON 12 Subject: Re: Graupner Krabenkutter TON 12  Sun Nov 03, 2019 1:59 pm Sun Nov 03, 2019 1:59 pm | |
| I realised when looking at the front of the wheelhouse that I had made a mistake. One of the panels had the grain running the opposite way to the other two    So I had to remove it and re-make a new one. That done I removed the masking tape from the hull and re-applied ready for painting the topside of the hull. The instructions say this is Ochre but I don't have anything like that, so it will have to be a different colou r - not sure what as yet.  It also shows the rubbing strip as white, but there's no way to get masking tape on it, so careful painting it will have to be   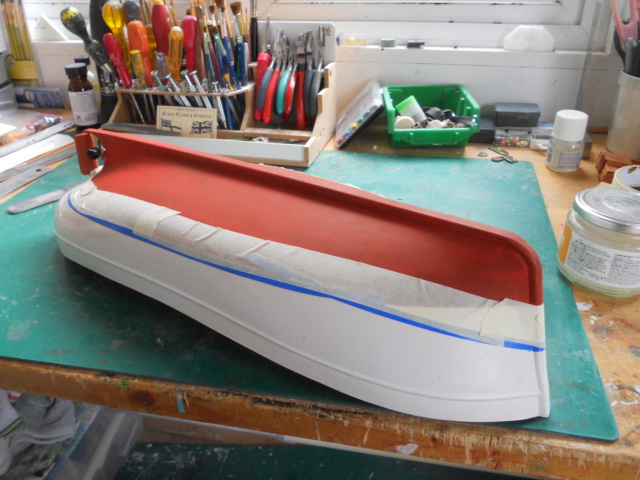 Once the replacement panel had set a little I started applying the framing to the wheelhouse. I am using some 1 mm strip that I had in my box, rather than cutting strips from the sheet supplied. 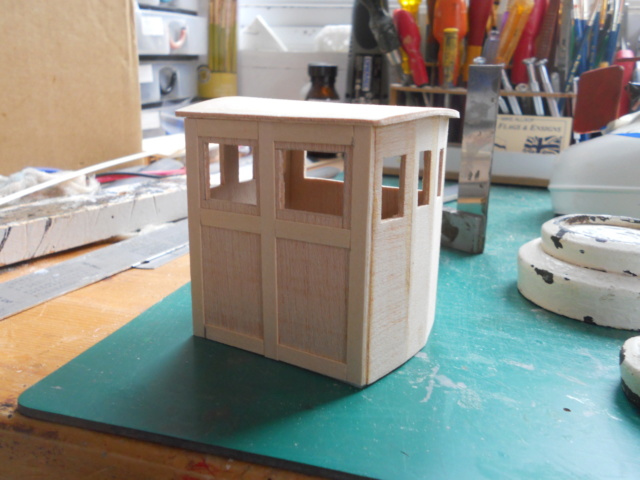 Two sides done, two to go! Barrie | |
|
  | |
Guest
Guest
 |  Subject: Re: Graupner Krabenkutter TON 12 Subject: Re: Graupner Krabenkutter TON 12  Sun Nov 03, 2019 9:46 pm Sun Nov 03, 2019 9:46 pm | |
| Use your blue tape to define the rubbing strip then put masking tape on top of it simples
Dave |
|
  | |
barriew
Captain (moderator)

Posts : 2631
Join date : 2011-11-26
Age : 83
Location : Thaxted, Essex
 |  Subject: Re: Graupner Krabenkutter TON 12 Subject: Re: Graupner Krabenkutter TON 12  Mon Nov 04, 2019 11:33 am Mon Nov 04, 2019 11:33 am | |
| Thanks Stavros - didn't think it was flexible enough to do that, but it looks as though it has gone on OK. Time will tell when I remove it  I chose Blue - mainly because I didn't have many other options   - first coat applied.  I also finished the framing on the wheelhouse and have given its roof a first coat of pale grey paint. The small Hatch has also been painted the same colour. The main hatch has received one coat of satin varnish - it may need more then sanding back to a more matt finish. The main deck will receive the same treatment when I can get at it after the hull is dry. The wheelhouse will be sanded then stain applied until I am happy with the colour  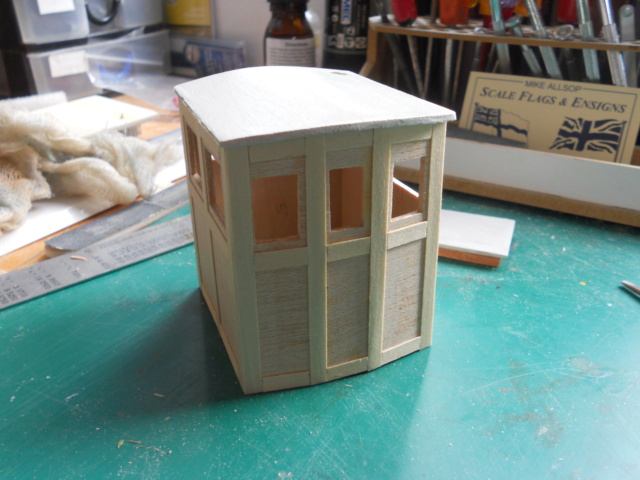 Barrie | |
|
  | |
barriew
Captain (moderator)

Posts : 2631
Join date : 2011-11-26
Age : 83
Location : Thaxted, Essex
 |  Subject: Re: Graupner Krabenkutter TON 12 Subject: Re: Graupner Krabenkutter TON 12  Tue Nov 05, 2019 12:43 pm Tue Nov 05, 2019 12:43 pm | |
| The hull has had its second coat of blue and the masking removed. I think the rubbing strip has come out quite well - just a little scraping and touching up when the paint is hard.  The wheelhouse has been sanded and stained - 2 coats and then some varnish. I am happy with the colour even though I used Teak stain   The main deck has also been varnished so all is ready to assemble the items on the main hatch. I will also give the hull a coat of satin varnish, then turn my attention to the bulwark capping. I suspect that this will require me to re-trim the bulwarks. I started to cut out some of the parts for the winch. These were not diecut and the wood split before I could get the first item out - so I have copied them on my printer and will try using some liteply. There are a number of similar small items that are only printed on the mahogany and I suspect these will have to be recreated in liteply. 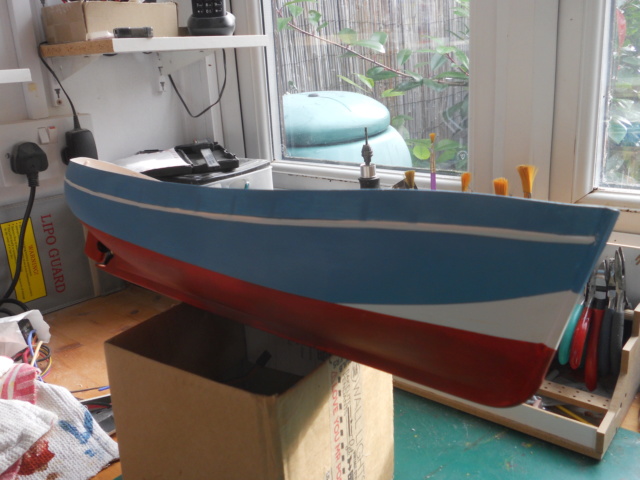 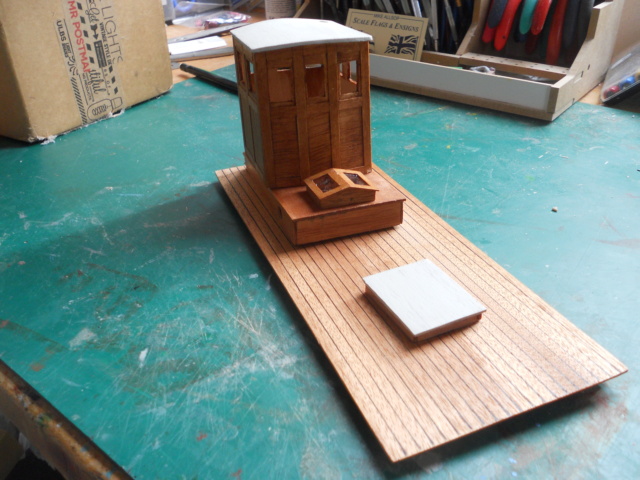 Barrie | |
|
  | |
barriew
Captain (moderator)

Posts : 2631
Join date : 2011-11-26
Age : 83
Location : Thaxted, Essex
 |  Subject: Re: Graupner Krabenkutter TON 12 Subject: Re: Graupner Krabenkutter TON 12  Tue Nov 12, 2019 1:11 pm Tue Nov 12, 2019 1:11 pm | |
| This is on hold for a while as I help my Grandson to build one of SHG's 'Peggy Sue' kits. I need to cut out most of the parts so that he will be able to take over. Cutting the parts from the vac moulded sheets is something I always find difficult - never quite sure where to cut  . He will be able to manage some of the simpler parts. I hope to get back to my model next week. Barrie | |
|
  | |
barriew
Captain (moderator)

Posts : 2631
Join date : 2011-11-26
Age : 83
Location : Thaxted, Essex
 |  Subject: Re: Graupner Krabenkutter TON 12 Subject: Re: Graupner Krabenkutter TON 12  Tue Nov 19, 2019 12:56 pm Tue Nov 19, 2019 12:56 pm | |
| Back to my model - still more cutting for me on Saucy Sue, but there's plenty for him to get on with. First job was to fix the 'stringer' to support the bulwark cappings. This came pre-bent for the stern, but required a soak to get around the bows. It sits on top of the supports. To fix, I held it in place with lots of clamps then ran thin CA down the joint with the hull. Once dry, I scraped and sanded the hull top ready for the pre-shaped cappings. The quality of this timber is very bad - very pronounced grain - but I hope that after several coats of sanding sealer it will not be too obvious. I have also glazed the wheelhouse. Finally I glued the wheelhouse base to the deck and left it under lots of weight! Barrie 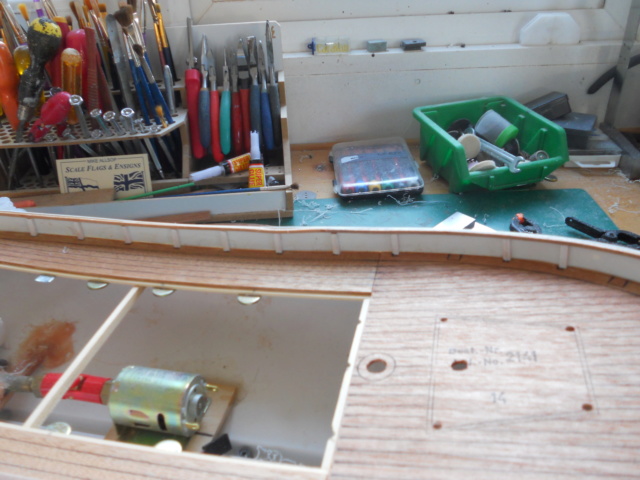  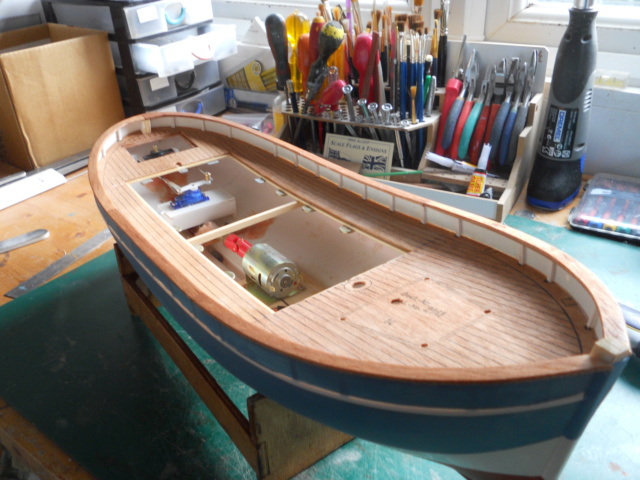 | |
|
  | |
barriew
Captain (moderator)

Posts : 2631
Join date : 2011-11-26
Age : 83
Location : Thaxted, Essex
 |  Subject: Re: Graupner Krabenkutter TON 12 Subject: Re: Graupner Krabenkutter TON 12  Wed Nov 20, 2019 12:46 pm Wed Nov 20, 2019 12:46 pm | |
| The wheelhouse has now been stuck to its base. The skylight has its bars fitted and I stuck a piece of black tape under it so the wood didn't show. The hatch is not stuck down as the grain of the top was very obvious, so I filled it and have re-painted it ready to stick down. Portholes have been glazed and fitted to the wheelhouse structure and the forward companionway. There are a total of six bollards to be cut and shaped from square timber. These slot over the bulwark cap so are rather fiddly - I have done two of them. Finally I gave the cap a good sanding and then a coat of varnish (after I took this photo!). Barrie 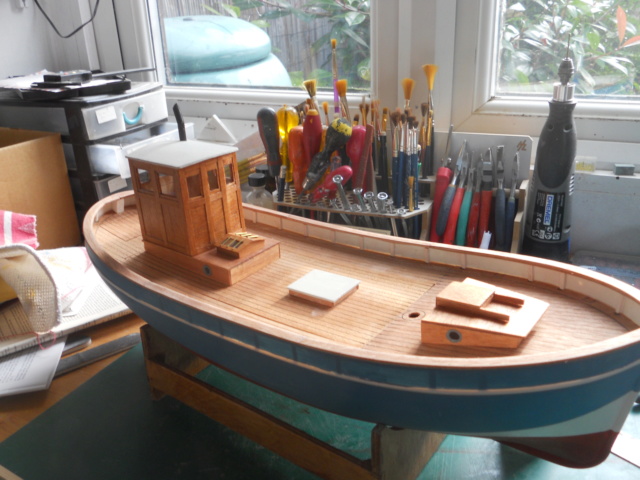 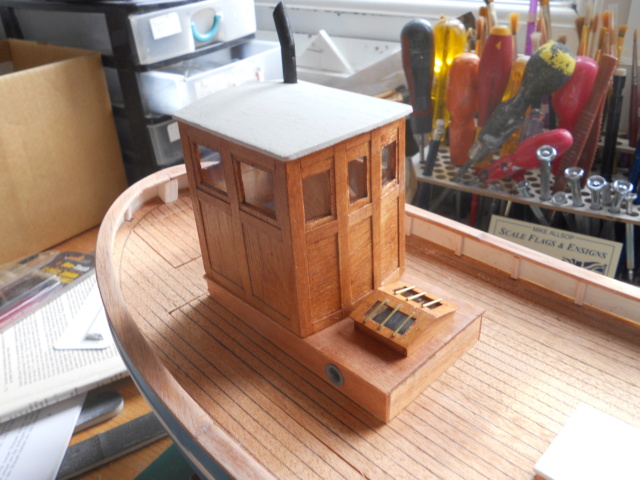 | |
|
  | |
barriew
Captain (moderator)

Posts : 2631
Join date : 2011-11-26
Age : 83
Location : Thaxted, Essex
 |  Subject: Re: Graupner Krabenkutter TON 12 Subject: Re: Graupner Krabenkutter TON 12  Thu Nov 21, 2019 12:56 pm Thu Nov 21, 2019 12:56 pm | |
| | |
|
  | |
barriew
Captain (moderator)

Posts : 2631
Join date : 2011-11-26
Age : 83
Location : Thaxted, Essex
 |  Subject: Re: Graupner Krabenkutter TON 12 Subject: Re: Graupner Krabenkutter TON 12  Sat Nov 23, 2019 12:43 pm Sat Nov 23, 2019 12:43 pm | |
| The winch has now been built and painted - its largely guess work as the drawings weren't very clear. It will be fitted when the paint is dry  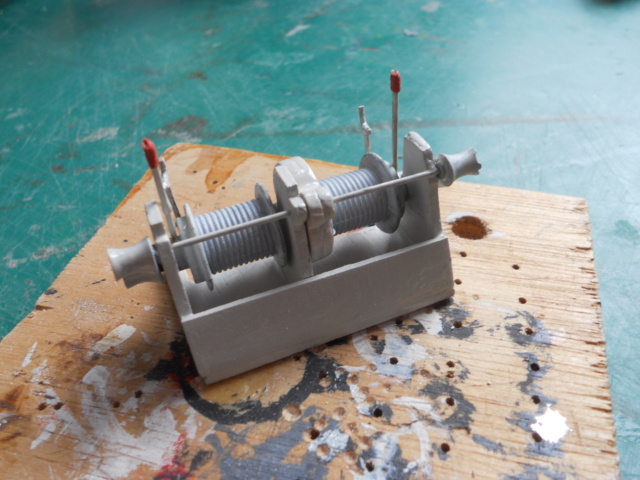 I have fitted most of the bollards - just one i the bows required more work.  The winch and lifering are not fixed. Next up is the crab sieve - I started by sanding the frames and coating them in sanding sealer. I think it will have to be painted as its built as access will be difficult once finished. the drawings for this are even less clear than the winch, but I guess most people wont know what it should look like   Barrie | |
|
  | |
barriew
Captain (moderator)

Posts : 2631
Join date : 2011-11-26
Age : 83
Location : Thaxted, Essex
 |  Subject: Re: Graupner Krabenkutter TON 12 Subject: Re: Graupner Krabenkutter TON 12  Sun Nov 24, 2019 12:53 pm Sun Nov 24, 2019 12:53 pm | |
| I have started on the sieve. First parts made and painted. These are the bits I can understand. How they go together is less clear  I also made and painted the boiler - just a cowl to make for the chimney. I have also realised that there is another structure similar to the sieve - I think its a cooling rack for the boiled crabs. I did have a problem due to lack of material - no 4mm dowel for the chimney and not enough 3 x 2 for the framing. Luckily I had some of both in my stock. As this was a second hand buy, it may not be Graupner's fault. I also believe that in the latest kits the sieve is a plastic moulding. 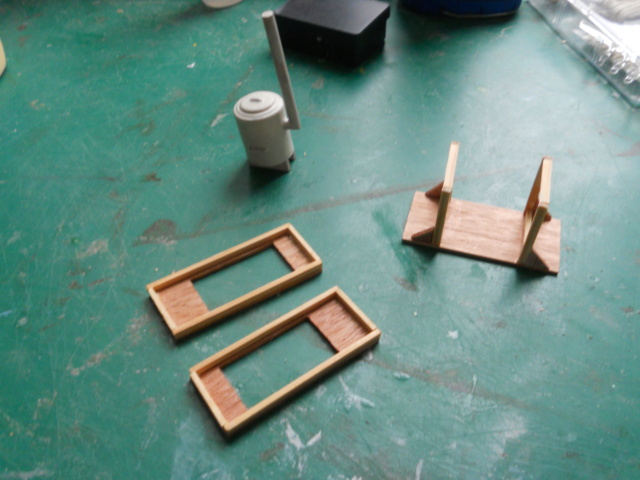 Barrie | |
|
  | |
barriew
Captain (moderator)

Posts : 2631
Join date : 2011-11-26
Age : 83
Location : Thaxted, Essex
 |  Subject: Re: Graupner Krabenkutter TON 12 Subject: Re: Graupner Krabenkutter TON 12  Wed Nov 27, 2019 12:36 pm Wed Nov 27, 2019 12:36 pm | |
| 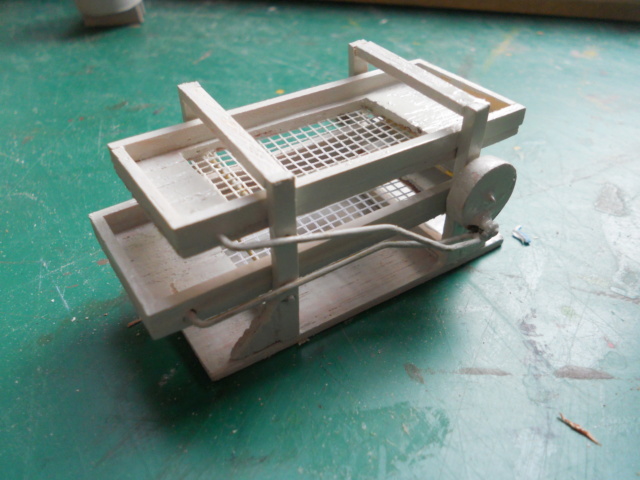 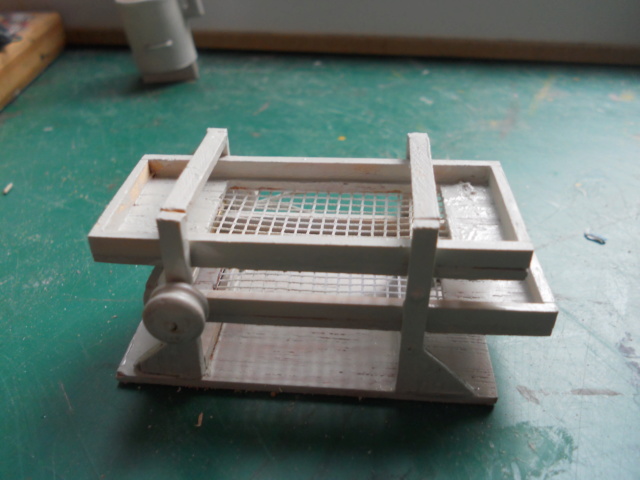 The crab sorter has now been built. Not quite as intended I think, but it looks OK. I started on the masts - mizzen mast first. It is shaped and the mast collar made - not from the kit. That split as I tried to cut it from the sheet  There are some fittings to go on this before it is glued in place. Looking at the plans there are going to be some challenges ahead  There is lots of the rigging from both masts that goes to the removable deck section  As I need to be able to remove that for battery access I am not sure at the moment how to proceed. 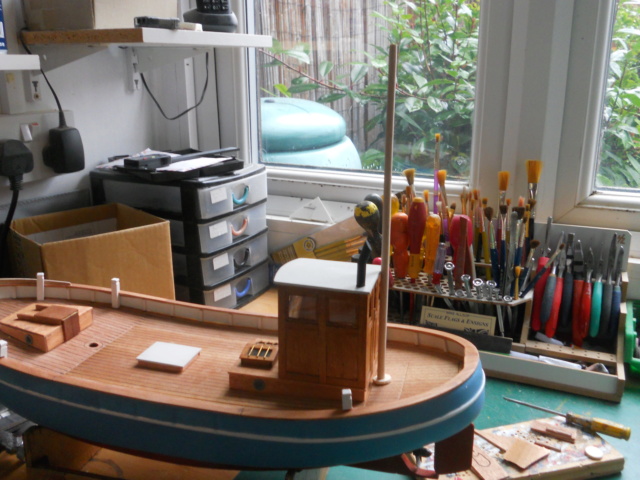 Barrie | |
|
  | |
Guest
Guest
 |  Subject: Re: Graupner Krabenkutter TON 12 Subject: Re: Graupner Krabenkutter TON 12  Fri Nov 29, 2019 12:42 am Fri Nov 29, 2019 12:42 am | |
| |
|
  | |
barriew
Captain (moderator)

Posts : 2631
Join date : 2011-11-26
Age : 83
Location : Thaxted, Essex
 |  Subject: Re: Graupner Krabenkutter TON 12 Subject: Re: Graupner Krabenkutter TON 12  Fri Nov 29, 2019 6:19 am Fri Nov 29, 2019 6:19 am | |
| | |
|
  | |
Guest
Guest
 |  Subject: Re: Graupner Krabenkutter TON 12 Subject: Re: Graupner Krabenkutter TON 12  Fri Nov 29, 2019 6:59 pm Fri Nov 29, 2019 6:59 pm | |
| looking very good mate...…...if I'd known how good you are with frames you could have cut n glued all 42 frames for my lifeboats ........only 168 pieces to get level, lol.
you lucky thou...….they done now, pheeuuwww!!! |
|
  | |
barriew
Captain (moderator)

Posts : 2631
Join date : 2011-11-26
Age : 83
Location : Thaxted, Essex
 | |
  | |
barriew
Captain (moderator)

Posts : 2631
Join date : 2011-11-26
Age : 83
Location : Thaxted, Essex
 |  Subject: Re: Graupner Krabenkutter TON 12 Subject: Re: Graupner Krabenkutter TON 12  Sat Dec 07, 2019 12:34 pm Sat Dec 07, 2019 12:34 pm | |
| 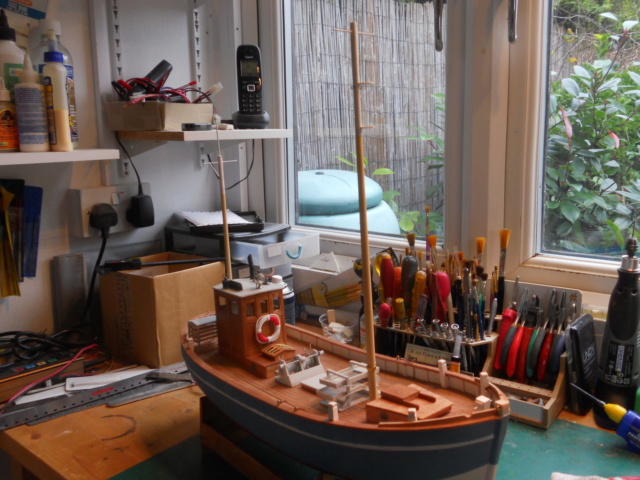 Both masts now fixed in place although I have just realised I didn't apply any P40 to the foot of the main mast as I intended to  I will have to do that tomorrow first job before switching to Grandson's boat. I also fitted many of the fixings for the rigging. Some of these I had to make as they go through the capping rail into the deck below. Looking more closely at the rigging on the plans I notice that they show links that will undo in order to allow the wheelhouse deck to be removed. Quite fiddly but as I have a switch accessible without removing that deck, I can insert and connect the battery at home before I get to the lake so it should be OK. Barrie | |
|
  | |
barriew
Captain (moderator)

Posts : 2631
Join date : 2011-11-26
Age : 83
Location : Thaxted, Essex
 |  Subject: Re: Graupner Krabenkutter TON 12 Subject: Re: Graupner Krabenkutter TON 12  Sun Dec 08, 2019 11:00 am Sun Dec 08, 2019 11:00 am | |
| I decided to stick a couple of pieces of plastic 6 mm square strip either side of the foot of the mast rather than using P40. The electrics are now fitted. 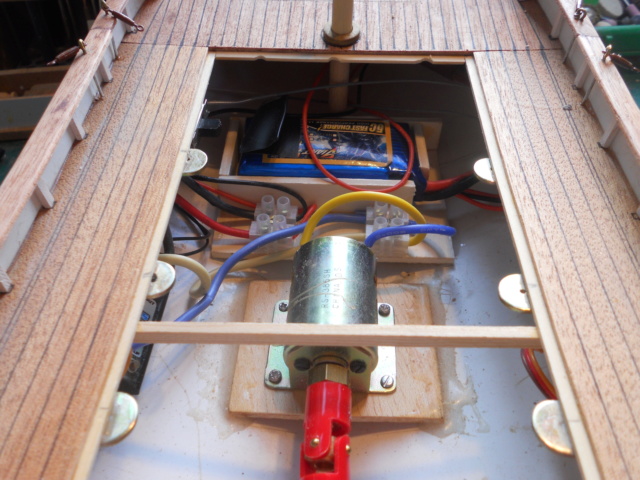 I'm quite pleased with this layout. Its really much neater than my usual efforts    The receiver is mounted under the deck on the starboard side. There is a slight problem as the switch is too tall for the cabin which goes over it  I think I can probably drop it enough if I fit some washers under the deck. Onto the rigging - I made a start today with the fixed rigging on the mizzen mast. Barrie | |
|
  | |
Guest
Guest
 |  Subject: Re: Graupner Krabenkutter TON 12 Subject: Re: Graupner Krabenkutter TON 12  Sun Dec 08, 2019 7:23 pm Sun Dec 08, 2019 7:23 pm | |
| looking at the pics I would say that the motor and coupling are not in line PLEASE pack up the REAR of the motor to align it properly this will reduce the current used,poor aligned motors are the kiss and death of batts
Dave |
|
  | |
barriew
Captain (moderator)

Posts : 2631
Join date : 2011-11-26
Age : 83
Location : Thaxted, Essex
 |  Subject: Re: Graupner Krabenkutter TON 12 Subject: Re: Graupner Krabenkutter TON 12  Sun Dec 08, 2019 7:27 pm Sun Dec 08, 2019 7:27 pm | |
| No Stavros - its an illusion. They are aligned I assure you.
Barrie | |
|
  | |
barriew
Captain (moderator)

Posts : 2631
Join date : 2011-11-26
Age : 83
Location : Thaxted, Essex
 |  Subject: Re: Graupner Krabenkutter TON 12 Subject: Re: Graupner Krabenkutter TON 12  Mon Dec 09, 2019 12:38 pm Mon Dec 09, 2019 12:38 pm | |
| 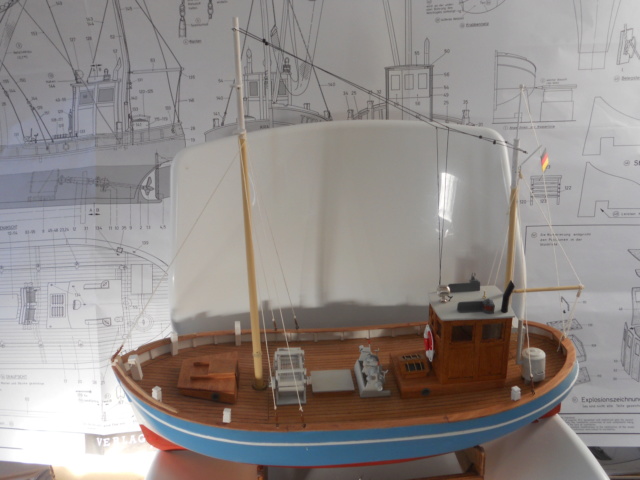 Today I finished the standing rigging - at least to my design  . There are a few items to add before I start on the nets and their booms etc. I think I may have to enlist a skilled needle woman for part of this  Barrie can I borrow her after you please...….need two sets of 3 sails for my lifeboats, lol. | |
|
  | |
barriew
Captain (moderator)

Posts : 2631
Join date : 2011-11-26
Age : 83
Location : Thaxted, Essex
 |  Subject: Re: Graupner Krabenkutter TON 12 Subject: Re: Graupner Krabenkutter TON 12  Fri Dec 13, 2019 12:40 pm Fri Dec 13, 2019 12:40 pm | |
| Not sure how Neil's post appears at the bottom of mine  However, she not available so far North - the shock would be too much after our exile in the south   The nets have been made. I have also completed the booms to hold the nets. The spacers were very tricky to construct and are far from perfect, but will suffice. 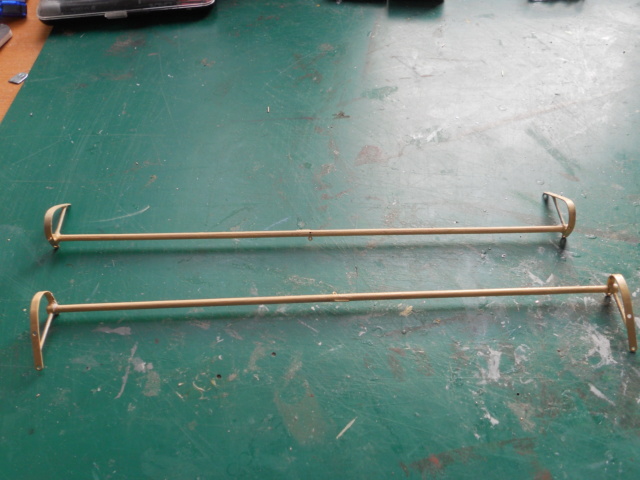  When the paint is dry I can try to fit the nets onto them, after I have threaded a large number of beads onto some chain. Barrie | |
|
  | |
barriew
Captain (moderator)

Posts : 2631
Join date : 2011-11-26
Age : 83
Location : Thaxted, Essex
 |  Subject: Re: Graupner Krabenkutter TON 12 Subject: Re: Graupner Krabenkutter TON 12  Tue Dec 17, 2019 12:53 pm Tue Dec 17, 2019 12:53 pm | |
| Back to the model after a couple of days feeling more dizzy than usual  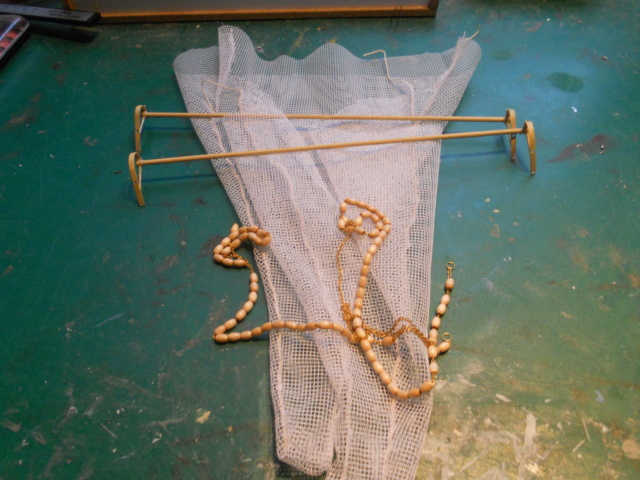 These are the component parts of the nets - all they need is putting together   My needlewoman is currently attempting part of that job.  I have added more rigging. I think this is very much as the plans show, but there is more on the plans which I cant decipher and so will not be appearing on my model  . I will obviously have to add some more to rigg the nets. Apart from this I only have one or two small fittings to add and then its ready for the test tank to see how much lead it needs.  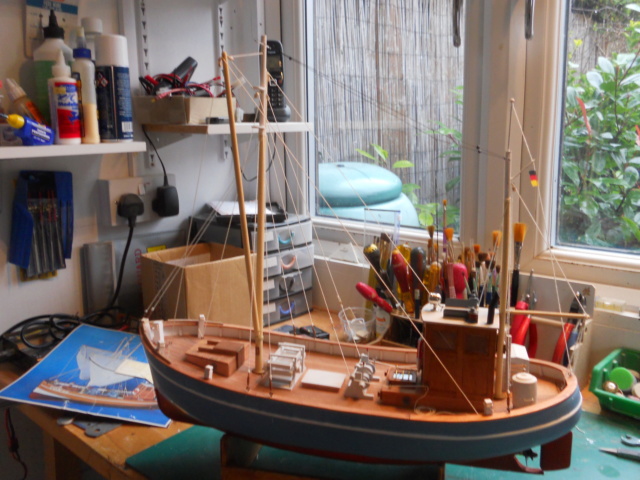 Barrie
Last edited by barriew on Tue Dec 17, 2019 1:03 pm; edited 1 time in total | |
|
  | |
Guest
Guest
 |  Subject: Re: Graupner Krabenkutter TON 12 Subject: Re: Graupner Krabenkutter TON 12  Tue Dec 17, 2019 12:56 pm Tue Dec 17, 2019 12:56 pm | |
| |
|
  | |
barriew
Captain (moderator)

Posts : 2631
Join date : 2011-11-26
Age : 83
Location : Thaxted, Essex
 |  Subject: Re: Graupner Krabenkutter TON 12 Subject: Re: Graupner Krabenkutter TON 12  Wed Dec 18, 2019 3:13 pm Wed Dec 18, 2019 3:13 pm | |
| | |
|
  | |
barriew
Captain (moderator)

Posts : 2631
Join date : 2011-11-26
Age : 83
Location : Thaxted, Essex
 |  Subject: Re: Graupner Krabenkutter TON 12 Subject: Re: Graupner Krabenkutter TON 12  Thu Dec 19, 2019 5:52 pm Thu Dec 19, 2019 5:52 pm | |
| 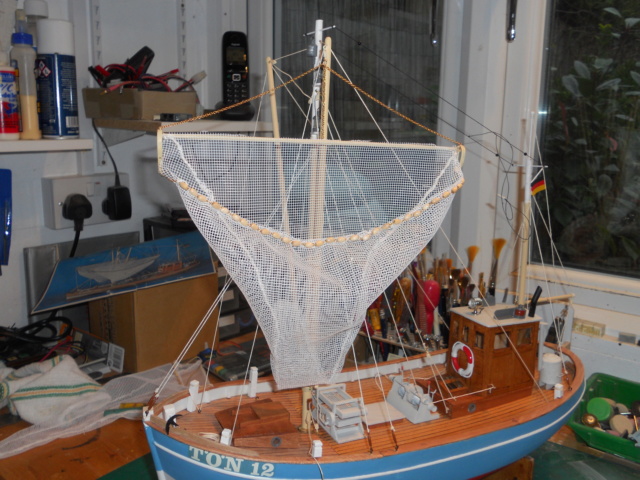 I've started to fit the nets to the model. Not easy trying to sort out which rope goes where  It is also becoming increasingly obvious fitting R/C to this model was an afterthought. When all the rigging is in place I will be lucky if I can get the hatch off to charge the battery  This side is not complete - more ropes to figure out yet, but at least I managed to get the chains fitted. The eyepins supplied were too thick to take the chain links - luckily I had some thin copper ones. Barrie | |
|
  | |
barriew
Captain (moderator)

Posts : 2631
Join date : 2011-11-26
Age : 83
Location : Thaxted, Essex
 |  Subject: Re: Graupner Krabenkutter TON 12 Subject: Re: Graupner Krabenkutter TON 12  Fri Dec 20, 2019 11:48 am Fri Dec 20, 2019 11:48 am | |
| 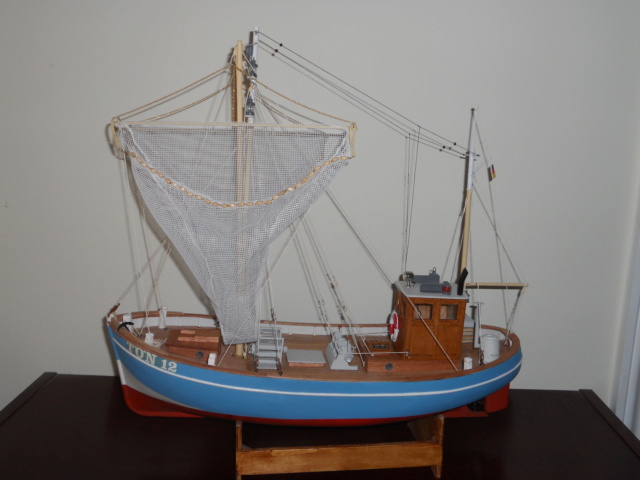 Finished   I think all the ropes shown on the plan have been fitted. Access to the hatch is very difficult as predicted. I don't think this will get sailed very often. Apart from the access problems, I think it will have to be a very calm day before I risk it on the water. I will ballast it once the weather improves so I can set up my test tank and give it at least its maiden voyage, but then I think I will strip out the electrics and keep it as a static model. Two more photos. 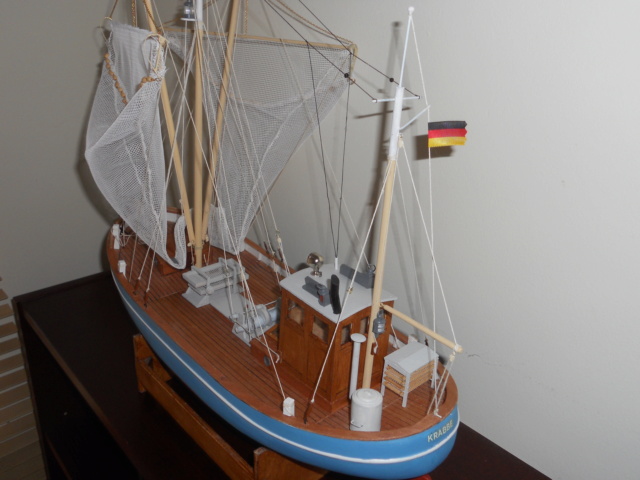 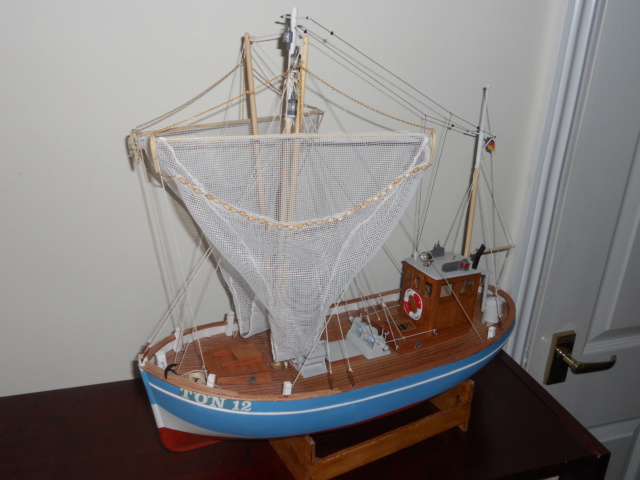 So that's it - no more models in the pipeline. Just Crosby's to finish then I don't know what to try next. I haven't found anything that fits my size criteria and which appeals to me. Barrie As an aside, I noticed that the only photo of a completed model - the one on the box lid - has the net booms mounted incorrectly   | |
|
  | |
Guest
Guest
 |  Subject: Re: Graupner Krabenkutter TON 12 Subject: Re: Graupner Krabenkutter TON 12  Fri Dec 20, 2019 3:16 pm Fri Dec 20, 2019 3:16 pm | |
| really enjoyed this build Barrie, and am amazed at ther quality of the kit and fittings compared with what they used to be like years ago.
I will be sorry if you cannot find another model to build to your requiirements, but live in hope.
have you thought of scratch building something next time......
anyway, another good build for new comers to read....great stuff mate.
neil. |
|
  | |
barriew
Captain (moderator)

Posts : 2631
Join date : 2011-11-26
Age : 83
Location : Thaxted, Essex
 |  Subject: Re: Graupner Krabenkutter TON 12 Subject: Re: Graupner Krabenkutter TON 12  Fri Dec 20, 2019 5:47 pm Fri Dec 20, 2019 5:47 pm | |
| Thanks Neil. I think this was a pretty old kit - very poor wood and not very well die-cut either. The fittings were OK though. I'm sure I will eventually find something, I just don't want another POF hull  Happy Christmas to all Barrie | |
|
  | |
Sponsored content
 |  Subject: Re: Graupner Krabenkutter TON 12 Subject: Re: Graupner Krabenkutter TON 12  | |
| |
|
  | |
| | Graupner Krabenkutter TON 12 |  |
|
