| | Loyal Moderator |  |
|
+4Tug--Kenny intrepid75 phil winks barriew 8 posters |
|
| Author | Message |
|---|
barriew
Captain (moderator)

Posts : 2631
Join date : 2011-11-26
Age : 83
Location : Thaxted, Essex
 |  Subject: Loyal Moderator Subject: Loyal Moderator  Fri Feb 08, 2013 8:14 pm Fri Feb 08, 2013 8:14 pm | |
| So the next project is one I have been considering for some time - the 1/48th Loyal Moderator. (I'll call it that but have not finally decided which one of the class it will be.) I picked up the semi-kit on ebay at a good saving to the current price. I understand that this is one of Neil's designs and hulls, so I will have to be careful what I say  So far I have fitted the prop shaft and motor and one side of the hull supports. I have also skimmed the bulwarks with filler and sanded it smooth. The prop shaft is a Model Boat Bits slim line one with a 2 mm shaft. I have a 25mm 3 bladed prop. This is the largest brass 2 mm prop I could find. The motor is a 6 volt Graupner Speed 400 as its current draw is considerably less than the 385 that I have. I have started fabricating the rudder and skeg, but had too many interruptions today to finish. Barrie 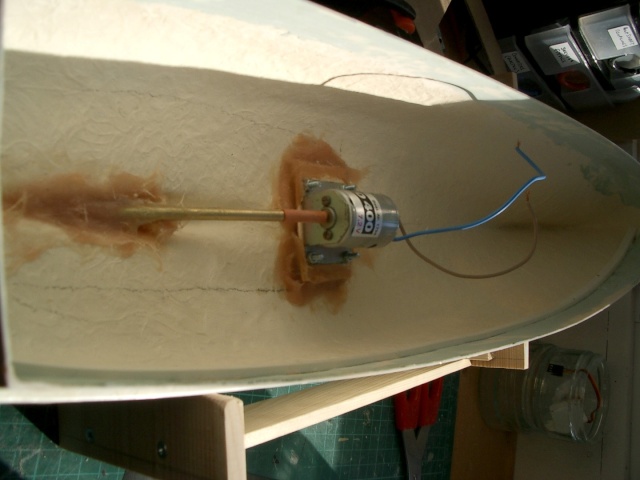 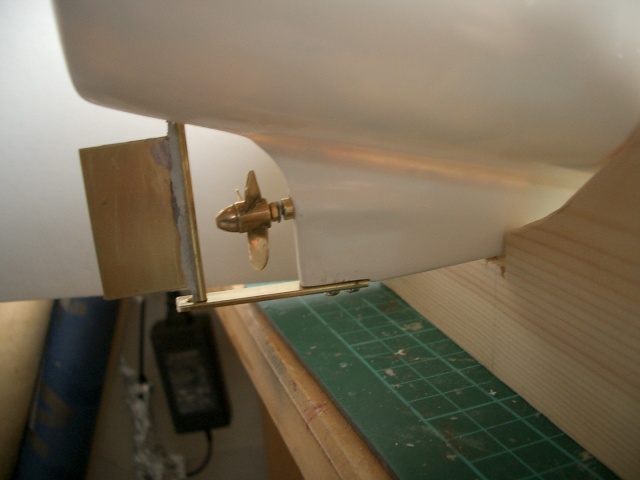 | |
|
  | |
phil winks
Master


Posts : 583
Join date : 2011-06-12
Age : 68
Location : Taunton
 |  Subject: Re: Loyal Moderator Subject: Re: Loyal Moderator  Fri Feb 08, 2013 8:18 pm Fri Feb 08, 2013 8:18 pm | |
| This will be fun to watch  | |
|
  | |
Guest
Guest
 |  Subject: Re: Loyal Moderator Subject: Re: Loyal Moderator  Mon Feb 11, 2013 7:40 am Mon Feb 11, 2013 7:40 am | |
| No Barrie..........only the hull...........made the mould many years ago..believe the storage of the mould was poor and the bow is a slight bit bent these days, lol
it does sail well though in rough weather.I made it initially for a mate of mine.
neil. |
|
  | |
barriew
Captain (moderator)

Posts : 2631
Join date : 2011-11-26
Age : 83
Location : Thaxted, Essex
 |  Subject: Re: Loyal Moderator Subject: Re: Loyal Moderator  Mon Feb 11, 2013 8:46 am Mon Feb 11, 2013 8:46 am | |
| Neil, The hull seems pretty good to me - haven't noticed any problem with the bow but will double check now  The only 'problem' I have found is that the bulwarks are much too high - about half a centimetre. Its going to take a lot of sanding unless I risk a cutter on my Dremel. Of course the drawing could be wrong I suppose.  Barrie | |
|
  | |
barriew
Captain (moderator)

Posts : 2631
Join date : 2011-11-26
Age : 83
Location : Thaxted, Essex
 |  Subject: Re: Loyal Moderator Subject: Re: Loyal Moderator  Tue Feb 12, 2013 3:44 pm Tue Feb 12, 2013 3:44 pm | |
| Since my last post I have completed the deck supports, cut out the deck and fitted a shelf for the servo, receiver and ESC. The servo is a mini digital one from HobbyKing at a cost of £1.98. I thought I would try it out. The ESC will be an Mtroniks microViper 10amp. Bought from their test stock so only costs £18 inc postage  The Speed 400 draws less than half an amp on 6 volts on the bench. I fabricated a tiller arm - I'm quite pleased with myself with all the brass work  I also made a battery box and stuck in at the same time as I was strengthening the deck supports. I also cut down the bulwarks to the height shown on the plan - I used my Dremel without any disasters  , then finished off with sandpaper. The freeing ports have been drilled out ready for filing to shape when the deck is fitted. Neil, the shape of the bows looks OK to me, although from this photo it looks as though I need to check the port bulwark height near the bow. Barrie 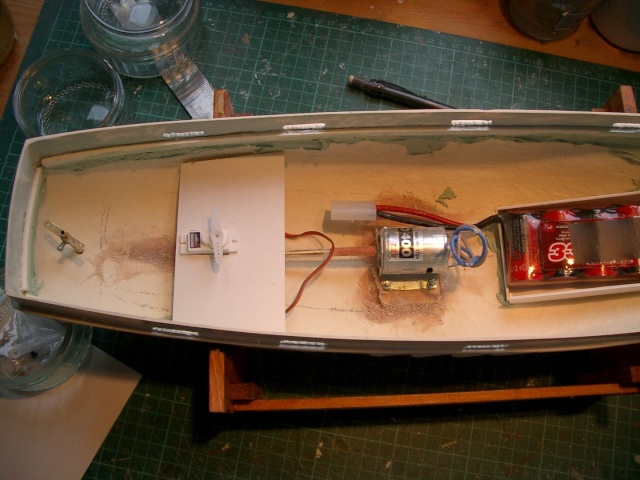 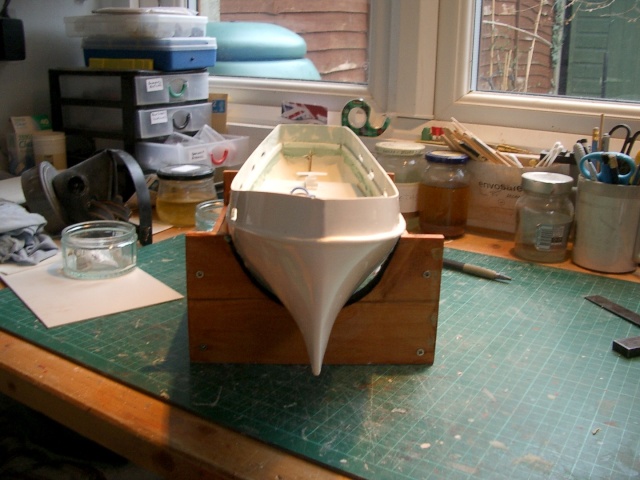 | |
|
  | |
phil winks
Master


Posts : 583
Join date : 2011-06-12
Age : 68
Location : Taunton
 |  Subject: Re: Loyal Moderator Subject: Re: Loyal Moderator  Tue Feb 12, 2013 6:06 pm Tue Feb 12, 2013 6:06 pm | |
|  Nice work as usual Barrie | |
|
  | |
Guest
Guest
 |  Subject: Re: Loyal Moderator Subject: Re: Loyal Moderator  Tue Feb 12, 2013 8:12 pm Tue Feb 12, 2013 8:12 pm | |
| must admit it looks straighter there than ever I remember it.......must have been over critical with my work........or storage of the mould....they used to get tossed here there and everywhere.lol |
|
  | |
barriew
Captain (moderator)

Posts : 2631
Join date : 2011-11-26
Age : 83
Location : Thaxted, Essex
 |  Subject: Re: Loyal Moderator Subject: Re: Loyal Moderator  Fri Feb 15, 2013 1:40 pm Fri Feb 15, 2013 1:40 pm | |
| The electrics are now complete - a bit messy at the moment. I will try to tidy the wiring later after I have installed the switch. This will be installed under the middle hatch - the mTroniks switch will be permanently on. The deck is stuck down and the Freeing Ports tidied up. Next on the list are the coamings for the three hatches, then onto the superstructure  Barrie  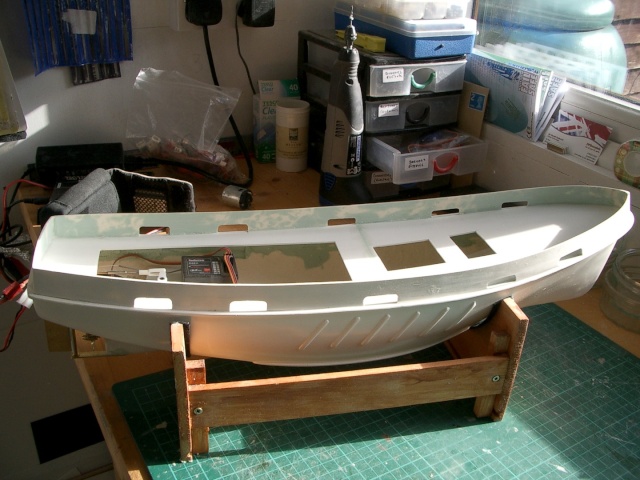 | |
|
  | |
intrepid75
Master


Posts : 271
Join date : 2011-06-11
Age : 68
Location : Bristol, West country
 |  Subject: Re: Loyal Moderator Subject: Re: Loyal Moderator  Fri Feb 15, 2013 9:00 pm Fri Feb 15, 2013 9:00 pm | |
| Getting on pretty fast there Barry. And looking nice too | |
|
  | |
barriew
Captain (moderator)

Posts : 2631
Join date : 2011-11-26
Age : 83
Location : Thaxted, Essex
 |  Subject: Re: Loyal Moderator Subject: Re: Loyal Moderator  Sat Feb 16, 2013 7:40 am Sat Feb 16, 2013 7:40 am | |
| - intrepid75 wrote:
- Getting on pretty fast there Barry. And looking nice too
Yes - I think it will slow down now as the superstructure is quite complicated - lots of windows and doors  Barrie | |
|
  | |
barriew
Captain (moderator)

Posts : 2631
Join date : 2011-11-26
Age : 83
Location : Thaxted, Essex
 |  Subject: Re: Loyal Moderator Subject: Re: Loyal Moderator  Sat Feb 16, 2013 3:52 pm Sat Feb 16, 2013 3:52 pm | |
| Coamings fitted to all three openings and the switch installed. It stands proud of the coaming, but the hatch cover is tall enough to fit over it - I think  I can now try to tidy the wiring by securing some of the cables. Barrie 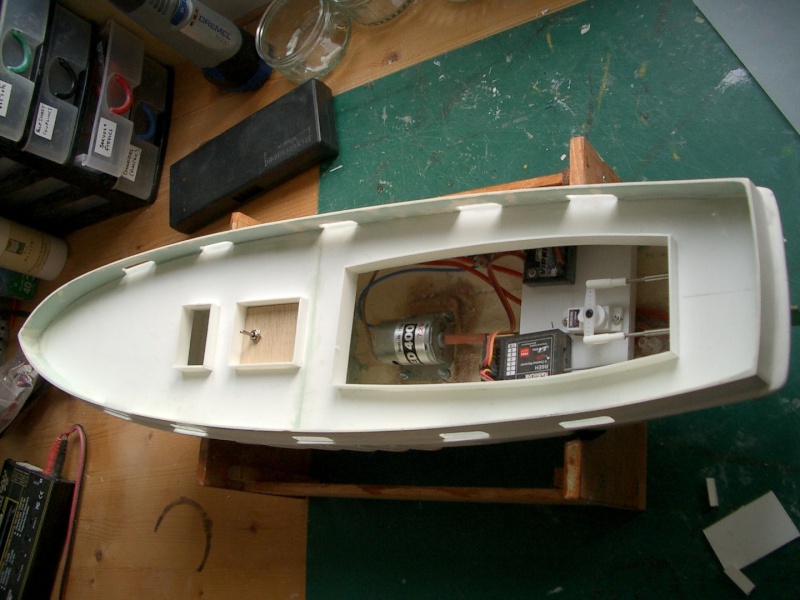 | |
|
  | |
Guest
Guest
 |  Subject: Re: Loyal Moderator Subject: Re: Loyal Moderator  Sat Feb 16, 2013 5:22 pm Sat Feb 16, 2013 5:22 pm | |
| I might be a little biased.....but this looks great..........and coming along lovely.
neil. |
|
  | |
intrepid75
Master


Posts : 271
Join date : 2011-06-11
Age : 68
Location : Bristol, West country
 |  Subject: Re: Loyal Moderator Subject: Re: Loyal Moderator  Sat Feb 16, 2013 5:54 pm Sat Feb 16, 2013 5:54 pm | |
| It is indeed. Giving me itchy hands to start my Castle Class but I dont want to rush the final stages of my Northlight Puffer. No more than a couple of weeks work at worst before I can start it. This lovely little build though is making me think about starting a new small manageable project to fill in indoors when it will be too wet or cold to work in the garage. Cant see her indoors letting me bring in 64 inch hull to work on the kitchen table with!! | |
|
  | |
barriew
Captain (moderator)

Posts : 2631
Join date : 2011-11-26
Age : 83
Location : Thaxted, Essex
 |  Subject: Re: Loyal Moderator Subject: Re: Loyal Moderator  Sat Feb 16, 2013 6:05 pm Sat Feb 16, 2013 6:05 pm | |
| Thanks guys - wait till I start on the superstructure - it may not look so great then  I always wanted to build the Model Slipway version, but its quite large and I have set myself a size and weight limit on future builds. This fits the bill nicely. Barrie | |
|
  | |
Tug--Kenny
Lost But Never Forgotten R.I.P

Posts : 284
Join date : 2011-06-11
Age : 82
Location : Newport, South Wales,UK
 |  Subject: Re: Loyal Moderator Subject: Re: Loyal Moderator  Tue Feb 19, 2013 11:19 am Tue Feb 19, 2013 11:19 am | |
| It's a very tidy build.  Ken | |
|
  | |
Guest
Guest
 |  Subject: Re: Loyal Moderator Subject: Re: Loyal Moderator  Tue Feb 19, 2013 12:15 pm Tue Feb 19, 2013 12:15 pm | |
| Looking real good Barrie. |
|
  | |
barriew
Captain (moderator)

Posts : 2631
Join date : 2011-11-26
Age : 83
Location : Thaxted, Essex
 |  Subject: Re: Loyal Moderator Subject: Re: Loyal Moderator  Tue Feb 19, 2013 7:18 pm Tue Feb 19, 2013 7:18 pm | |
| I've spent the last couple of days tracing the superstructure parts and copying onto styrene sheet. I have most of it cut out now and hope to start assembling tomorrow  I hope it all goes together as it should. The port and starboard sides are quite different and the drawing only shows the starboard  A club member has the Model Slipway version so I have asked him to bring it to the lake so I can take some photos to add to the info on the plans.  Barrie | |
|
  | |
barriew
Captain (moderator)

Posts : 2631
Join date : 2011-11-26
Age : 83
Location : Thaxted, Essex
 |  Subject: Re: Loyal Moderator Subject: Re: Loyal Moderator  Wed Feb 20, 2013 3:52 pm Wed Feb 20, 2013 3:52 pm | |
| Started constructing the superstructure today in between visits from grandson. Its quite tricky as its built from 0.75 mm styrene and so is quite flimsy. It will be fine when complete (I hope  ) but wobbles around a bit under construction which makes it tricky to get square joints. I'm still trying to work out how the back end goes together. Whilst waiting for glue to dry, I also fitted a 1.5 mm strip around the top of the gunwhales, and have marked out ready for the supports - again strips of 1.5 mm. I was very pleased with the way it sat on the deck - no trimming required  Barrie  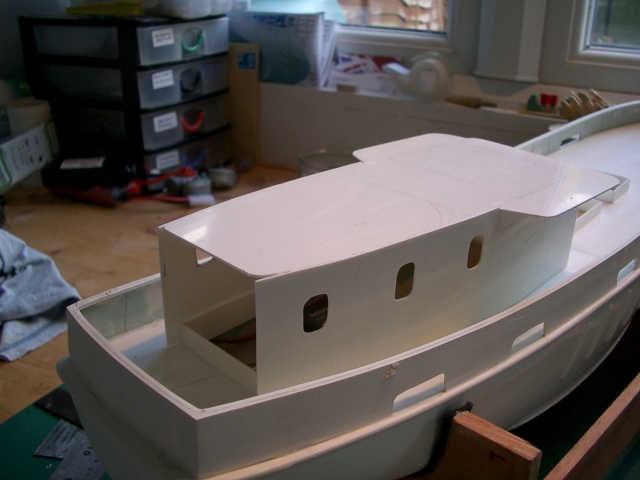 | |
|
  | |
intrepid75
Master


Posts : 271
Join date : 2011-06-11
Age : 68
Location : Bristol, West country
 |  Subject: Re: Loyal Moderator Subject: Re: Loyal Moderator  Wed Feb 20, 2013 8:22 pm Wed Feb 20, 2013 8:22 pm | |
| Starting to take real shape and looking vey nice indeed. | |
|
  | |
Guest
Guest
 |  Subject: Re: Loyal Moderator Subject: Re: Loyal Moderator  Wed Feb 20, 2013 10:45 pm Wed Feb 20, 2013 10:45 pm | |
| looks damn good to me Barrie.
neil. |
|
  | |
barriew
Captain (moderator)

Posts : 2631
Join date : 2011-11-26
Age : 83
Location : Thaxted, Essex
 |  Subject: Re: Loyal Moderator Subject: Re: Loyal Moderator  Fri Feb 22, 2013 3:48 pm Fri Feb 22, 2013 3:48 pm | |
| Told you to wait until I started the superstructure  I was just attaching the rear wall when I realised that I had the two side pieces on the wrong sides  As both sides are quite different, it did matter. I scrapped them and made new ones and almost put them on wrong again  I didn't remake the roof - I hope I can smooth it out with filler etc. Whilst waiting for bits to dry, I finished the bulwark supports. Barrie | |
|
  | |
Guest
Guest
 |  Subject: Re: Loyal Moderator Subject: Re: Loyal Moderator  Fri Feb 22, 2013 10:15 pm Fri Feb 22, 2013 10:15 pm | |
| I have those moments too Barrie annoying though. |
|
  | |
barriew
Captain (moderator)

Posts : 2631
Join date : 2011-11-26
Age : 83
Location : Thaxted, Essex
 | |
  | |
phil winks
Master


Posts : 583
Join date : 2011-06-12
Age : 68
Location : Taunton
 |  Subject: Re: Loyal Moderator Subject: Re: Loyal Moderator  Sun Feb 24, 2013 1:49 pm Sun Feb 24, 2013 1:49 pm | |
| Definately a  moment Barrie thats looking superb mate. | |
|
  | |
intrepid75
Master


Posts : 271
Join date : 2011-06-11
Age : 68
Location : Bristol, West country
 |  Subject: Re: Loyal Moderator Subject: Re: Loyal Moderator  Sun Feb 24, 2013 3:45 pm Sun Feb 24, 2013 3:45 pm | |
| Yep. Very ncie as usual from you Barrie. | |
|
  | |
Guest
Guest
 |  Subject: Re: Loyal Moderator Subject: Re: Loyal Moderator  Sun Feb 24, 2013 9:02 pm Sun Feb 24, 2013 9:02 pm | |
| A very fine piece of work Barrie. |
|
  | |
barriew
Captain (moderator)

Posts : 2631
Join date : 2011-11-26
Age : 83
Location : Thaxted, Essex
 |  Subject: Re: Loyal Moderator Subject: Re: Loyal Moderator  Sat Mar 02, 2013 3:33 pm Sat Mar 02, 2013 3:33 pm | |
| The cold continued to bug me during the week, so I didn't get much done.Feeling better today so had another go! Whilst I wasn't building I was trying to source fittings, but not having much luck. 1/48th scale fittings are not very common and most of those available tend to be weapons for naval vessels. So today after a little painting, I set out to make some mast lights and some ventilators. The drawings only show a plan view of the ventilators which are described variously as mushroom vents and can vents. This is my attempt at making them. 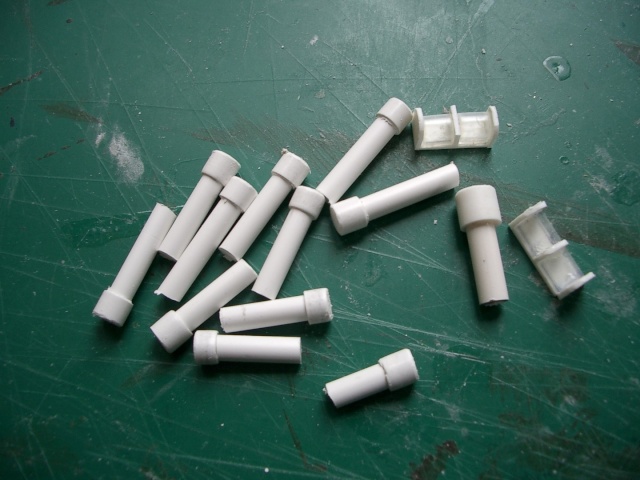 and the superstructure with a first coat of paint. 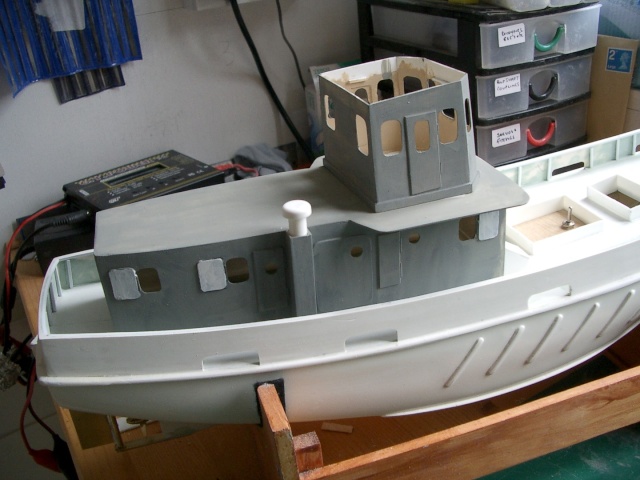 Barrie | |
|
  | |
Guest
Guest
 |  Subject: Re: Loyal Moderator Subject: Re: Loyal Moderator  Sat Mar 02, 2013 10:09 pm Sat Mar 02, 2013 10:09 pm | |
| |
|
  | |
barriew
Captain (moderator)

Posts : 2631
Join date : 2011-11-26
Age : 83
Location : Thaxted, Essex
 |  Subject: Re: Loyal Moderator Subject: Re: Loyal Moderator  Wed Mar 06, 2013 3:37 pm Wed Mar 06, 2013 3:37 pm | |
| Progress seem quite slow at the moment. Lots of waiting for glue and paint to dry  I have made some more mast lights - there are two on the main mast and two on the stern mast although the drawing only shows 1. Checking some photos of actual Loyal class vessels, this is one thing I discovered. I also discovered that they didn't have foremasts although one is shown on the drawing, and that there are hawse holes in the stern  . I still need to make some nav lights. I have made the radar scanner. This will be a working feature! I'm a bit stuck in this area as I am waiting for some window tint spray so that I can fit the glazing into the wheelhouse and fix it to the superstructure. I was going to attempt some ladders, but 1 mm brass rod seems to be in very short supply, so I will probably buy photo etched ones. 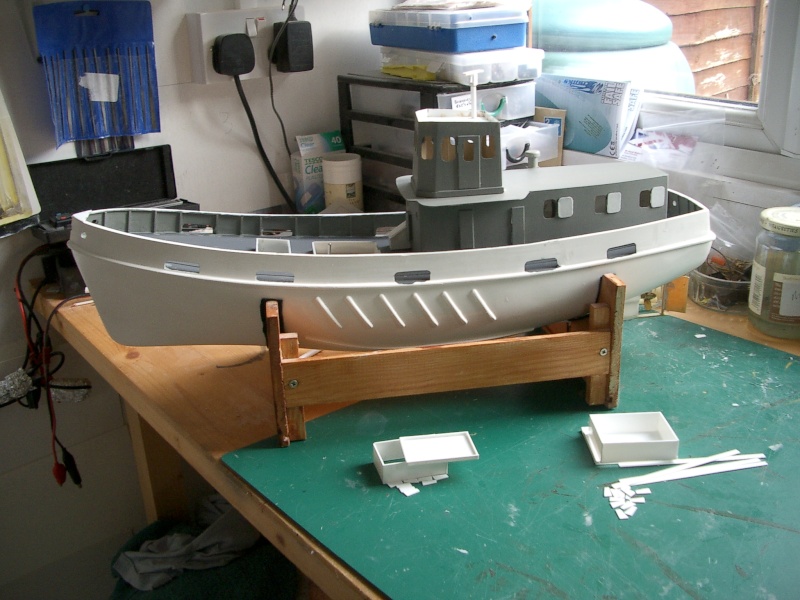 The bits on the work top are the hatch cover kits waiting for glue to dry  I bought one of these tools following a tip on a Forum - Mayhem I think. Used by hand it gives perfect holes for portholes etc in plastic card. It only cost about £3 from ebay - a very good purchase   Barrie | |
|
  | |
barriew
Captain (moderator)

Posts : 2631
Join date : 2011-11-26
Age : 83
Location : Thaxted, Essex
 |  Subject: Re: Loyal Moderator Subject: Re: Loyal Moderator  Thu Mar 07, 2013 5:52 pm Thu Mar 07, 2013 5:52 pm | |
| My tint Spray arrived this morning (thanks for the tip Phil) and so I was able to glaze all the windows in the superstructure and wheelhouse. I particularly wanted to reduce visibility into the wheelhouse as I didn't want to fit it out. I also completed the two hatch covers. The forward one will be fixed as I don't need access. The rear one houses the switch. I think I may fix part of it and just leave the 'lid' removable - if I can find a way of making it secure. It will have a companion way and dinghy on top of it. Tomorrow I hope to start painting the hull and making some more fittings whilst waiting for paint to dry. I have two winches to make and details of only one. Barrie  | |
|
  | |
phil winks
Master


Posts : 583
Join date : 2011-06-12
Age : 68
Location : Taunton
 |  Subject: Re: Loyal Moderator Subject: Re: Loyal Moderator  Thu Mar 07, 2013 5:59 pm Thu Mar 07, 2013 5:59 pm | |
| Looking very good Barrie that tint spray realy is usfull in situations like this isn't it ?
| |
|
  | |
barriew
Captain (moderator)

Posts : 2631
Join date : 2011-11-26
Age : 83
Location : Thaxted, Essex
 |  Subject: Re: Loyal Moderator Subject: Re: Loyal Moderator  Thu Mar 07, 2013 6:23 pm Thu Mar 07, 2013 6:23 pm | |
| - phil winks wrote:
- Looking very good Barrie that tint spray realy is usfull in situations like this isn't it ?
Yes - much better than the film I used on 'Yarra'. I think maybe I was a little heavy with it on this one though. Barrie | |
|
  | |
phil winks
Master


Posts : 583
Join date : 2011-06-12
Age : 68
Location : Taunton
 |  Subject: Re: Loyal Moderator Subject: Re: Loyal Moderator  Thu Mar 07, 2013 6:35 pm Thu Mar 07, 2013 6:35 pm | |
| Hi Barrie it is indeed a fine art getting the tint just so mate but not a difficult one to learn and in fact a slightly over heavy tint is far better than under doing it when your trying to conceal an empty bridge. a slightly more advanced technique is to use alclad chrome lacquer for lexan plastic and back it with a light black tint this gives a near one way mirrored effect particularly good on topend luxury motor yachts. | |
|
  | |
barriew
Captain (moderator)

Posts : 2631
Join date : 2011-11-26
Age : 83
Location : Thaxted, Essex
 |  Subject: Re: Loyal Moderator Subject: Re: Loyal Moderator  Sun Mar 10, 2013 2:05 pm Sun Mar 10, 2013 2:05 pm | |
| I have now started painting the hull. Below the rubbing strip it had a coat of white Halfords primer, then a couple of red. I then painted below the water line with 2 coats of Humrol Red/Brown - the nearest I can find to Red Oxide! Above the water line it has had one coat of Satin Black. The strip above the rubbing strip will need at least one more coat as it didn't have any primer. From pictures of this class, I do not think they had a white boot topping, so I will not be doing one  I am not even sure that they had a 'red' anti-fouling. I have also fixed the radar motor. This uses a 1.5v AA cell inside the superstructure. I am now working on the wrap-round pieces on the superstructure front. This is mark 2 - the first piece I cut from the templates with the plan didn't fit - they were way out. I just hope they meet up with the bulwarks when the superstructure sits on the hull - I couldn't try because of the wet paint on the hull  Barrie 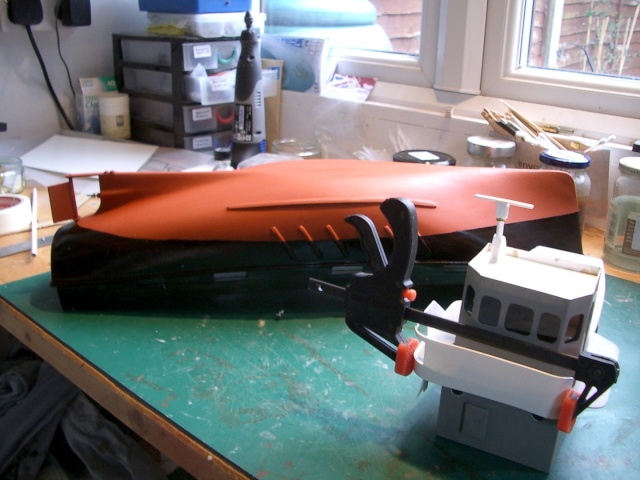 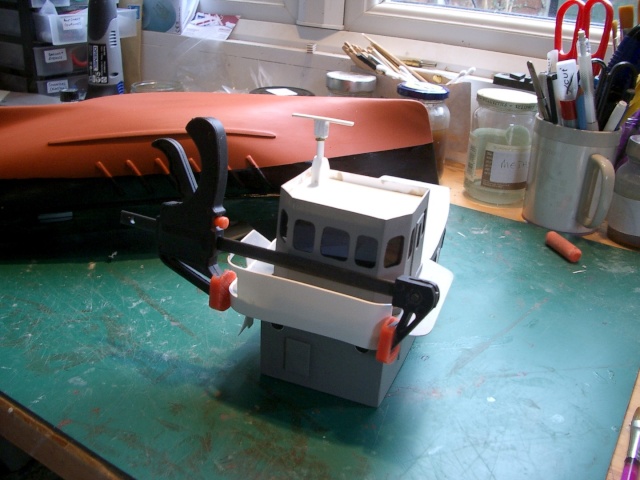 | |
|
  | |
Roadrunner
Forum Overlord


Posts : 1715
Join date : 2011-06-10
 |  Subject: Re: Loyal Moderator Subject: Re: Loyal Moderator  Sun Mar 10, 2013 2:46 pm Sun Mar 10, 2013 2:46 pm | |
| Another nice paint job there Barrie 
_________________
I'm Not Anti-Social, I'm Anti-Stupid.
| |
|
  | |
davidjt
Forum Sponsor


Posts : 534
Join date : 2013-01-08
Age : 72
Location : n wales coast
 |  Subject: Re: Loyal Moderator Subject: Re: Loyal Moderator  Sun Mar 10, 2013 3:48 pm Sun Mar 10, 2013 3:48 pm | |
| hi what a differance a coat of paint makes brings it all to life  . did you brush paint the red oxide?. david | |
|
  | |
barriew
Captain (moderator)

Posts : 2631
Join date : 2011-11-26
Age : 83
Location : Thaxted, Essex
 |  Subject: Re: Loyal Moderator Subject: Re: Loyal Moderator  Sun Mar 10, 2013 3:54 pm Sun Mar 10, 2013 3:54 pm | |
| Yes - both black and red/brown were brushed. I usually only spray primer from cans. If you use cans for the finished colour its a problem to touch up later  I find that if you get a good coat of primer, then the top coats goes on nice and smooth. The only problem is keeping the dust down  It will all get some satin varnish when I've finished painting to even up the surface finish. Barrie | |
|
  | |
Roadrunner
Forum Overlord


Posts : 1715
Join date : 2011-06-10
 |  Subject: Re: Loyal Moderator Subject: Re: Loyal Moderator  Sun Mar 10, 2013 4:51 pm Sun Mar 10, 2013 4:51 pm | |
| Old trick for you Barrie, get a bit of scrap carpet as big as the model, and place is close by to your model, on the wall or something, just before you spray give the carpet a brush over with your hand, this makes the carpet static and then spray, you find most of the dust gets drawn from the surrounding areas to the carpet.
I have a small ish workshop so spraying inside such a close area, this little trick has saved my lungs quite a few times.
_________________
I'm Not Anti-Social, I'm Anti-Stupid.
| |
|
  | |
barriew
Captain (moderator)

Posts : 2631
Join date : 2011-11-26
Age : 83
Location : Thaxted, Essex
 |  Subject: Re: Loyal Moderator Subject: Re: Loyal Moderator  Thu Mar 14, 2013 3:31 pm Thu Mar 14, 2013 3:31 pm | |
| Not much visible progress, but the 'wall' round the superstructure deck has been fitted and painted. It took two goes as the templates were way out. Then I had a panic as I thought the side pieces which join the bulwarks wouldn't! I wasn't able to test as I was fitting them as the paint on the hull was wet. Luckily they are OK. the starboard one is at a bit of an angle, but acceptable I think. To correct it would mean re-doing the whole superstructure  The two hatch covers are made. I plan to glue the rear one apart from the 'lid' which is held by two magnets to give easy access to the main switch. I was going to glue the front one as I don't need the access, but its a tight fit so will not bother - you never know when it might be useful to have access  . I have spayed the stanchions so fitting them is probably the next job, after another coat of paint on the forward hatch. I need now to order some fittings. I think I have found everything I want apart from a dinghy. The only one I can find at the correct size is from Quaycrafts - excellent quality but a little expensive. Anyone know of a dinghy or RIB about 60 to 70 mm long? Barrie 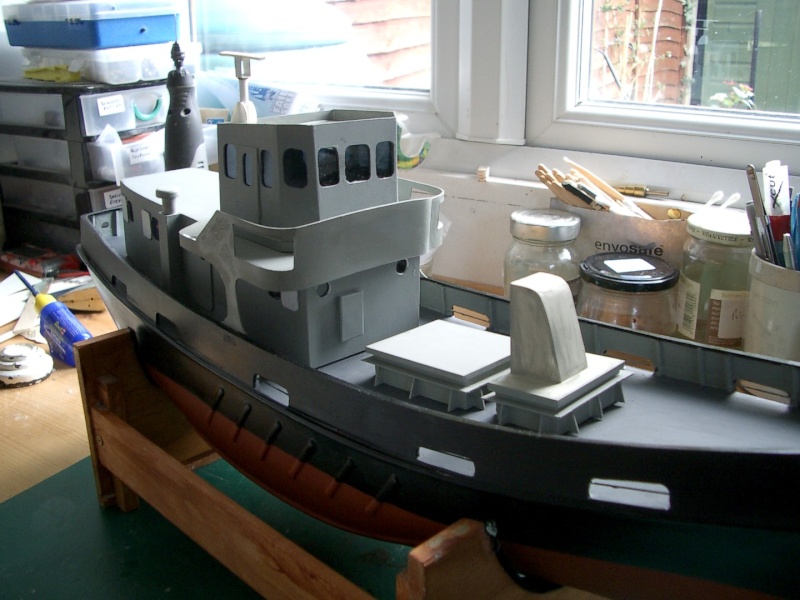 | |
|
  | |
intrepid75
Master


Posts : 271
Join date : 2011-06-11
Age : 68
Location : Bristol, West country
 |  Subject: Re: Loyal Moderator Subject: Re: Loyal Moderator  Thu Mar 14, 2013 7:42 pm Thu Mar 14, 2013 7:42 pm | |
| Macs mouldings do a 1/48th RIB but its at 95mm. They also do liferaft cannisters that might be of use. | |
|
  | |
barriew
Captain (moderator)

Posts : 2631
Join date : 2011-11-26
Age : 83
Location : Thaxted, Essex
 |  Subject: Re: Loyal Moderator Subject: Re: Loyal Moderator  Thu Mar 14, 2013 7:59 pm Thu Mar 14, 2013 7:59 pm | |
| Intrepid - yes I had hoped that the Macs Mouldings RIB might be suitable, but its much too big. I have bought liferaft canisters from Battlecrafts - nearer the size I need and come with a stand  One less thing to build especially as 1 mm brass rod seems to have vanished from the planet  If I can't find a dinghy I am going to try to build a RIB. I have spent the evening using my vinyl cutter to cut the names and number - its quite tricky to get it to cut 5 mm letters, and took lots of attempts, but they are done now. I actually cut some 4 mm ones - never managed that before  I'll fix them tomorrow and then apply some Humbrol satin cote to seal everything on the hull. Barrie | |
|
  | |
barriew
Captain (moderator)

Posts : 2631
Join date : 2011-11-26
Age : 83
Location : Thaxted, Essex
 |  Subject: Loyal Moderator becomes Loyal Mediator! Subject: Loyal Moderator becomes Loyal Mediator!  Fri Mar 15, 2013 6:01 pm Fri Mar 15, 2013 6:01 pm | |
| Today I fixed the names and numbers I cut last night. I decided on Mediator because I have some photos of the original, its also shorter.  The hull has had a coat of Humbrol Satincote and will get one more at least. I finished painting the hatches, and started on fitting the stanchions and railings. Those on the main superstructure deck are done, the top deck still to do, then all to paint. I found out from the pictures of the original that the stanchions were not 2 rail round ones, but three rail flat - another error on the drawing  However. having spent about £13 buying these I was not going to not use them  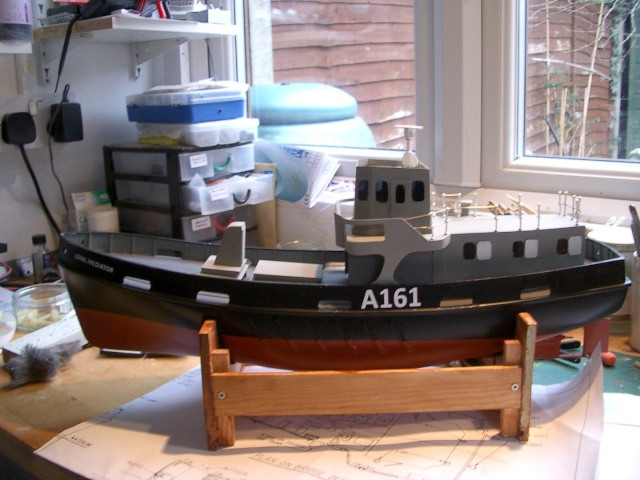 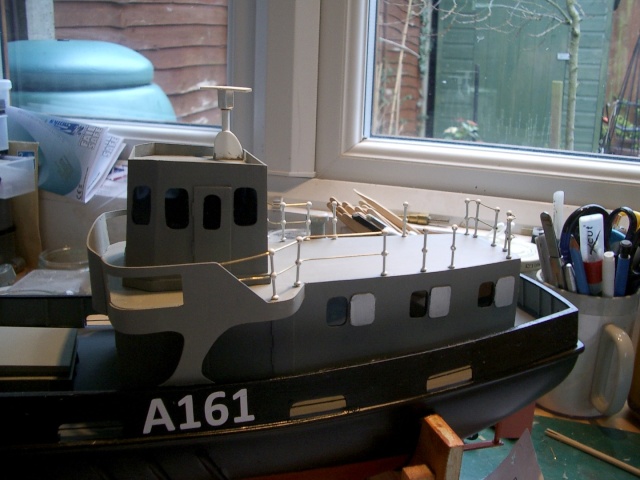 I have also started making a RIB - not sure if it will turn out OK or not. This is where I have got to. 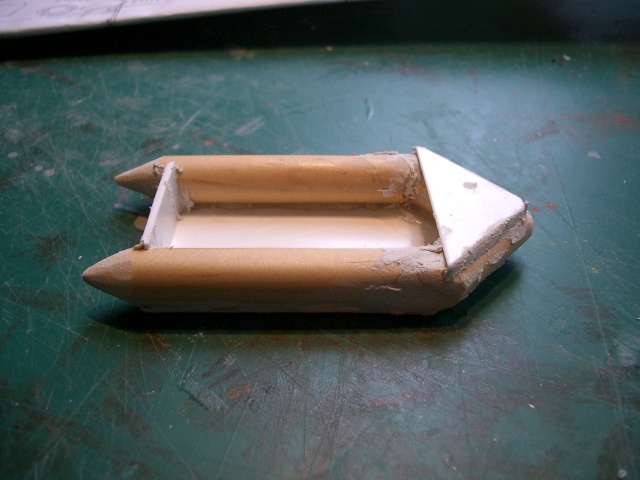 Plan B if this does not look OK when finished is to buy one from Macs Mouldings and cut it down  Barrie | |
|
  | |
Guest
Guest
 |  Subject: Re: Loyal Moderator Subject: Re: Loyal Moderator  Fri Mar 15, 2013 11:38 pm Fri Mar 15, 2013 11:38 pm | |
| Looking good so far Barrie. |
|
  | |
davidjt
Forum Sponsor


Posts : 534
Join date : 2013-01-08
Age : 72
Location : n wales coast
 |  Subject: Re: Loyal Moderator Subject: Re: Loyal Moderator  Sat Mar 16, 2013 7:49 pm Sat Mar 16, 2013 7:49 pm | |
| hi barrie
the rib looks fine to me from some one who makes most parts, i hate buyeing anything allways try to do my own.
david | |
|
  | |
Guest
Guest
 |  Subject: Re: Loyal Moderator Subject: Re: Loyal Moderator  Sat Mar 16, 2013 9:07 pm Sat Mar 16, 2013 9:07 pm | |
| just great matey....looking superb.
neil. |
|
  | |
barriew
Captain (moderator)

Posts : 2631
Join date : 2011-11-26
Age : 83
Location : Thaxted, Essex
 |  Subject: Re: Loyal Moderator Subject: Re: Loyal Moderator  Fri Mar 22, 2013 3:11 pm Fri Mar 22, 2013 3:11 pm | |
| Quite a bit of effort recently but not much to show. Having discovered my error with the stanchions I have removed them ready for the etched brass ones from Windy. Several small items are in progress - two water tanks, an outboard for the RIB, plus some more ventilators. I have moved the switch for the radar motor to save having to remove the superstructure at the lakeside. It is now accessible from the outside and will be covered by the large box. The new stanchions have been painted and are ready to remove from the web and install. They are quite delicate, so its going to be a slow process I think. Barrie  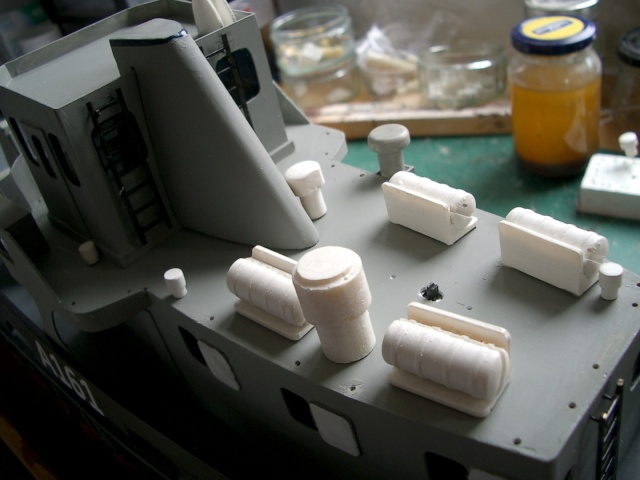  | |
|
  | |
phil winks
Master


Posts : 583
Join date : 2011-06-12
Age : 68
Location : Taunton
 |  Subject: Re: Loyal Moderator Subject: Re: Loyal Moderator  Fri Mar 22, 2013 5:01 pm Fri Mar 22, 2013 5:01 pm | |
| | |
|
  | |
Guest
Guest
 |  Subject: Re: Loyal Moderator Subject: Re: Loyal Moderator  Sat Mar 23, 2013 12:21 am Sat Mar 23, 2013 12:21 am | |
| |
|
  | |
barriew
Captain (moderator)

Posts : 2631
Join date : 2011-11-26
Age : 83
Location : Thaxted, Essex
 |  Subject: Re: Loyal Moderator Subject: Re: Loyal Moderator  Thu Mar 28, 2013 6:01 pm Thu Mar 28, 2013 6:01 pm | |
| Its almost a week since I last posted. I rather lost motivation for a few days  I have now fitted the first batch of the new stanchions and rails. This was quite a struggle as the stanchions are quite thin etched brass and for some reason the superglue didn't want to set. However they are now fitted and after things have set properly I'll try to straighten the stanchions. I also need to source some finer chain but am not quite sure how to do that online - is it measured by links per cm? Next up are the stanchions on the top deck, and I have to make a compass binnacle and voice pipe. The RIB is now finished with an outboard and one of the winches is ready to glue down. I still have to make another winch but so far have only the vaguest idea of what it looks like! I am still hoping for a fine Sunday so my friend will bring his MS version to the lake. I have realised one major omission - I didn't cut and fit the anchor recesses and I no longer have access below the deck. I have an idea how to rectify this but need to do some tests first. Barrie 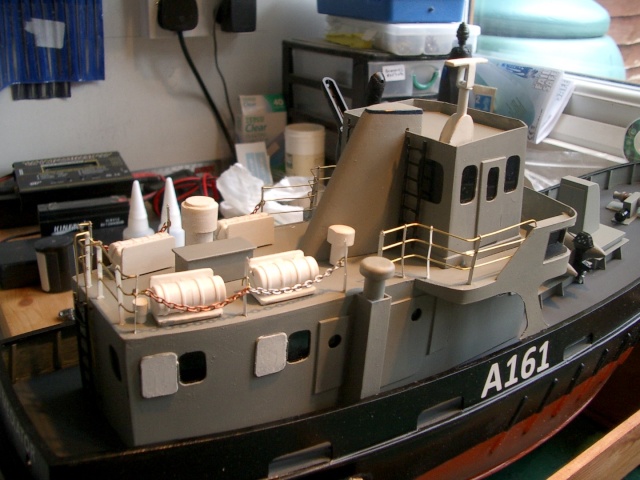 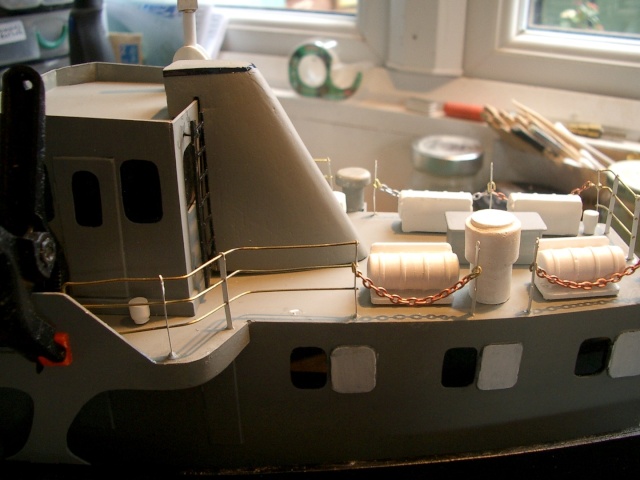 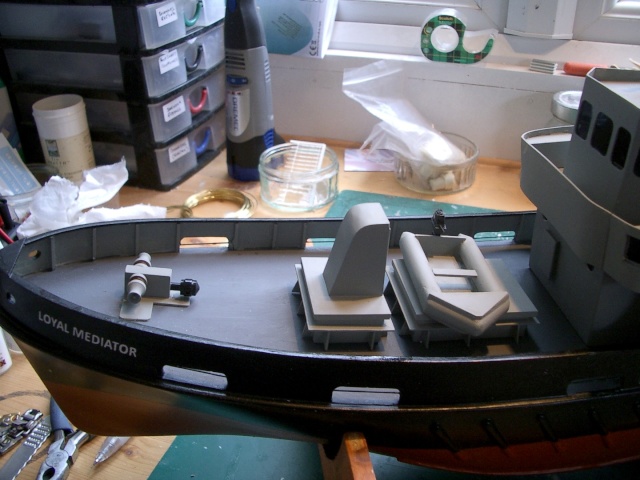 | |
|
  | |
davidjt
Forum Sponsor


Posts : 534
Join date : 2013-01-08
Age : 72
Location : n wales coast
 |  Subject: Re: Loyal Moderator Subject: Re: Loyal Moderator  Thu Mar 28, 2013 6:38 pm Thu Mar 28, 2013 6:38 pm | |
| hi barrie
the rib looks well , as for fine chain I normally go to a car boot sale and look for old jewellery the chain they normally let you have it for 50p our so if it wants untangling and are not dealers
david | |
|
  | |
Sponsored content
 |  Subject: Re: Loyal Moderator Subject: Re: Loyal Moderator  | |
| |
|
  | |
| | Loyal Moderator |  |
|
