|
| | MY NEW PROJECT...or two. |  |
|
+6davidjt barriew Tug--Kenny TonyW phil winks Footski 10 posters | |
| Author | Message |
|---|
Guest
Guest
 |  Subject: MY NEW PROJECT...or two. Subject: MY NEW PROJECT...or two.  Wed Aug 29, 2012 6:35 pm Wed Aug 29, 2012 6:35 pm | |
| I have been loosing sleep over this one..........a number of boats have come to mind over the past couple of months and my early thoughts were either towards a tender tug or a 61' Barnett class boat, but for differing reasons I was a little put off by both projects and to be honest, it came down to the fact that it would be sheer boredom on the part of the Tender tug.............I've built 3 Imara tugs and two Marie Fellings over the years, and each time I said Never again. As for the 61' barnett, well, to be honest it wouldhave the same attributes as the Clyde that I built.........too big to keep in my workshop, and the presence of my smaller barnett which I love anyway, so dispenced with them both. I thought about doing a 41' and a 42' Watson, but they would be similar to the two 46' boats that I have just finished, and a cross over from the 41' Anne Lettitia Russell that I started off doing in the mid 1990's. I wanted something different and think I have found the one to fit the bill, and keep me interested. It is the old Fleetwood Pulling and sailing lifeboat of 1894 which served well into the 20century. Also a good pro towards this class was that in 1908 they modified the class (the 43' Watson class) to motorise 5 of them, as well as motorising some of the smaller pulling and sailing boats. So I have decided to build one with drop keels for purely a sailing version ( no toy like oarsmen rowing for me) and a second boat which has been modified for single motor movement, with auxiliary sail. Pictures below are of the smaller ( I think) 1:24 scale waterline model of the Maude Pickup........Fleetwoods lifeboat) that is in the Fleetwood Museum. All I have to do now is get some plans for the class.........and this is in hand with NMM in Greenwich. Hope you like my choice. 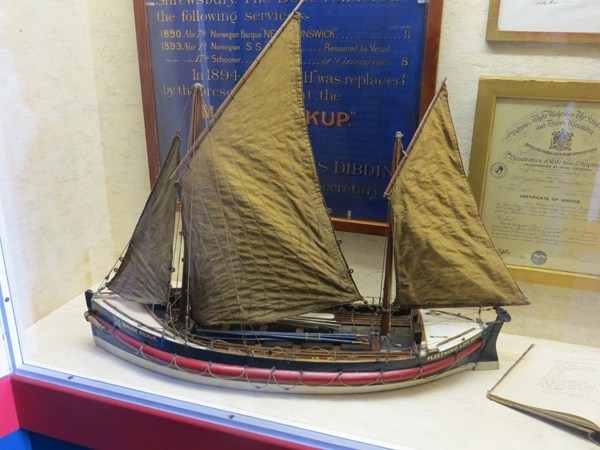 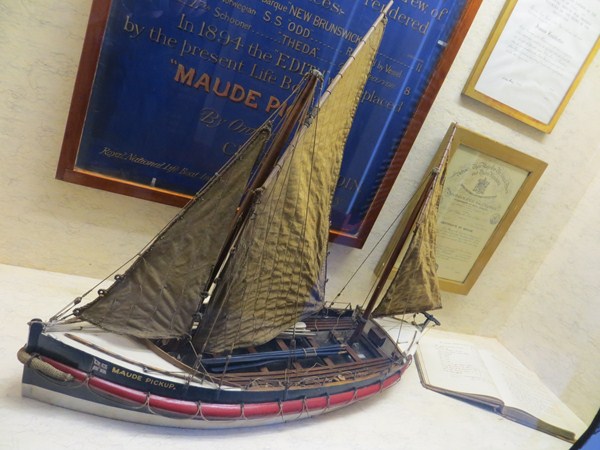 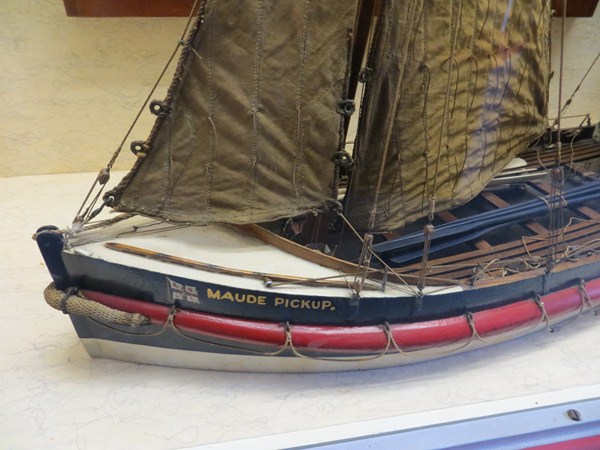 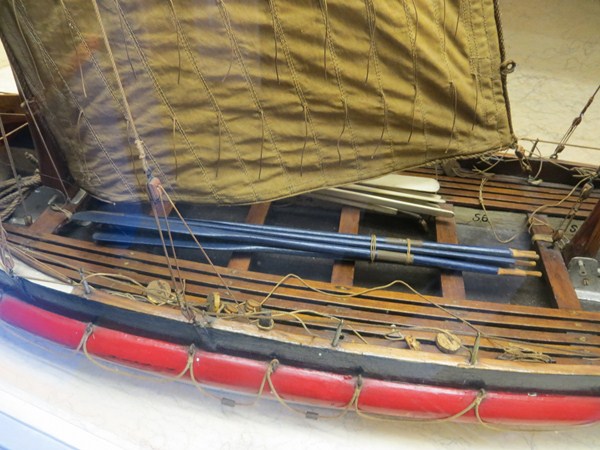 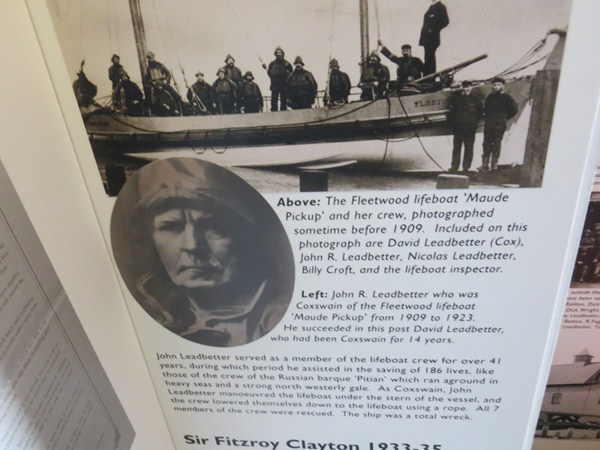 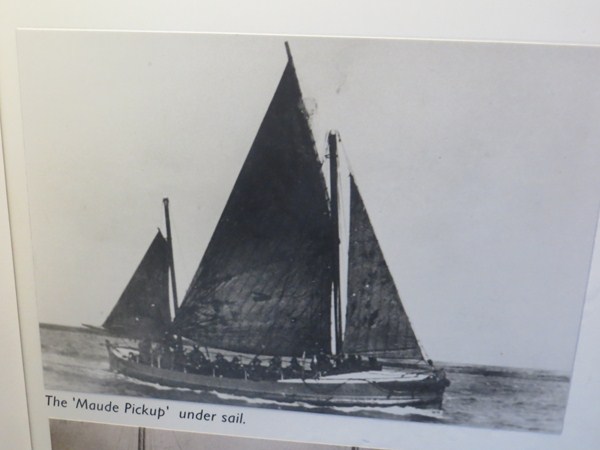 |
|   | | Footski
Master


Posts : 548
Join date : 2011-06-11
Age : 66
Location : Malaga, Spain
 | |   | | Guest
Guest
 |  Subject: Re: MY NEW PROJECT...or two. Subject: Re: MY NEW PROJECT...or two.  Wed Aug 29, 2012 10:49 pm Wed Aug 29, 2012 10:49 pm | |
| just a small problem of getting plans now Barry..........but am hoping.......have contacted a friend in ireland where one of these boats was on station.....his family have been involved in the town's lifeboat station for many years, and he restores lifeboats...........so hoping he might have some.
neil. |
|   | | Guest
Guest
 |  Subject: Re: MY NEW PROJECT...or two. Subject: Re: MY NEW PROJECT...or two.  Thu Aug 30, 2012 9:28 am Thu Aug 30, 2012 9:28 am | |
| well, good lord, I now have copies of original photos of the motorised RNLB William and Laura ON 595,(c1910) based from new at Donaghadee coming to me from the great grandson of the coxs'n..............they apparently were taken by the coxs'n and motorman at the time when she was delivered..............brilliant!, so just need to get some plans from NMM.............things are starting to roll quietly.
I love it when a plan comes together!! |
|   | | Footski
Master


Posts : 548
Join date : 2011-06-11
Age : 66
Location : Malaga, Spain
 |  Subject: Re: MY NEW PROJECT...or two. Subject: Re: MY NEW PROJECT...or two.  Thu Aug 30, 2012 1:12 pm Thu Aug 30, 2012 1:12 pm | |
| Fingers crossed you get those plans Neil....Hey, thinking of selling up down here and returning to the Bolton area, so I may well get over to Fleetwood lake for a sailor two next summer!!!!! | |
|   | | Guest
Guest
 |  Subject: Re: MY NEW PROJECT...or two. Subject: Re: MY NEW PROJECT...or two.  Thu Aug 30, 2012 7:04 pm Thu Aug 30, 2012 7:04 pm | |
| it would be very nice to meet you barry........but why the change?
neil. |
|   | | Guest
Guest
 |  Subject: Re: MY NEW PROJECT...or two. Subject: Re: MY NEW PROJECT...or two.  Fri Aug 31, 2012 12:47 am Fri Aug 31, 2012 12:47 am | |
| I'm looking forward to this build Neil I hope plans are available. |
|   | | Footski
Master


Posts : 548
Join date : 2011-06-11
Age : 66
Location : Malaga, Spain
 |  Subject: Re: MY NEW PROJECT...or two. Subject: Re: MY NEW PROJECT...or two.  Fri Aug 31, 2012 7:22 am Fri Aug 31, 2012 7:22 am | |
| - nhp651 wrote:
- it would be very nice to meet you barry........but why the change?
neil. Various reasons. Bored out of our brains down here. Too darned hot in summer. 4 elderly parents. No model boat clubs. etc etc... | |
|   | | Guest
Guest
 |  Subject: Re: MY NEW PROJECT...or two. Subject: Re: MY NEW PROJECT...or two.  Fri Aug 31, 2012 7:15 pm Fri Aug 31, 2012 7:15 pm | |
| the last one's a good enough reason for me matey, lol |
|   | | Guest
Guest
 |  Subject: Re: MY NEW PROJECT...or two. Subject: Re: MY NEW PROJECT...or two.  Sat Sep 01, 2012 9:13 pm Sat Sep 01, 2012 9:13 pm | |
| I really am getting itchy fingers now................but can't even attempt to get plans from the NMM until Simon Stevens gets back from Holls this coming week. However, whilst looking through one of my books called "Let not the deep" I found small GA plans including line plans for both boats that I intend to build. Strangely, although they are both classed as 43' Watsons and there is 20 years between builds, both hulls are very slightly different in plan detail......with the full beam just that little further back on one than the other. Also the bow is raked a little more on the pulling and sailing boat than it is the motor/sailer. Which has left me in a slight dilemma, as I wanted to use the same mould and hull for both boats. The question is, if I make the mould and hull as for the motor/sailer would it really have much effect to the pulling/sailing model at 1:12 scale. the lines of the hulls for both boats are almost identical, and I can really only see the almost vertical bow of the motor/sailer being any obstacle to it being a decent sailer for the second boat, but just wondering whether anyone else could shed any light on this, as I am not a yachtsman, and presume that the more raked bow of the earlier pulling/sailing boat was to facilitate the boat to cut through the water that little better. As for purism, as I have always said..................a little modellers licence always comes into my models, and as such, do not suffer from the comments of purists......this question is purly to accertain whether that more virticle bow would hinder the sailing model. the top set of plans is the motor/sailor, and the bottom set the pulling/salior. I, myself don't think it will have much effect, but would like to hear from those more knowledgeable on this subject. cheers, neil.  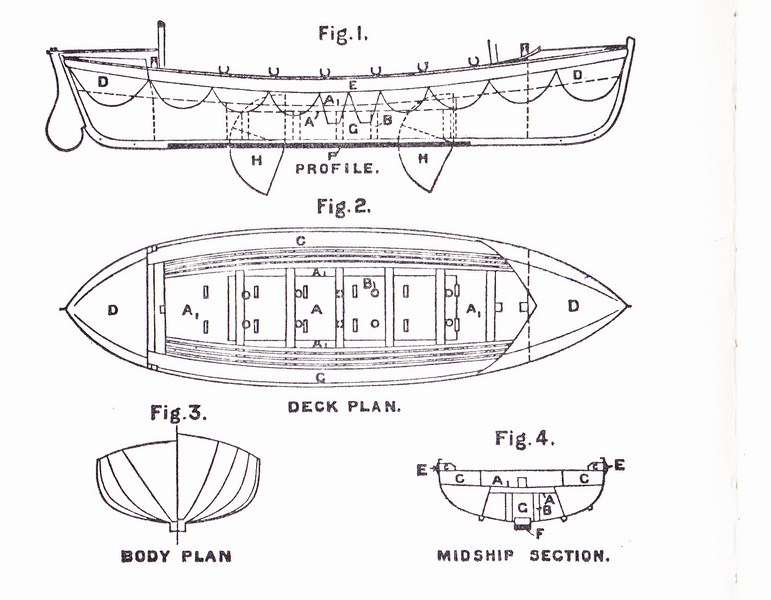 |
|   | | Footski
Master


Posts : 548
Join date : 2011-06-11
Age : 66
Location : Malaga, Spain
 |  Subject: Re: MY NEW PROJECT...or two. Subject: Re: MY NEW PROJECT...or two.  Sun Sep 02, 2012 7:34 am Sun Sep 02, 2012 7:34 am | |
| Neil,
I am no expert, but these plans appear to be hand drawn, not professional. That may account for the very slight difference. As I say, I am not an expert, but I would hang on and see what the NMM have. | |
|   | | Guest
Guest
 |  Subject: Re: MY NEW PROJECT...or two. Subject: Re: MY NEW PROJECT...or two.  Sun Sep 02, 2012 9:06 am Sun Sep 02, 2012 9:06 am | |
| I think they were diagramatical ones circa the period, Barry and used to illustrate the periodicals of the day.........they do have discrepancies but give an idea as to the very little differences of the two boats. |
|   | | Guest
Guest
 |  Subject: Re: MY NEW PROJECT...or two. Subject: Re: MY NEW PROJECT...or two.  Tue Sep 04, 2012 4:32 pm Tue Sep 04, 2012 4:32 pm | |
| Well, to all those who condemn the prices of plans from National Maritime Museum, I have an answer to them, and after the help I recieved from Simon Stevens, Curator of the NMM this afternoon, I am forever in his debt.
I phoned him this pm after he returned from his 2 week hols and we spent an hour together on the phone, where he went through file after file, folder after folder, back referencing and finally coming up with lines, GA's and sail plans for the two boats I want to build...........just brilliant service, and tomorrow with the numbers and refs that he gave me I'll be placing my order.
Without plans you can do so little, and without people like Simon Stevens, willing to spend that time helping you, you have absolutely no chance.
My sincere thanks go out to him for all his help this afternoon, and bearing in mind that we are going back 125 years to some of these plans..........."the boy dun gud" is all I can say.
Thanks Simon.
Neil.
And if anyone still moans about the price of plans....just ask Rod ( trawlernam) he was quoted the other day from a museum in Yorkshire, that has just had a government grant to set up their archive system of £50,000.00p.....nearly 50 quid a sheet, plus 5 quid research plus postage.................I reckon that NMM's prices and help are cheep compared |
|   | | Footski
Master


Posts : 548
Join date : 2011-06-11
Age : 66
Location : Malaga, Spain
 |  Subject: Re: MY NEW PROJECT...or two. Subject: Re: MY NEW PROJECT...or two.  Wed Sep 05, 2012 7:16 am Wed Sep 05, 2012 7:16 am | |
| Good to hear that service still counts....... | |
|   | | phil winks
Master


Posts : 583
Join date : 2011-06-12
Age : 68
Location : Taunton
 |  Subject: Re: MY NEW PROJECT...or two. Subject: Re: MY NEW PROJECT...or two.  Sun Sep 09, 2012 8:37 pm Sun Sep 09, 2012 8:37 pm | |
| Hi Neil my 1st thoughts on the differences are that
on the pulling hull displacement would possibly be less (no engine to allow for) and a more streamlined hull would be a serious advantage hence the rake on the bow and the max beam being further aft giving a more slippery shape.
Where as with the motorised version the change of bow and beam shape may well give a larger displacement allowing for the extra weight of the engine. Just my 1st impressions ! | |
|   | | Guest
Guest
 |  Subject: Re: MY NEW PROJECT...or two. Subject: Re: MY NEW PROJECT...or two.  Mon Sep 10, 2012 9:30 pm Mon Sep 10, 2012 9:30 pm | |
| cheers Phill..............I understand what you are saying, and all seams logical when explained to me......cheers.
One more question........do you think it would matter if I made the hull to the motorised lines, and used it as a stand off scale boat for the sailer.......which I'm building for myself anyway.
neil. |
|   | | Guest
Guest
 |  Subject: Re: MY NEW PROJECT...or two. Subject: Re: MY NEW PROJECT...or two.  Tue Sep 11, 2012 1:11 am Tue Sep 11, 2012 1:11 am | |
| It's for you who cares what the rivet counters think or say, go for it Neil it'll be a beautiful model if your making it.
My 2 bob's worth.
Damien. |
|   | | Guest
Guest
 | |   | | phil winks
Master


Posts : 583
Join date : 2011-06-12
Age : 68
Location : Taunton
 |  Subject: Re: MY NEW PROJECT...or two. Subject: Re: MY NEW PROJECT...or two.  Tue Sep 11, 2012 7:02 pm Tue Sep 11, 2012 7:02 pm | |
| Neil one little trick to enlarge a drawing is to scan it to a pdf file and then chat to a good local print shop, Independants are usually the better ones, they should be able to scale a pdf file to any size you want with out any increase in line thickness.
Regarding the using of the motor hull form for a puller/sailer it prob won't make a lot of difference to the models performance at up to say 1/12th scale though it will be marginally slower under sail | |
|   | | Guest
Guest
 |  Subject: Re: MY NEW PROJECT...or two. Subject: Re: MY NEW PROJECT...or two.  Wed Sep 12, 2012 9:51 pm Wed Sep 12, 2012 9:51 pm | |
| |
|   | | TonyW
Gunner


Posts : 181
Join date : 2011-06-12
Age : 70
Location : Newbury, Berkshire
 |  Subject: Re: MY NEW PROJECT...or two. Subject: Re: MY NEW PROJECT...or two.  Sun Sep 16, 2012 5:02 pm Sun Sep 16, 2012 5:02 pm | |
| | |
|   | | Guest
Guest
 |  Subject: Re: MY NEW PROJECT...or two. Subject: Re: MY NEW PROJECT...or two.  Fri Sep 28, 2012 12:00 pm Fri Sep 28, 2012 12:00 pm | |
| Well!, four weeks, not bad I suppose............could have been longer, but my plans for the Motor Lifeboat ON595, Donaghadee lifeboat have finally arrived including plan and profile, seating and W/T boxes, ( or Hold Air Cases as they called them in 1912), cross sections, Motor and cover and a sail plan for generic dipping lug sail lifeboats with main and mizzen mast and foresail. Time to get cracking!!!! 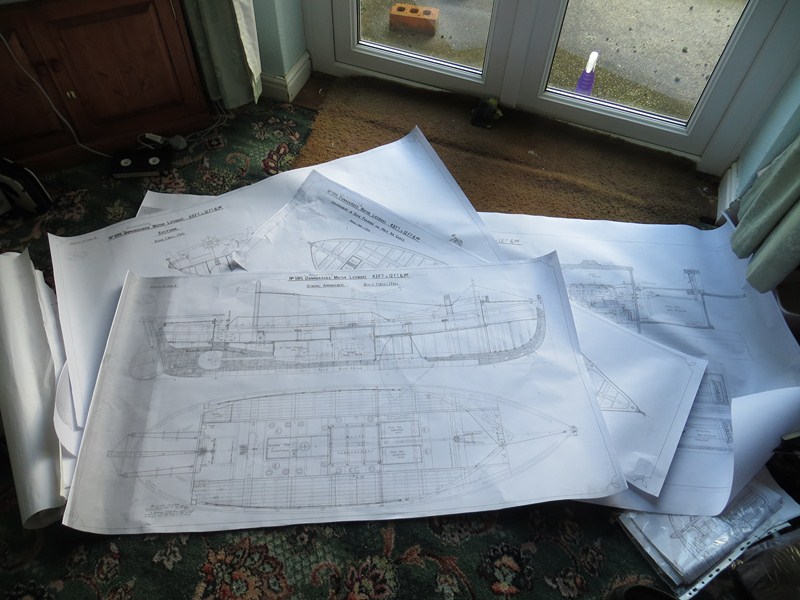 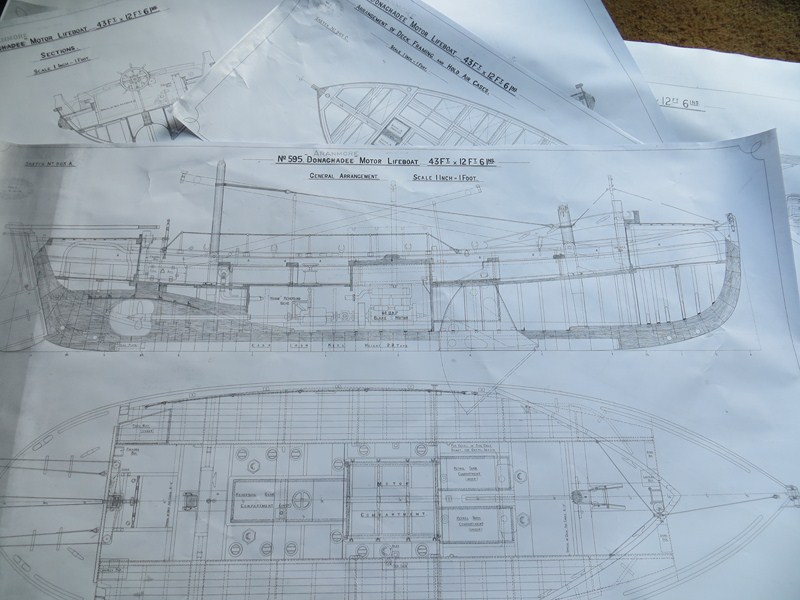 |
|   | | Guest
Guest
 |  Subject: Re: MY NEW PROJECT...or two. Subject: Re: MY NEW PROJECT...or two.  Fri Sep 28, 2012 12:12 pm Fri Sep 28, 2012 12:12 pm | |
| I guess you're eager to start. |
|   | | Guest
Guest
 |  Subject: Re: MY NEW PROJECT...or two. Subject: Re: MY NEW PROJECT...or two.  Fri Sep 28, 2012 12:24 pm Fri Sep 28, 2012 12:24 pm | |
| that's an understatement, Damien...........
been bored out of my tree that last month or so........driven my misses mad, walking around like a bear with a sore head.......
she'll be well pleased that they have come, lol |
|   | | Guest
Guest
 |  Subject: Re: MY NEW PROJECT...or two. Subject: Re: MY NEW PROJECT...or two.  Fri Sep 28, 2012 12:33 pm Fri Sep 28, 2012 12:33 pm | |
|  I guess thet's the reason my wife got me doing the 1/12th man's shed. |
|   | | Guest
Guest
 |  Subject: Re: MY NEW PROJECT...or two. Subject: Re: MY NEW PROJECT...or two.  Fri Sep 28, 2012 1:32 pm Fri Sep 28, 2012 1:32 pm | |
| Just seen that Damien.......amazing and lovely........I really do like it.
neil. |
|   | | Guest
Guest
 |  Subject: Re: MY NEW PROJECT...or two. Subject: Re: MY NEW PROJECT...or two.  Sat Sep 29, 2012 11:00 pm Sat Sep 29, 2012 11:00 pm | |
| I finally got down to some work today in preparation for building the plug for taking a GRP mould of the hull and end case tops. However the problem with building a model that is of a boat one hundred years old is that not all the plans are available..........and sadly for the William and Laura, although the plans I got from the National Maritime museum are excellent in that all GA's and sail plans are there, along with superb drawings of the engine and compartment ( which I think I'll build and mould), there are no line drawings for that type of boat, and so I have had to rely on the very small set that were supplied and as posted on post out of the book Let Not the Deep. there is a problem though in that when these were photo enlarged and three times over at +400% they become distorted in length and height, and as such give an incorrect shape. To overcome this, using my long past teaching skills in Tech Drawing, I set about correcting this. And this is the way I do it. I set the photocopied plans of the frames into a grid, of approximately 20mm squares, by using both measured and parallel segmentation, where a line is drawn at an angle to the axis that is to be split ( this would invariably be an odd measurement) and along that angled line, measure out with screw dividers, the set number of partitions that you want your axis deviding into. Join the last measurement to the end of the axis, and then using the square, adjustable and fixt set squares, run parallel markings to the end line, from each of the measurements......this will then devide the axis into equal measurements. Set out the overal box grid of the measurements of the actual boat, and then divide this larger box, using the same methods as with the photocopied lines drawing, and you end up with a box grid of equal sections, but the exact actual overal size of the largest frame of the boat ( which is usually the moulded breadth of the boat ( or Beam as we know it) Once you have got the two box grids you just transfare the intersections of the lines to the grids from the line drawings onto the blank grid.......and hey presto, you end up with the proper lines properly shaped and representing the boat. However you will be surprised to see the difference between the photocopied lines and the newly drawn ones. It is an accurate way of transposing lines, as long as you are accurate with the measurements for the grid...............and any small discrepancy between the sections fixed to the keel can be taken away eventually with polyester filler. neil 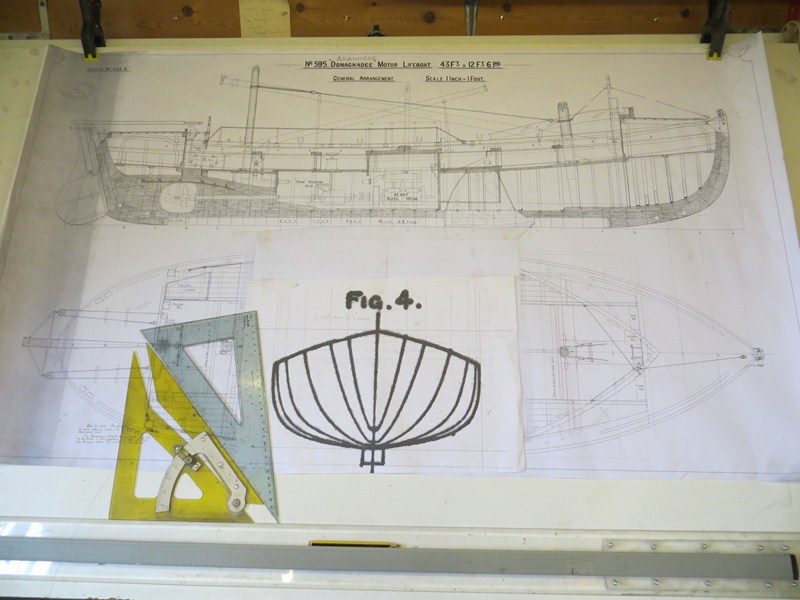 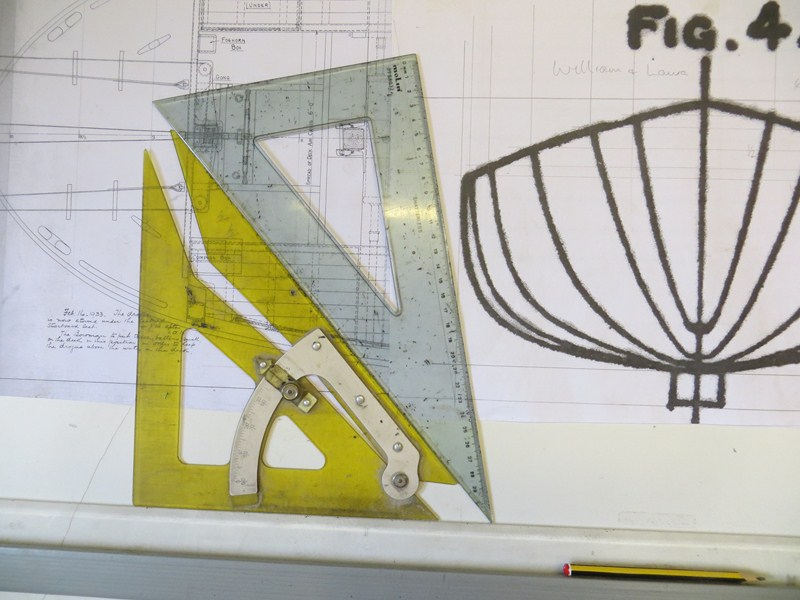 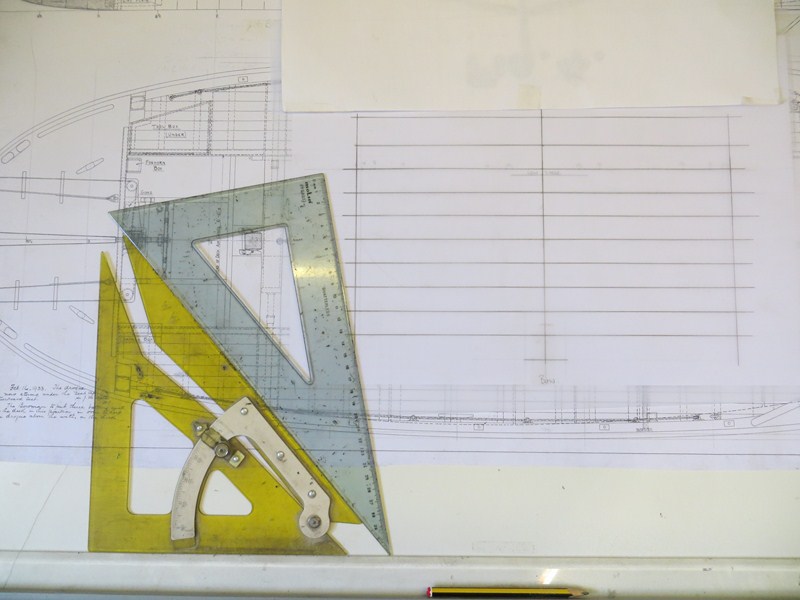 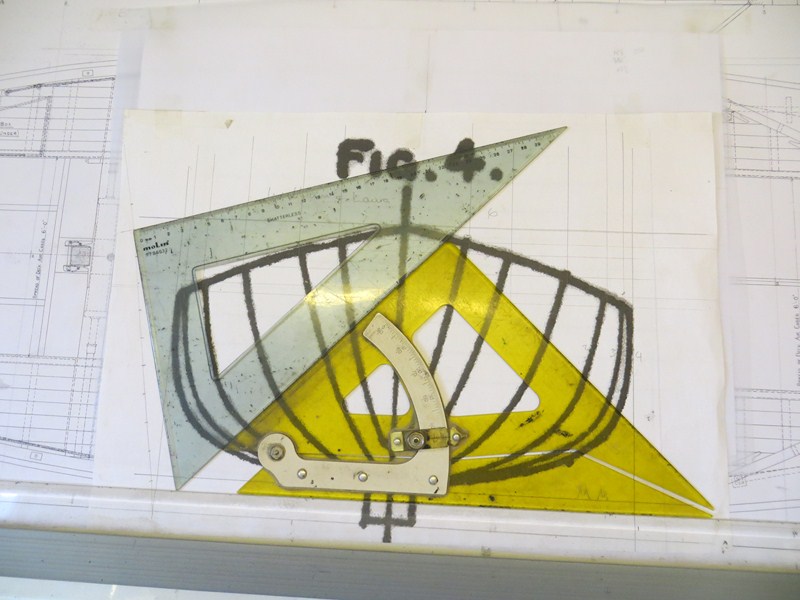   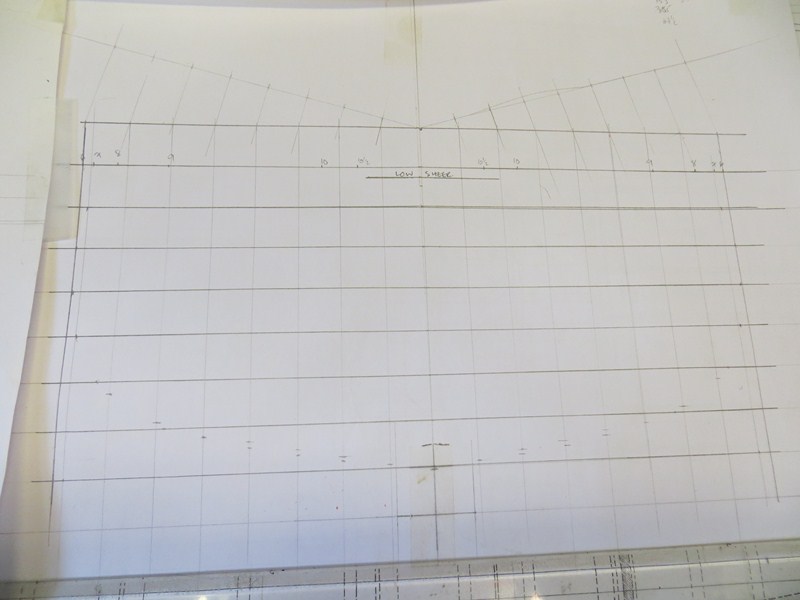  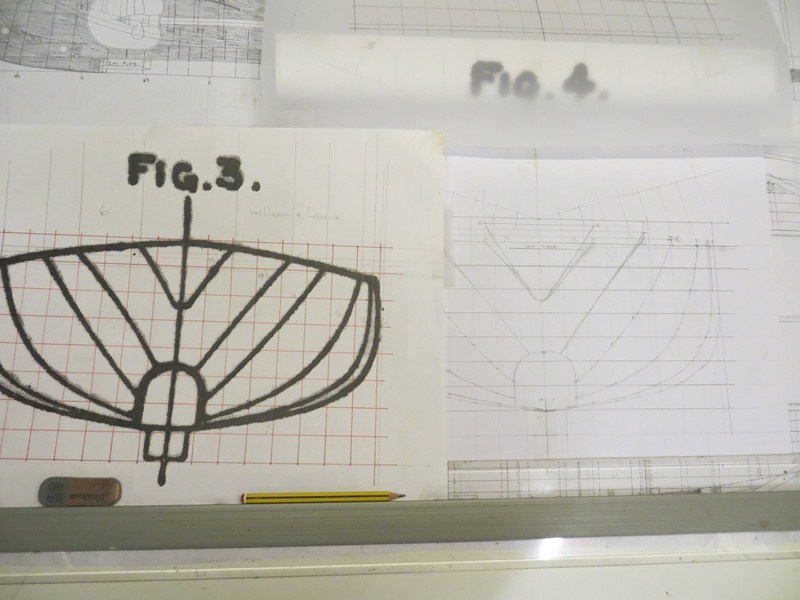 |
|   | | Guest
Guest
 |  Subject: Re: MY NEW PROJECT...or two. Subject: Re: MY NEW PROJECT...or two.  Mon Oct 01, 2012 9:32 pm Mon Oct 01, 2012 9:32 pm | |
| Well, the build has started..........got all my frames and plans copied today so that I could cut the spares up fpr copying onto timber. I'm using 9mm ply for the main keel and the two centre frames 5 & 6 and 6mm ply for the other frames. But beefore that, to the templates for the frames. Some are frightened of doing these and have said to me at clubs and my nightschool that I used to teach that they can't get the two halves equal, so this is my way of doing it ( there will be many other ways, but this is my tried and tested way so will just go through it step by step for anyone interested) 1) run a steel marking scribe down the center line of the frame template.....this will help the fold in the template to be crisp and straight. 2) Fold the template down the centre line. 3) cut the template you need from the copy leaving a margin to begin with. 4) Cut with a sharp scalpel knife across the top of the frame as the first cut whilst the template is folded, making s=ure that the under side doesn't "creep" thus giving a false half. 5) Cut out the frame line to the edge of the template, again whilst the template is folded. You then have the whole template, equal on both sides, ready to mark onto timber. 6) repeat the process with the other ten or so frame templates. The cutting out of the Keel is to the bulwark height and to the outer line of the keel, and I used household sharp scissors. One thing NOT to forget when copying the keel template to timber is to mark the centre possitions of the frames onto the keel itself before cutting out, as shown in picture 9.  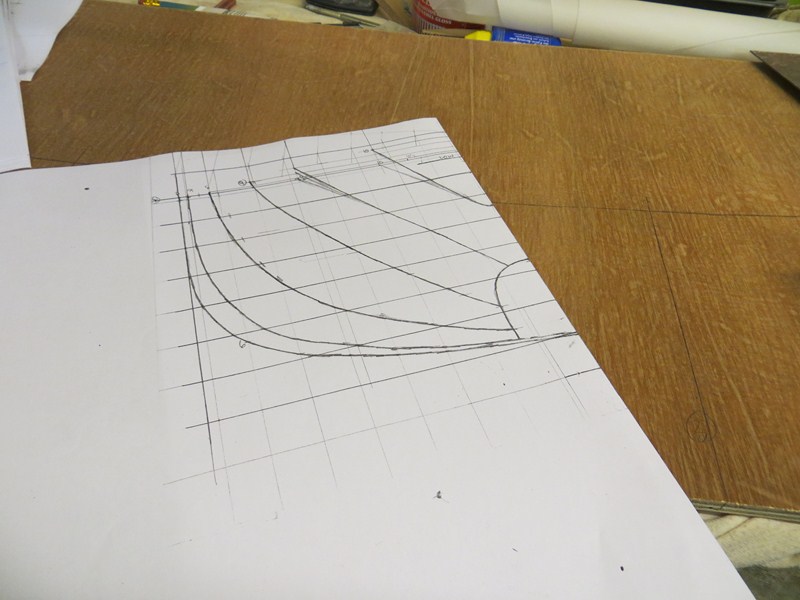 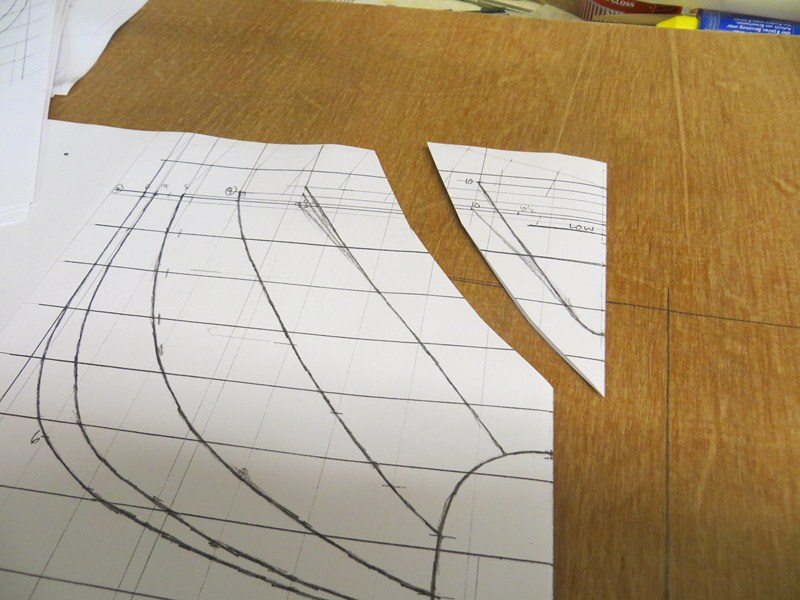 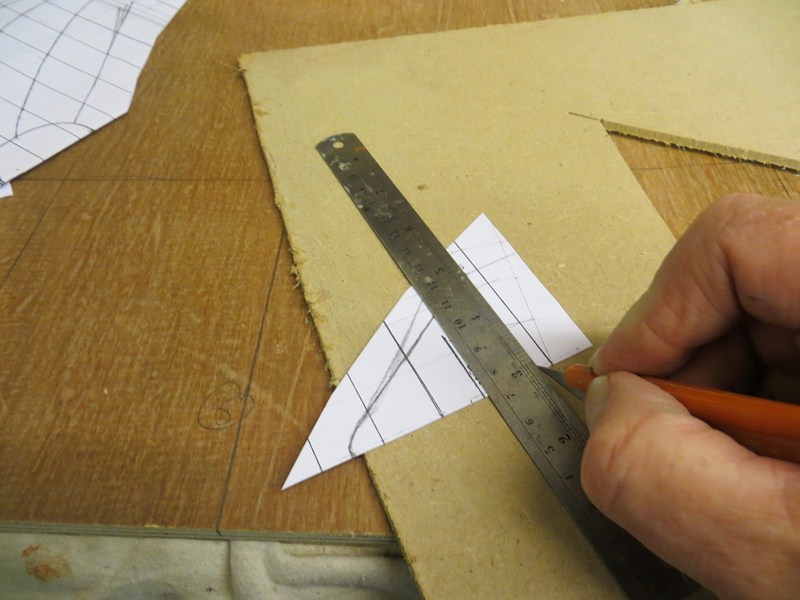   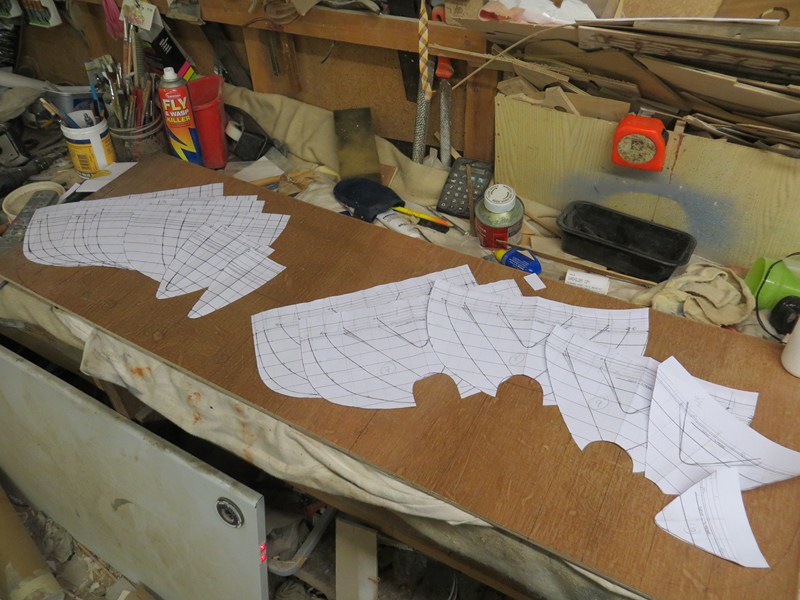 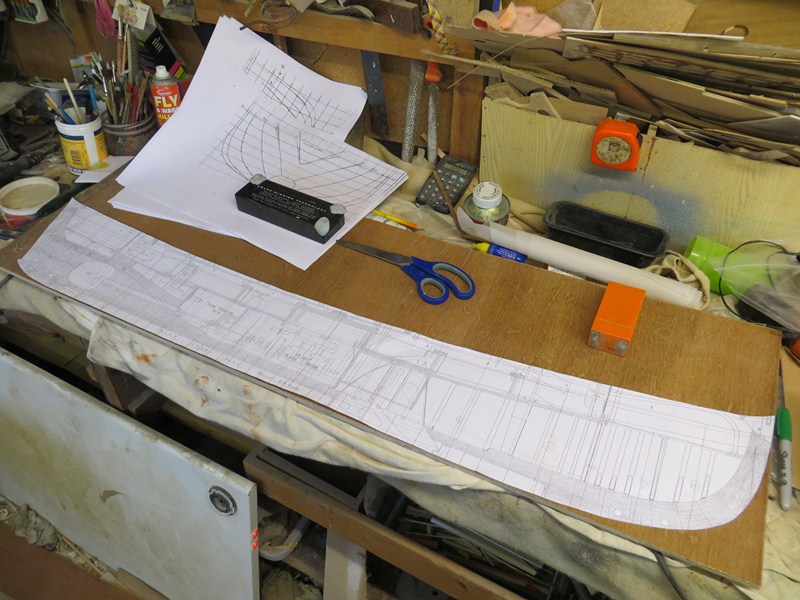 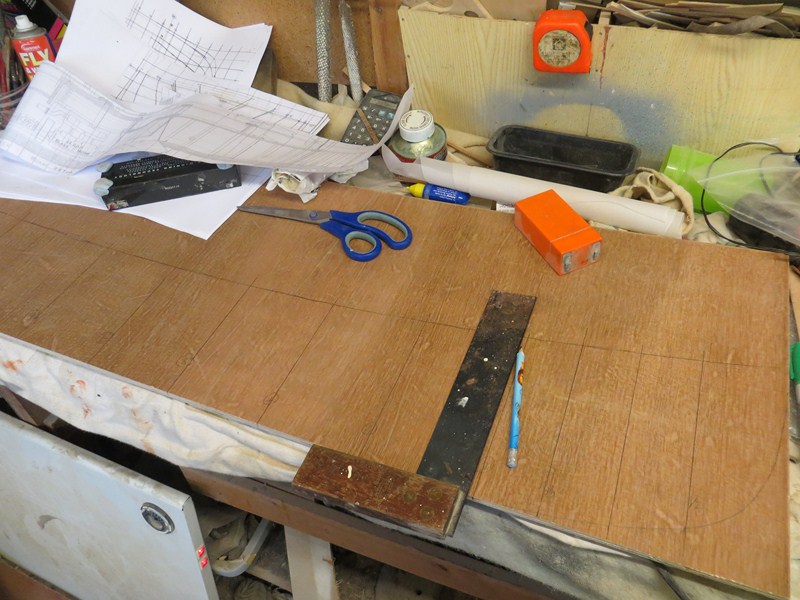 |
|   | | Guest
Guest
 |  Subject: Re: MY NEW PROJECT...or two. Subject: Re: MY NEW PROJECT...or two.  Tue Oct 02, 2012 10:18 pm Tue Oct 02, 2012 10:18 pm | |
| thought I'd post this picture tonight as my good lady has other ideas for me tomorrow and I won't get much modelling done so she tells me..( it's our 25th wedding anniversary tomorrow........so gawd knows what she means,            ) so, got round to cutting out the keel and the frames today. you might notice that the rear end bottom of the keel has been cut out...........this is the area of keel that will house the single propeller and as such is set into a "hole" for want of a better word..... well, this would be very hard to mould into the moulding with grp, and even harder for the builder , should it ever be kitted, to line up from the inside, a hole to drill that would come out dead centre for the prop shaft.............far easier to drill from the outside of the hull, so the aft end of the deadwood and keel can be added with a piece of 9mm ply and faired in with filler to the grp hull once the shaft tlocating hole has been drilled....that's how I did it for the two rudders on the 46' Watsons, and worked perfectly. Tomorrow, ( or when ever i get the chance) I'll cut the slots into the frames and the keel and get the frame ready for attaching to a building board, ready for ( I think but haven't made up my mind yet) a plank on frame hull. 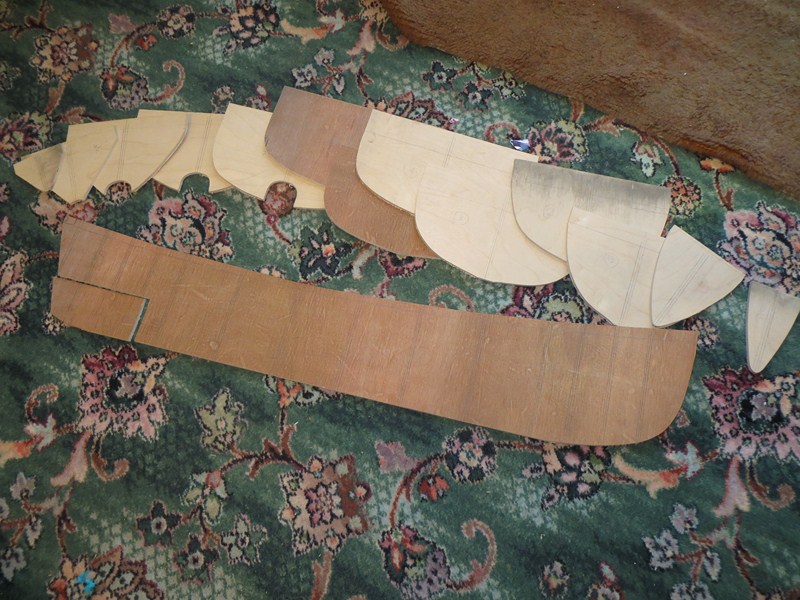 |
|   | | phil winks
Master


Posts : 583
Join date : 2011-06-12
Age : 68
Location : Taunton
 |  Subject: Re: MY NEW PROJECT...or two. Subject: Re: MY NEW PROJECT...or two.  Wed Oct 03, 2012 6:27 pm Wed Oct 03, 2012 6:27 pm | |
| Congrats to you and your good lady on your silver wedding anniversary Neil thats a fair old stint mate | |
|   | | Guest
Guest
 |  Subject: Re: MY NEW PROJECT...or two. Subject: Re: MY NEW PROJECT...or two.  Thu Oct 04, 2012 11:18 am Thu Oct 04, 2012 11:18 am | |
| thanks matey........and we are as happy today as 25 years ago, lol Scratch building is a trial and error thing, especially if you are building to take a mould from the piece being worked on. Don't forget, GRP is not a pliable material, and any bends or stresses in it willl crack and break the mould, especially when you are trying to remove the plug from the mould or a moulding from it, and so, there must be no overhangs, or basically inaccecible areas to lay up, and the easier you can make the mould (and the plug) for moulding the better. I cut out all the frames yesterday evening, and this moring I fitted them to the keel. I found at the stern that the small cuttaway that I had mentioned in an e\arlier post was totally insufficient in one part for me to actually lay up the tunnel area of the boat with the keel section in place, and so this extra area had to be removed, and yet the smaller area that I had removed from the keel earlier had been overdone, and so I had to replace ( or will do once the frames have been glued in place) a small strip to it to mate up with the top of the tunnel section. The whole of this keel section that was removed will be added back to the grp moulded hull, once fabrication has been made and has been drilled for the prop shaft, and then faired in with filler. The bend in the keel will be taken out by fixing 20 x 20 mm pine to the frames and screwing the frames to the building board, shown marked out in the pictures, and all will be straight before planking the hull. 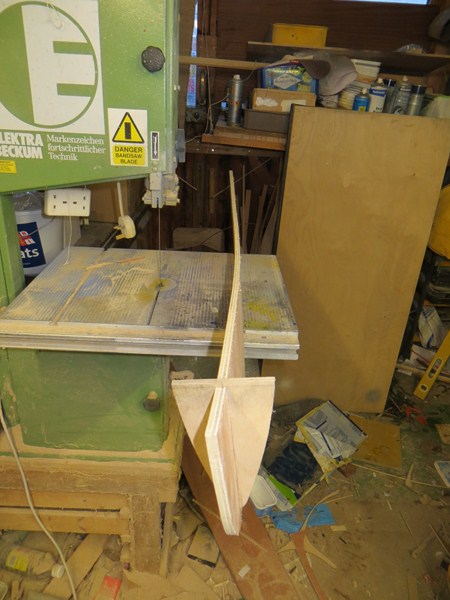      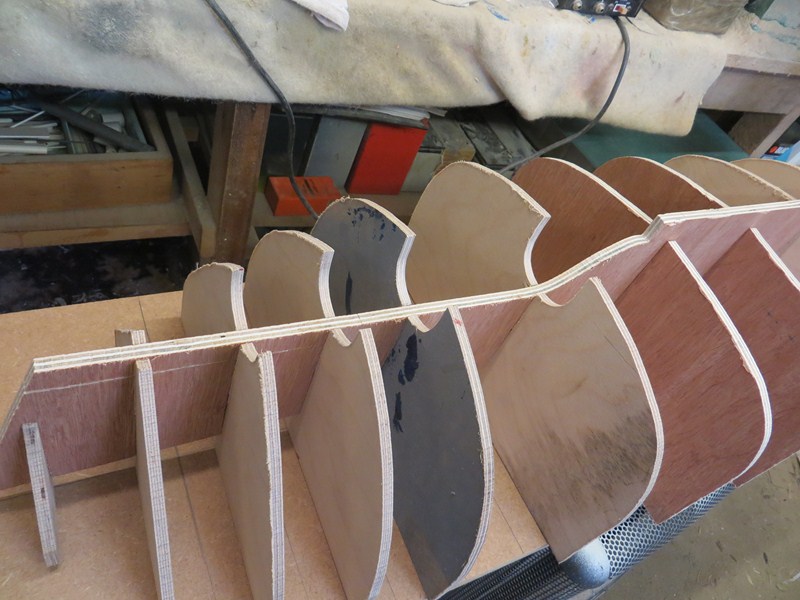   |
|   | | Guest
Guest
 |  Subject: Re: MY NEW PROJECT...or two. Subject: Re: MY NEW PROJECT...or two.  Thu Oct 04, 2012 12:13 pm Thu Oct 04, 2012 12:13 pm | |
| |
|   | | Guest
Guest
 |  Subject: Re: MY NEW PROJECT...or two. Subject: Re: MY NEW PROJECT...or two.  Thu Oct 04, 2012 1:38 pm Thu Oct 04, 2012 1:38 pm | |
| cheers Damien, starting slowly to take shape.
neil. |
|   | | Guest
Guest
 |  Subject: Re: MY NEW PROJECT...or two. Subject: Re: MY NEW PROJECT...or two.  Thu Oct 04, 2012 9:36 pm Thu Oct 04, 2012 9:36 pm | |
| the frames have been glued to the keel now, and the two end framess were fixed with small blocks earlier today to screw to the building board. Once they were set and the blocks screwed to the board, further blocks were glued to the frames.......NO glue allowed onto the bottom faces of the blocks as these need to be removed upon the build being finished. they will be screwed through the bottom of the board tomorrow, and the whole keel straightened up from it's banana like appearance. 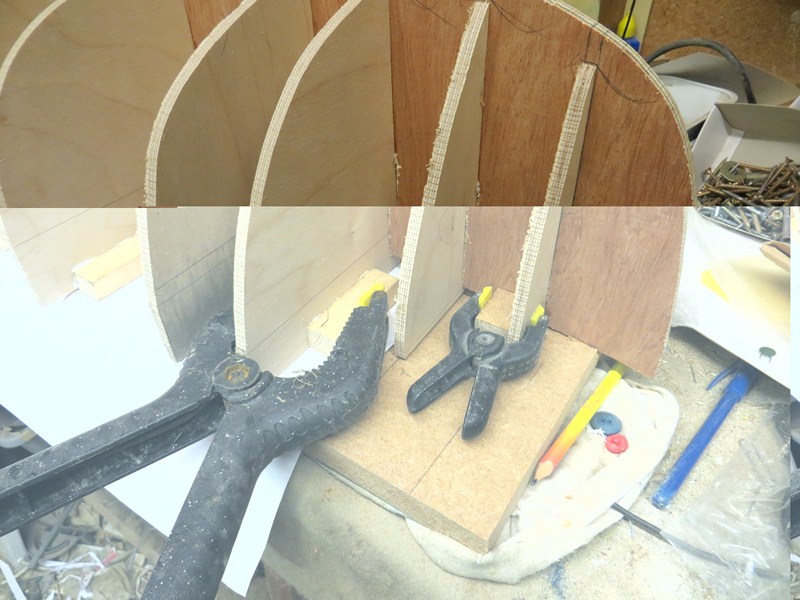 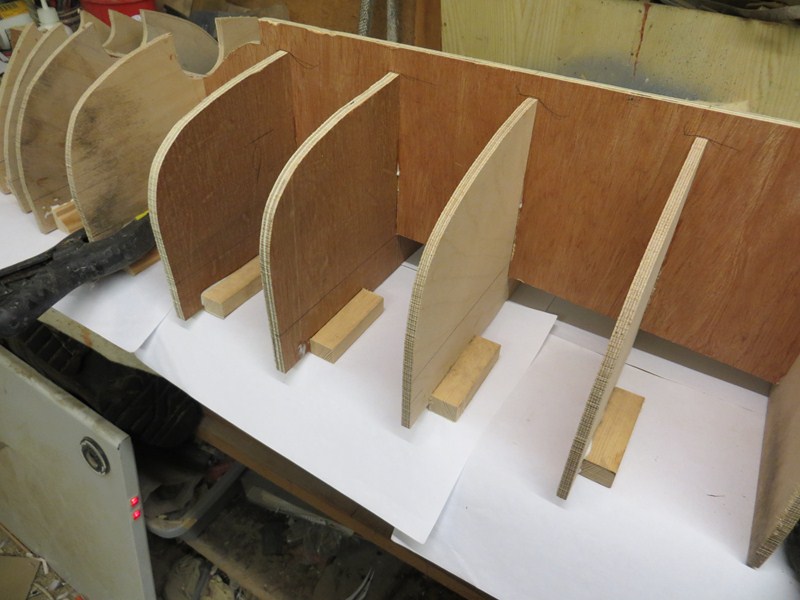 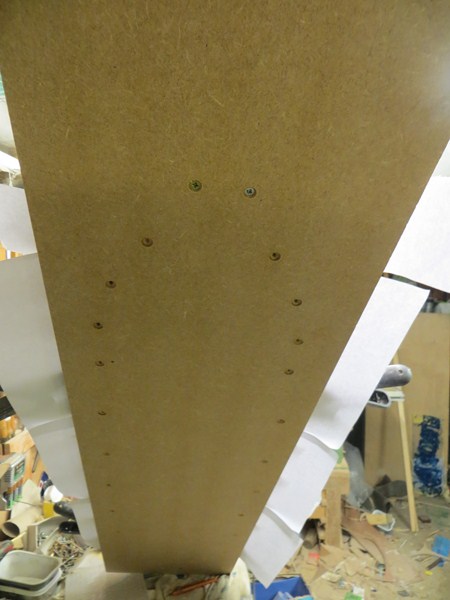 |
|   | | Guest
Guest
 |  Subject: Re: MY NEW PROJECT...or two. Subject: Re: MY NEW PROJECT...or two.  Fri Oct 05, 2012 11:28 am Fri Oct 05, 2012 11:28 am | |
| |
|   | | phil winks
Master


Posts : 583
Join date : 2011-06-12
Age : 68
Location : Taunton
 |  Subject: Re: MY NEW PROJECT...or two. Subject: Re: MY NEW PROJECT...or two.  Fri Oct 05, 2012 6:06 pm Fri Oct 05, 2012 6:06 pm | |
| | |
|   | | Guest
Guest
 |  Subject: Re: MY NEW PROJECT...or two. Subject: Re: MY NEW PROJECT...or two.  Sat Oct 06, 2012 5:39 pm Sat Oct 06, 2012 5:39 pm | |
| well, the first cock up...............I began planking last night, using "0beche.....I think".....from some old venetian blind strips............ Only laid the first two planks close to the keel and gave up.......they were too brittle and wouldn't bend without splitting, so today reverted back to good old birch faced ply. Last night I borrowed a small minicraft circular saw from my mate Rod, but although it cut a few planks, after about 10 of them the motor started to slow down, and so rather than overheat and kernacker it for him, I rigged up my band saw so that the ply ( 1.8mm thick) wouldn't slip under the fence, and cut my planks on that. Next I cut some 3mm square pear from stock and mounted this onto the hull frames at the top line of the sheerline of the boat to give a marker when cutting down to the mould line.......... enough for today, Merlin starts again tonight, and I can't miss that for anything, lol 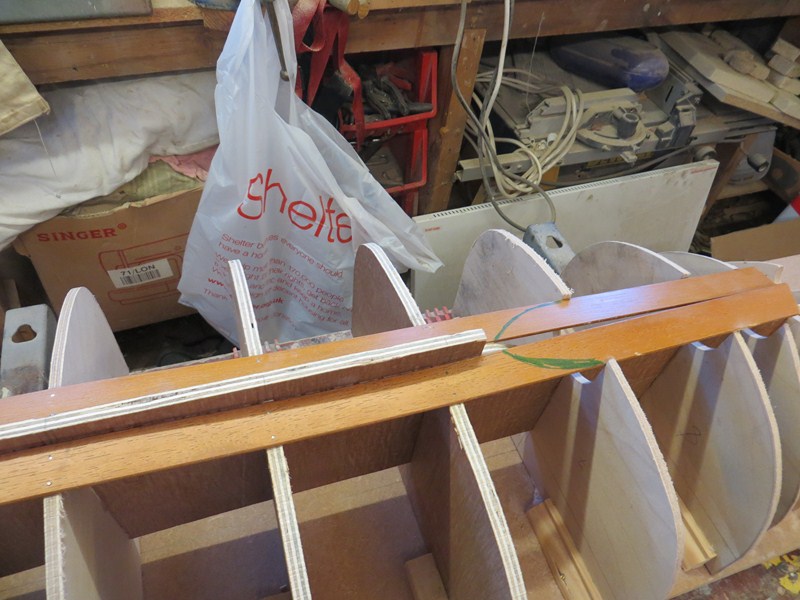 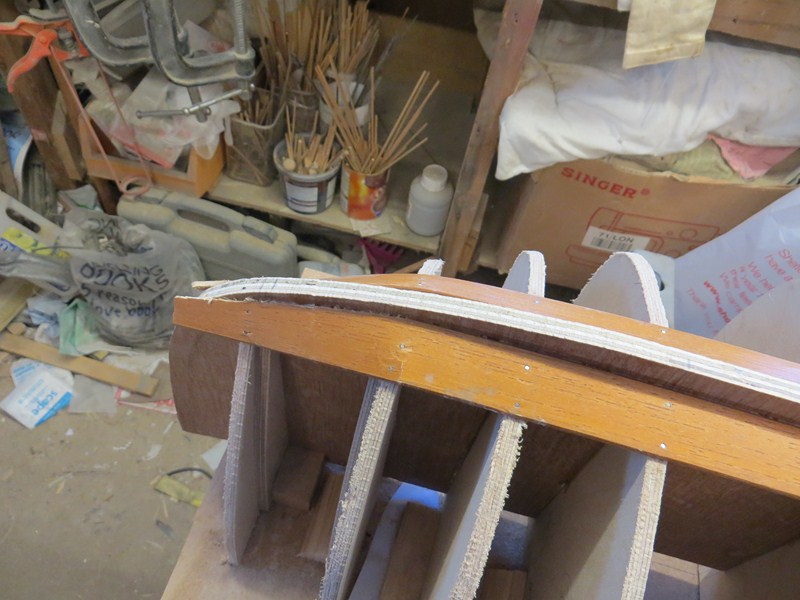 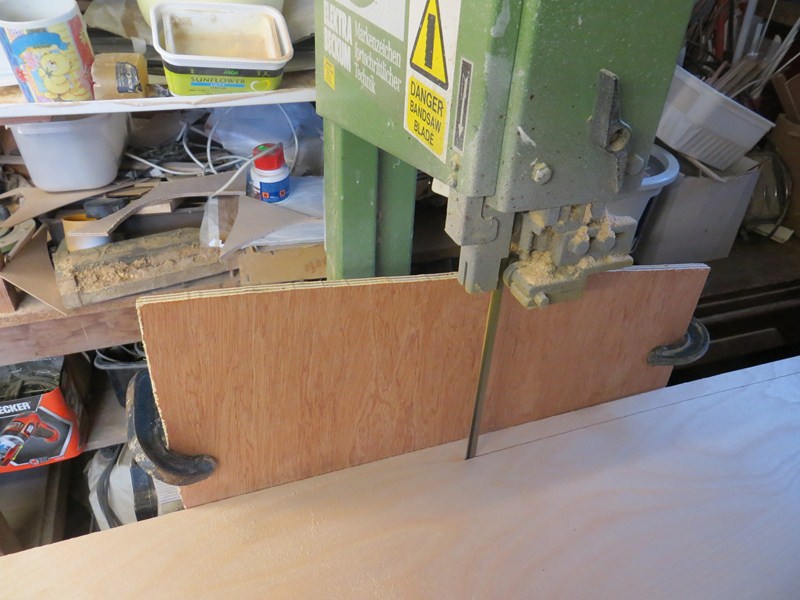 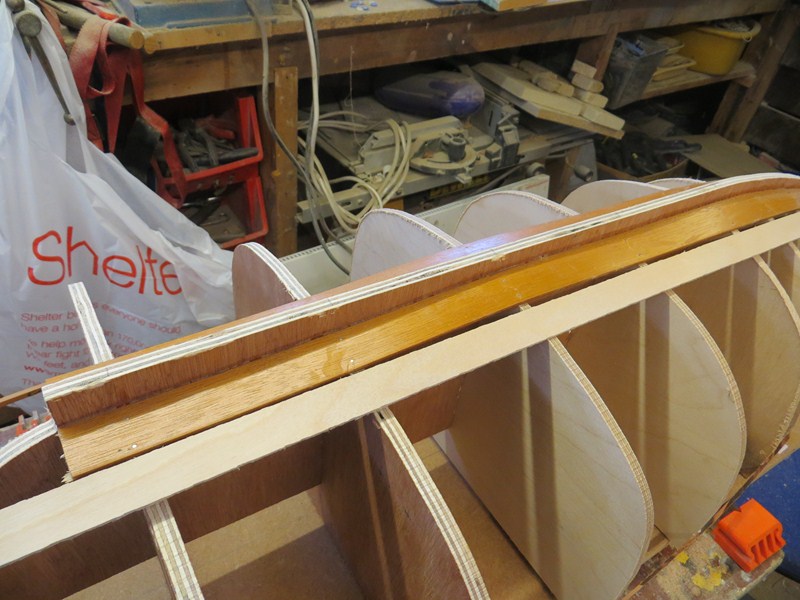 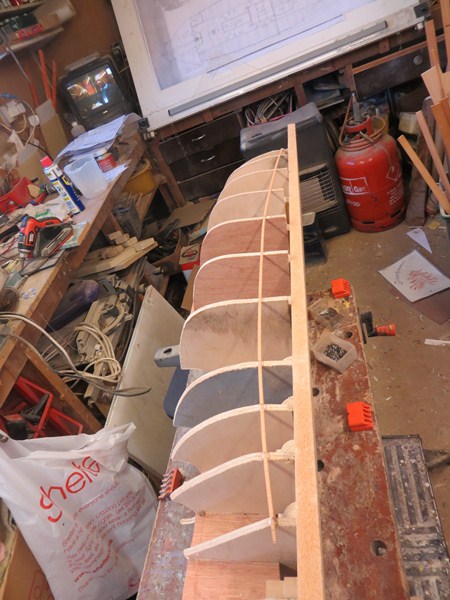 |
|   | | Guest
Guest
 |  Subject: Re: MY NEW PROJECT...or two. Subject: Re: MY NEW PROJECT...or two.  Mon Oct 08, 2012 12:53 pm Mon Oct 08, 2012 12:53 pm | |
| Ever since building my first Billing kit in my late teens I have had a morbid fear of building boat hulls plank on frame, and if anyone has built an early Billing kit with that horrendous mahogany type timber that they used to supply for planking their hulls.....you'll know why, and that is why I NEVER build a POF model anymore.........always resorting to grp for my models. However I have tried many methods of producing a plug including plaster, solid and bread and butter timber hulls, and even framed hulls covered with mesh and then filler, and have always found that basic rough plank on frame hulls, skimmed with polyester filler is the most cost effectiv and quickest method for making a plug. they might not be the prettiest of things I produce,and are full of gaps that you could sail a lifeboat through, and would never win a gong, but I find that once skimmed they come out ok..........so!!! Here is the start of the latest plug with equal planking on each side, tapered at bow and stern to fit in so that once over the round of the bilges, the planks can go on whole and in one length. neil. 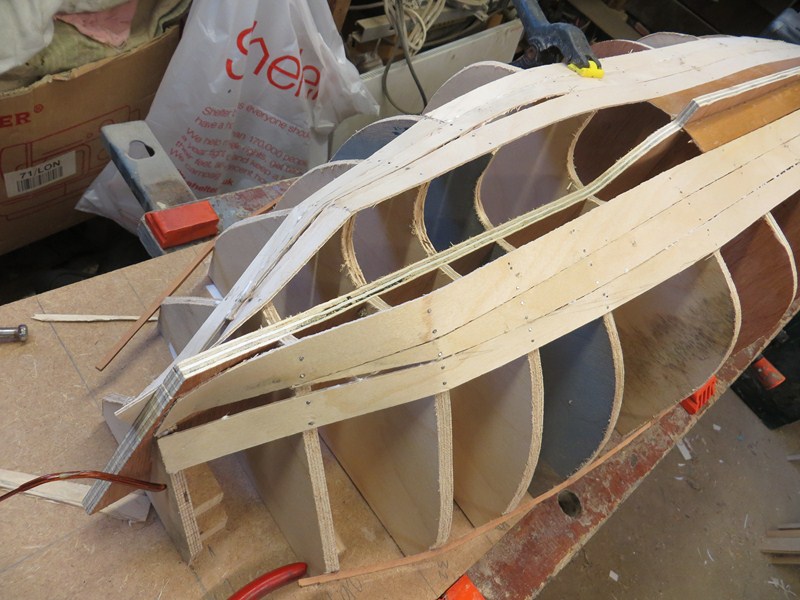 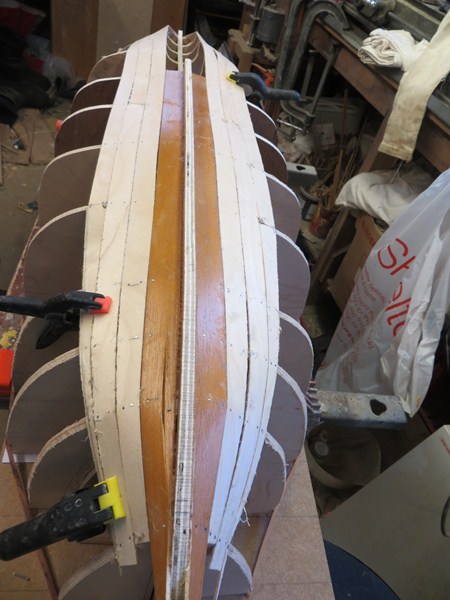 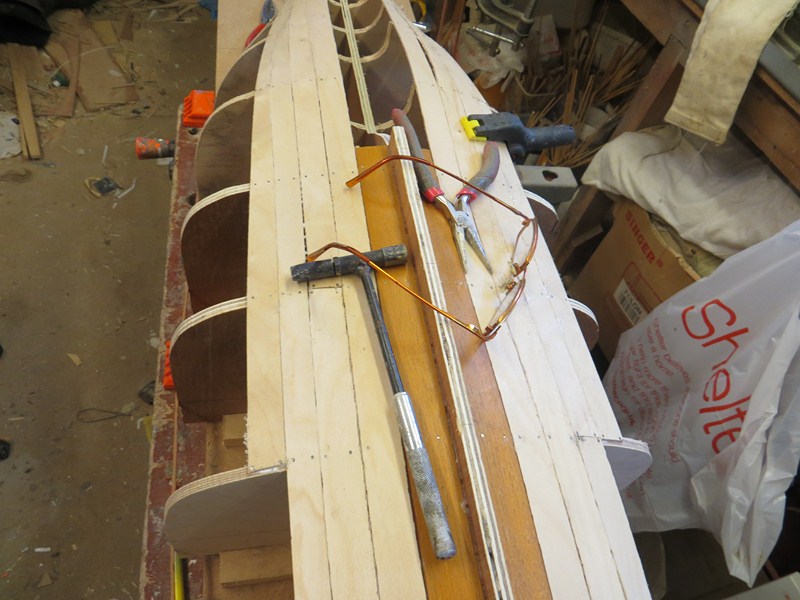 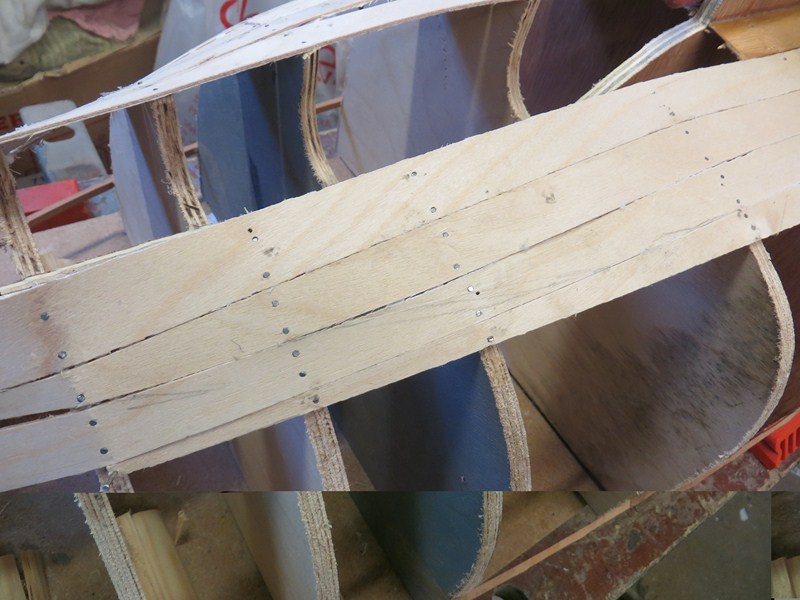 |
|   | | Guest
Guest
 |  Subject: Re: MY NEW PROJECT...or two. Subject: Re: MY NEW PROJECT...or two.  Tue Oct 09, 2012 11:26 am Tue Oct 09, 2012 11:26 am | |
| The hull has now been planked up to the sheer line of the 43' motor sailor lifeboat with the bulwarks to be raised for the pulling saler after I have taken it from the building board..............and what an unholy mess it is too..........I can only put it down to the fact that I had to photo enlarge the lines from a drawing 1.5" x 1" in the first place and then transpose it onto a grid to get the shapes right. the lines are basically correct, but because of the masive enlargement to get them, some dips and bumps are left in the shape and these have manifested when I plank onto them in alsorts of dips and bumps, so much so that a complete skimming of the hull with polyester filler WILL be needed to get a good uniform shape. To help this I have decided to sheathe whole boat first with a layer of surface tissue which I have just gone round to my good mate Trawlerman's for a borrow and laid a sheet over the hull in readyness for taking the resin.This will give a perfect surface for the polyester filler to adhere to. Saves paying for my own, lol Once this has been laid onto the hull I'll block the bow and stern end caps with Obeche and shape to finish along with the filler. You might note that I have cheated on the tunnel at the stern....instead of planking this, I have fashioned the shape with wire gauze mesh and will surface tissue this in place and then skim with filler.........got a little fed up with planking towards the end, and filler will cover a multitude of sins..........got my old MG's to testify to that, lol 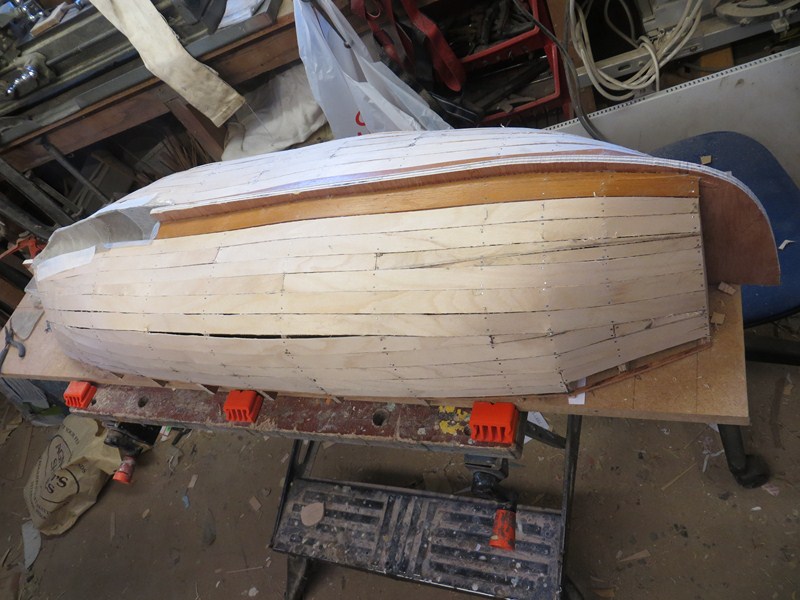 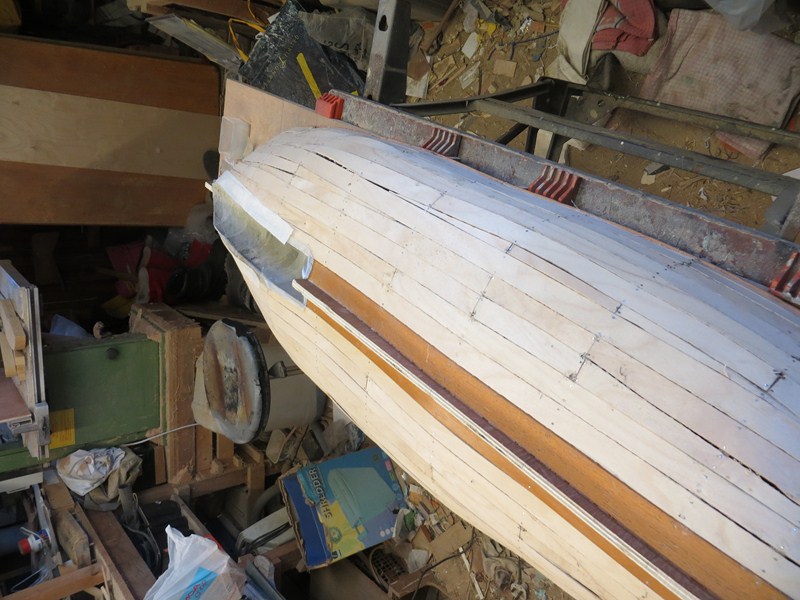 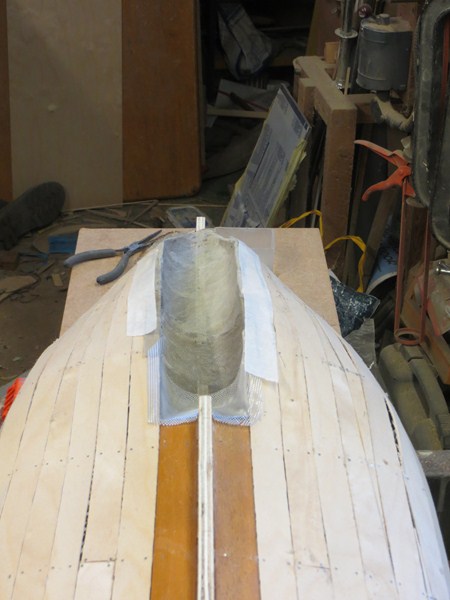  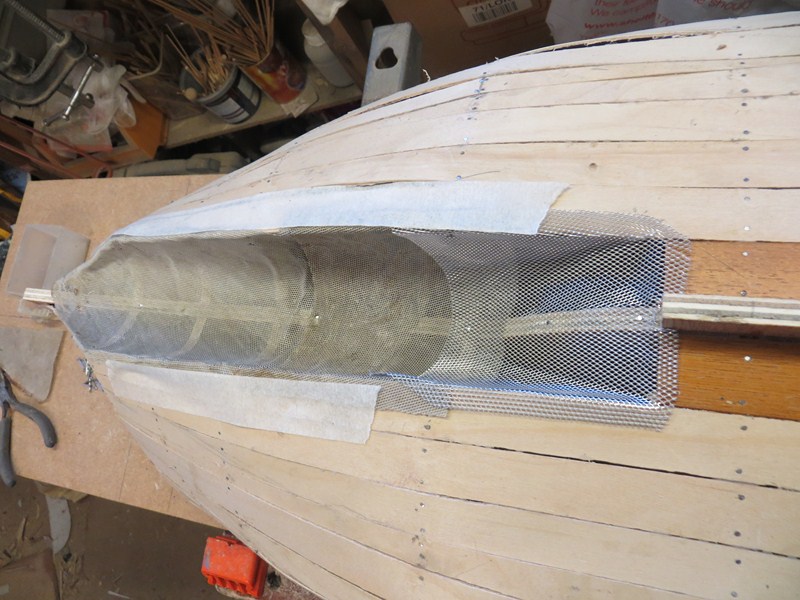 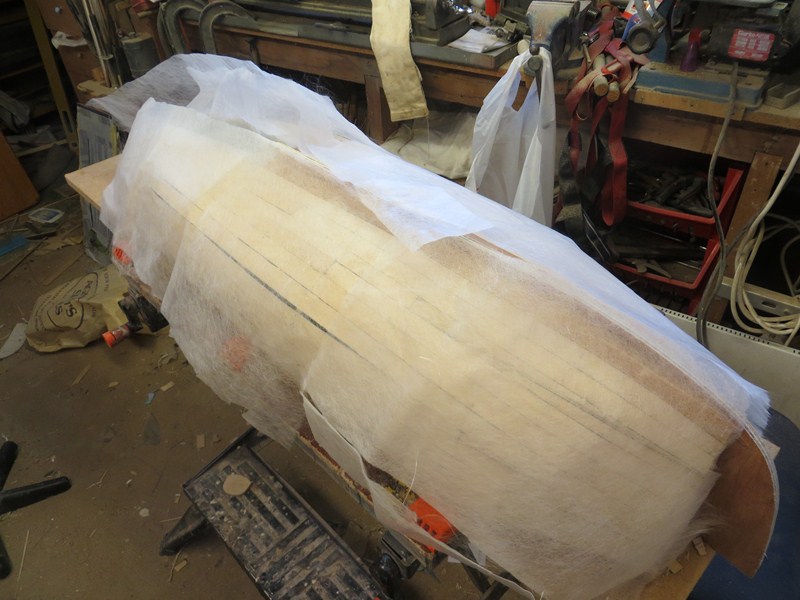 |
|   | | Footski
Master


Posts : 548
Join date : 2011-06-11
Age : 66
Location : Malaga, Spain
 |  Subject: Re: MY NEW PROJECT...or two. Subject: Re: MY NEW PROJECT...or two.  Tue Oct 09, 2012 2:57 pm Tue Oct 09, 2012 2:57 pm | |
| I have to say, I am nervous for you Neil. The last hull I glassed took me an age to get smooth!! | |
|   | | Guest
Guest
 |  Subject: Re: MY NEW PROJECT...or two. Subject: Re: MY NEW PROJECT...or two.  Tue Oct 09, 2012 7:02 pm Tue Oct 09, 2012 7:02 pm | |
| there'll be virtually no glass fabric to see on this hull, as it is so uneven there'll be kilo's of filler smothering it, lol |
|   | | Guest
Guest
 |  Subject: Re: MY NEW PROJECT...or two. Subject: Re: MY NEW PROJECT...or two.  Wed Oct 10, 2012 9:08 pm Wed Oct 10, 2012 9:08 pm | |
| Over the last few days I hit a brick wall, and the hull was so beat up that I lost a little enthusiasm, but as they say He who dares, wins, and so got back onto it yesterday afternoon. Yesterday, amongst all the gloom of what I think is a c*** hull I got round to glassing the surface tissue with polyester resin onto the planking to (not fill) cover the holes in the planking, so that the filler that I was to coat the hull with, wouldn't disappear into the casms of the inner hull. Then last night I added the obeche blocks to bow and stern and filled in between frames above the sheer line strake with a bulwark plank. Although this isn't needed for the motor lifeboat as the bulwarks are set just above the belting a higher bulwark is needed for the pulling and sailing boat Maude Pickup so by fixing this extra plank I can get both hulls out of one mould. This morning I filed down the blocks, bow and stern with a black and decker power file and then went out and bought a 2kilo tub of filler.........hope that will be enough, lol, and this afternoon set about filling the hull. It's amazing how much better it looks and I feel just after a couple of dollops of the stuff have been spread onto the hull, even in it's rough state. I now don't feel to bad tonight and will sleep a little better. 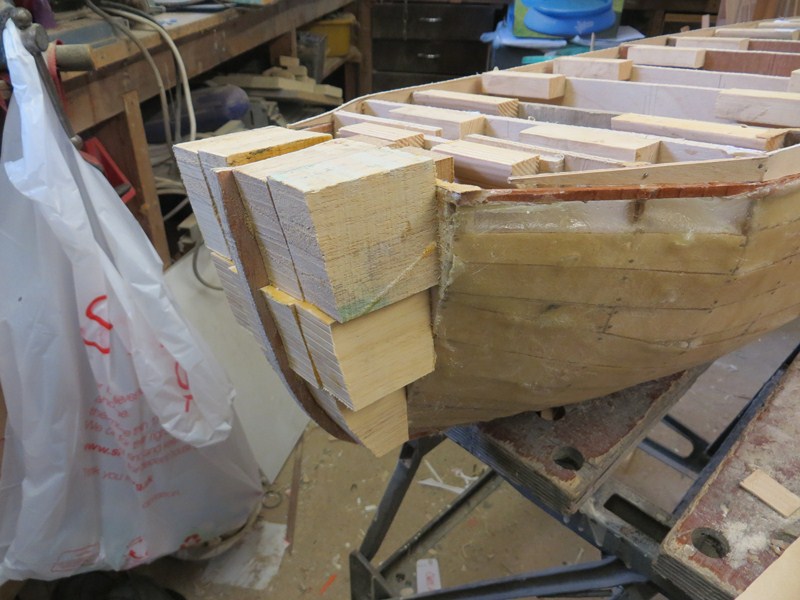 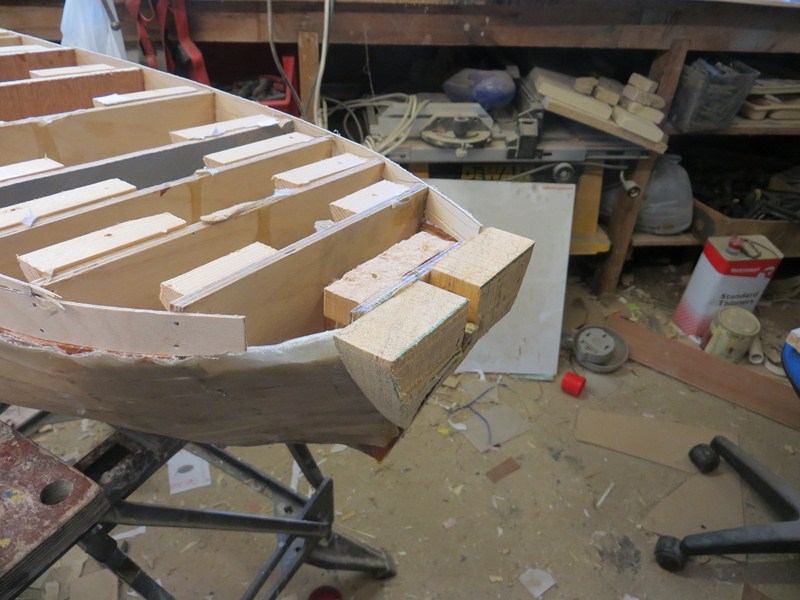      |
|   | | phil winks
Master


Posts : 583
Join date : 2011-06-12
Age : 68
Location : Taunton
 |  Subject: Re: MY NEW PROJECT...or two. Subject: Re: MY NEW PROJECT...or two.  Wed Oct 10, 2012 9:54 pm Wed Oct 10, 2012 9:54 pm | |
| 1st let me say its nice to see this plug taking shape Neil.
As a joiner with not just model pof experience but also some experience building full size. (Albeit small) hullls, both pof and traditional clinker on profiles. I sometimes look at your initial planking and think WHY? lol
But then as you very rightly say its a plug not a hull and as long as its strong enough to pull the mould of without damage to the mould, its a good plug! So keep the faith mate and do your usual excellent job of, 1st the plug then the mould, and finally the hull. I'm now starting to look forward to seeing this develop and can't wait to see you perform your usual magic on the detailing of the finished hull.
| |
|   | | Tug--Kenny
Lost But Never Forgotten R.I.P

Posts : 284
Join date : 2011-06-11
Age : 82
Location : Newport, South Wales,UK
 |  Subject: Re: MY NEW PROJECT...or two. Subject: Re: MY NEW PROJECT...or two.  Thu Oct 11, 2012 11:06 am Thu Oct 11, 2012 11:06 am | |
| Yes, I agree
What a chunky hull so far. My sort of engineering and the best part.
cheers
ken | |
|   | | Footski
Master


Posts : 548
Join date : 2011-06-11
Age : 66
Location : Malaga, Spain
 | |   | | Guest
Guest
 |  Subject: Re: MY NEW PROJECT...or two. Subject: Re: MY NEW PROJECT...or two.  Thu Oct 11, 2012 12:26 pm Thu Oct 11, 2012 12:26 pm | |
| thanks guys......got one side covered now.......what a difference it makes and the lines of the boat as it should be are coming out nicely...........................will do some more this afternoon and then post some pics.
neil. |
|   | | Guest
Guest
 |  Subject: Re: MY NEW PROJECT...or two. Subject: Re: MY NEW PROJECT...or two.  Thu Oct 11, 2012 2:15 pm Thu Oct 11, 2012 2:15 pm | |
| |
|   | | Footski
Master


Posts : 548
Join date : 2011-06-11
Age : 66
Location : Malaga, Spain
 | |   | | Guest
Guest
 |  Subject: Re: MY NEW PROJECT...or two. Subject: Re: MY NEW PROJECT...or two.  Thu Oct 11, 2012 9:26 pm Thu Oct 11, 2012 9:26 pm | |
| |
|   | | phil winks
Master


Posts : 583
Join date : 2011-06-12
Age : 68
Location : Taunton
 |  Subject: Re: MY NEW PROJECT...or two. Subject: Re: MY NEW PROJECT...or two.  Fri Oct 12, 2012 7:05 pm Fri Oct 12, 2012 7:05 pm | |
| With your new sonic sander it should be a breeze Neil  | |
|   | | Sponsored content
 |  Subject: Re: MY NEW PROJECT...or two. Subject: Re: MY NEW PROJECT...or two.  | |
| |
|   | | | | MY NEW PROJECT...or two. |  |
|
Similar topics |  |
|
| | Permissions in this forum: | You cannot reply to topics in this forum
| |
| |
| |
