| | A lifeboat build blog...........How a kit is made! |  |
|
+10tattooed Tug--Kenny scalloway41 phil winks pugwash AlanP HS93 intrepid75 Windy Footski 14 posters |
|
| Author | Message |
|---|
AlanP
Master


Posts : 278
Join date : 2011-06-11
Age : 80
Location : South Cumbria
 |  Subject: Re: A lifeboat build blog...........How a kit is made! Subject: Re: A lifeboat build blog...........How a kit is made!  Tue Feb 07, 2012 2:52 pm Tue Feb 07, 2012 2:52 pm | |
| Very smart Neil  Alan | |
|
  | |
Guest
Guest
 |  Subject: Re: A lifeboat build blog...........How a kit is made! Subject: Re: A lifeboat build blog...........How a kit is made!  Wed Feb 08, 2012 12:30 pm Wed Feb 08, 2012 12:30 pm | |
| Cheers Alan.........they're gaining momentum, lol today was deck fitting...yet again, lol what would I do without old batteries and parcel tape. deck overlays have now been glued to the main decks.just allow it to all dry for the next few hours. before removing all the weights.  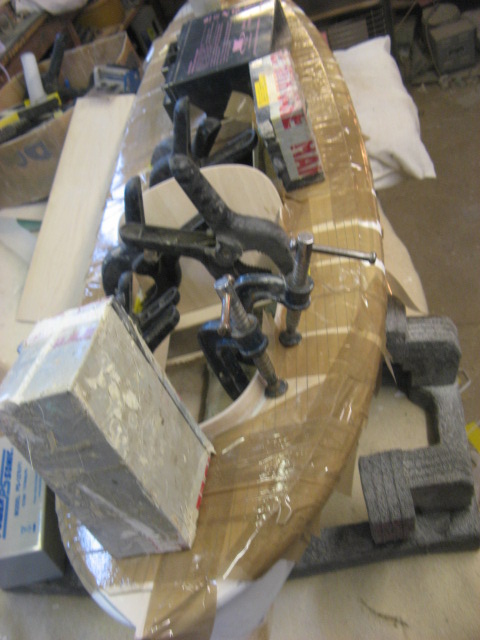 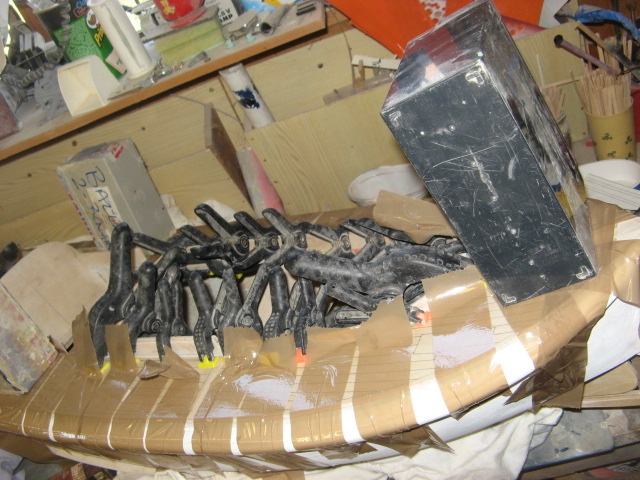 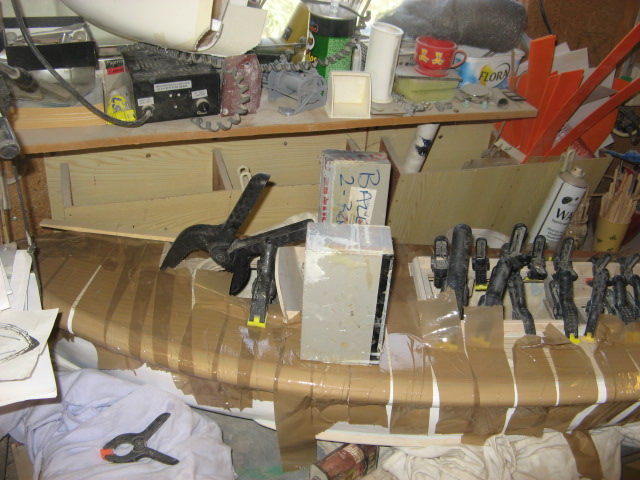  |
|
  | |
HS93
Lost But Never Forgotten R.I.P

Posts : 69
Join date : 2011-06-11
Location : merseyside
 |  Subject: Re: A lifeboat build blog...........How a kit is made! Subject: Re: A lifeboat build blog...........How a kit is made!  Thu Feb 09, 2012 5:05 am Thu Feb 09, 2012 5:05 am | |
| Been there done that , If the glue gets a chance to foam between the to pieces you are Knackerd, you wont get it down , I was glueing 0.005mm fiberglass on top of the lite ply decks , very thin but gives a fantastic finish when painted plus will not ley the ply de laminate if it gets water in . 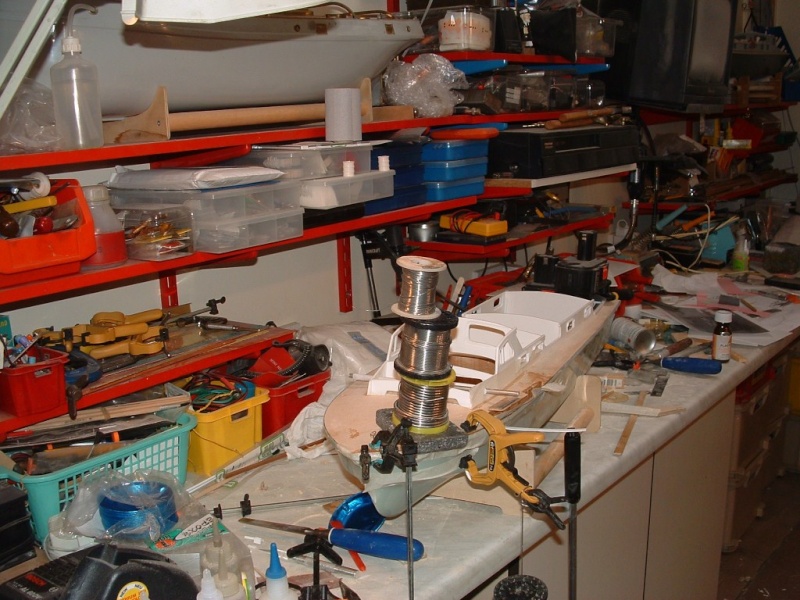 galso ot one of the sanders you bought Neil works great, I needed to remove some 4" x 1" in a cubourd in a tight place so It was an excuse to buy one for modeling , it riped through it very pleased I have to cut some light steel tomorow am going to try it , Peter | |
|
  | |
Guest
Guest
 |  Subject: Re: A lifeboat build blog...........How a kit is made! Subject: Re: A lifeboat build blog...........How a kit is made!  Thu Feb 09, 2012 7:49 am Thu Feb 09, 2012 7:49 am | |
| I'm glad you like it too, Peter......I have to admit for ripping down uneven surfaces, it has got to be the best tool I've ever bought.saved me hours on these builds...they are amazing.
I changed tact on these decks....didn't use gorilla type glue, as I needed more time to get them set, and I found that using a gas fire in my workshop, there was too much moisture in the air, and the gorilla glue was starting to foam before I got them set........so have used Evostick weatherproof white glue to set these.gave me a bit of working time and with decent slide to them. |
|
  | |
HS93
Lost But Never Forgotten R.I.P

Posts : 69
Join date : 2011-06-11
Location : merseyside
 |  Subject: Re: A lifeboat build blog...........How a kit is made! Subject: Re: A lifeboat build blog...........How a kit is made!  Thu Feb 09, 2012 8:00 am Thu Feb 09, 2012 8:00 am | |
| I'm lucky in that I have a 8 foot double rad to heat my room plus a lot of insulation, tends to be like an oven, gas fires tend to efect my sinus . Gorila glue is great but for anyone who hasent used it , squeeze a big dolop on your hands and rub it in....only joking use gloves or you will spend the next two weeks picking it of your hands, I get the blue one's and also use them when turning and milling brass, saves the splinters. I ended up buying a Bosh saw, as axminster had them £20 off and we have one of there stores just up the road, so when the wife goes to M + S she can call in and get me Tools  Peter | |
|
  | |
Guest
Guest
 |  Subject: Re: A lifeboat build blog...........How a kit is made! Subject: Re: A lifeboat build blog...........How a kit is made!  Thu Feb 09, 2012 4:47 pm Thu Feb 09, 2012 4:47 pm | |
| |
|
  | |
Guest
Guest
 |  Subject: Re: A lifeboat build blog...........How a kit is made! Subject: Re: A lifeboat build blog...........How a kit is made!  Sat Feb 11, 2012 7:36 pm Sat Feb 11, 2012 7:36 pm | |
| It's amazing how what looks to be a simple job/task takes so much work and so many attempts are thrown away before you get the pieces to fit just as they should. I thought theat the bow bulwark boards which will eventually incorporate the bow Gobeye and the two Fairleads as shown in the pics. They have to follow the sheer of the boat, and also the curve of the bulwarks whilst standing virtical to the deck. Finally got it right at the second attempt and then tried to "dry" bend one of the boards once cut....it didn't go well.....as I had cut accross the grain, leaving a "short" grain to the timber, and it snapped.......so back to the cutting board and yet another was made. I then decided that it would be easier to pin the boards with 0.5mm brass wire and then glue the piece into the deck with cyano. the fairleads were also glued into the boards to give them strength. The white metal fairleads are generic fittings taken from my fittings bin....and those which were used on the Anne Letita Russell. However they have been re cut to the design used on the other two larger Watson boats of the period. So a shortish job became a longer one than I thought it would.      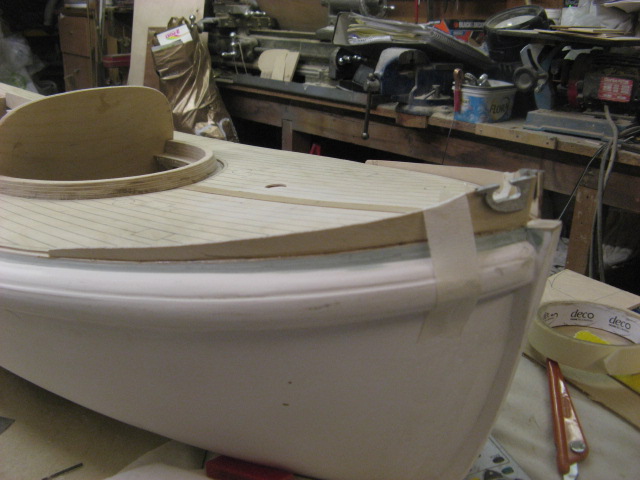 |
|
  | |
Guest
Guest
 |  Subject: Re: A lifeboat build blog...........How a kit is made! Subject: Re: A lifeboat build blog...........How a kit is made!  Sun Feb 12, 2012 11:23 am Sun Feb 12, 2012 11:23 am | |
| Plans can be wrong!!!! It's always wise when building from scratch to check ALL information before blundering on in your own little world of conceit and self importance. |I thought that by following the plans for the only one of two of the boats produced that the boat would be built as planned........ I spent time making the bow bulwark boards for the Field marshall and Mrs Smuts yesterday, glued them on and ONLY THEN did I look at the photos that I have of her............only to my annoyance that I had made them far too long, so I then checked the photos of the other Watson H F Bailey, which were the same on plans.....only to find that the photos showed that they too, were wrong..............so this morning, both boats will have the snip......and they should look something like this. the moral of the story is.........always check all forms of information before going further.  |
|
  | |
Footski
Master


Posts : 548
Join date : 2011-06-11
Age : 66
Location : Malaga, Spain
 |  Subject: Re: A lifeboat build blog...........How a kit is made! Subject: Re: A lifeboat build blog...........How a kit is made!  Sun Feb 12, 2012 12:13 pm Sun Feb 12, 2012 12:13 pm | |
| It makes us mortals feel better to know that even the experts get it wrong..  | |
|
  | |
Guest
Guest
 |  Subject: Re: A lifeboat build blog...........How a kit is made! Subject: Re: A lifeboat build blog...........How a kit is made!  Sun Feb 12, 2012 1:01 pm Sun Feb 12, 2012 1:01 pm | |
| plenty of c*** ups with me, barry....just don't tell them all.the build log would be twice as long, lol |
|
  | |
Guest
Guest
 |  Subject: Re: A lifeboat build blog...........How a kit is made! Subject: Re: A lifeboat build blog...........How a kit is made!  Sun Feb 12, 2012 7:50 pm Sun Feb 12, 2012 7:50 pm | |
| well, after the cock up last night of the bow bulwark boards, I set too and decided to look at the photos of the models I am building rather than use my imagination...so after much trimming marking and cutting of the pieces of 1.8 ply to conform to the sheer of the boat I was able to cut the six pieces thsat make up the curves of the kick boards lodged between the fairleads down the length of the boat. the sections for the other two boats will be different and so the whole process will begin again tomorrow. the kick boards are held in place onto the decks using pins made from 0.5mm brass rod drilled into the kick boards carefully and then will be cyano'd to the decks once other bits have been painted.   |
|
  | |
Guest
Guest
 |  Subject: Re: A lifeboat build blog...........How a kit is made! Subject: Re: A lifeboat build blog...........How a kit is made!  Mon Feb 13, 2012 8:52 pm Mon Feb 13, 2012 8:52 pm | |
| Today was the turn of the Field Marshall and Mrs Smuts for the kick boards. However, unlike the H F Bailey where there are broken runs along the length of the deck with this boat, it is a continuous run virtually from bow to stern. On the real boats the length would have been sections of plank scarfed together in a longitudinal joint..........but as I am working with 1.8mm ply, I didn't fancy that so one length it is. It was a little problamatic getting the correct sheer line to the deck cut, but with a little sanding and cutting it was achieved. On the fm & ms there is a gap at the bow end of the main longitudinal boards, port and sarboard, which on the boat is filled with a short length, recessed and fastened to the inside of the bow bulwark boards and the main kick board. thesae are shown on the first photo. The planks were then transfered to draughting paper for later screen printing and then pinned in the same manner as the bow bulwark boards..    |
|
  | |
Guest
Guest
 |  Subject: Re: A lifeboat build blog...........How a kit is made! Subject: Re: A lifeboat build blog...........How a kit is made!  Tue Feb 14, 2012 7:39 pm Tue Feb 14, 2012 7:39 pm | |
| |
|
  | |
Footski
Master


Posts : 548
Join date : 2011-06-11
Age : 66
Location : Malaga, Spain
 |  Subject: Re: A lifeboat build blog...........How a kit is made! Subject: Re: A lifeboat build blog...........How a kit is made!  Tue Feb 14, 2012 10:00 pm Tue Feb 14, 2012 10:00 pm | |
| Magnificent....  | |
|
  | |
Guest
Guest
 |  Subject: Re: A lifeboat build blog...........How a kit is made! Subject: Re: A lifeboat build blog...........How a kit is made!  Tue Feb 14, 2012 10:07 pm Tue Feb 14, 2012 10:07 pm | |
| thanks Barry.....they are getting there, slowly and surely.
neil. |
|
  | |
Guest
Guest
 |  Subject: Re: A lifeboat build blog...........How a kit is made! Subject: Re: A lifeboat build blog...........How a kit is made!  Thu Feb 16, 2012 9:54 pm Thu Feb 16, 2012 9:54 pm | |
| Someone asked me by pm on another forum exactly how I pinned the 1.8mm ply with a brass pin so thought I'd put it on here for those with a steady hand. I first used a tool (really it's a bit like the old bradawl for making holes to start a screw off).that I confiscated from a child one day who was throwing it at a bunch of other kids.............lethal thing but it has come in very handy. the steel tip is ground to a point, and I use this on the end grain to make a dimple into the ply. once the dimple has been made, the very fine 0.5mm drill bit will not slide around on top, and can be drilled into the end grain of the ply to a depth of around 5mm.... make sure that you drill slowly and keep both the timber and the drill bit ( mounted into a dremmell drill) vertically. finally cut some lengths of 0.5mm brass rod for the pins, put a little cyano onto a block of scrap timber and dab the ends of the pins into the cyano before inserting into the predrilled holes. finally using a guideline for the centre of the kickboard position, mark off the positions of the pins in the kick boards, 3 at a time from one end, and just set the kickboards into those holes, before proceeding onto the next three hols in turn......a slow but sure process, that needs to have a firm hold for the kick boards, as these boards will, although bracketted with white metal brackets of those fitted to the Anne Letitia Russell, will need to be sturdy as they will also carry the brackets for the white metal stanchions and cleets/anchors etc. they will eventually be painted and set in position with cyano once the hulls have been painted. 1. The first pic shows the tip of the "bradawl" with the indentation just to the right of the tip 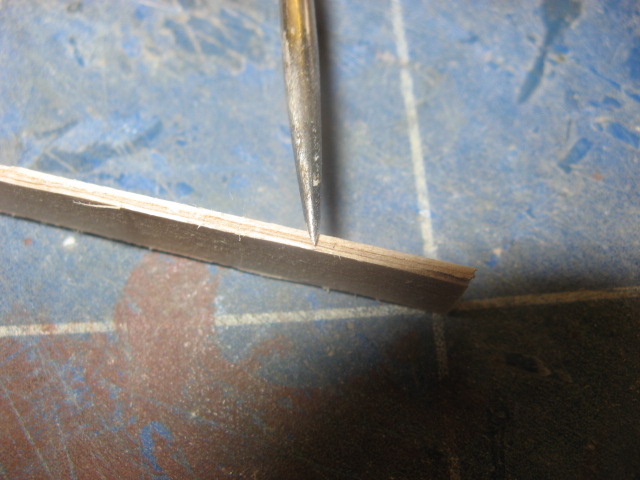 2. Next is the drill bit going into the end grain of the 1.8mm timber....a steady hand needed 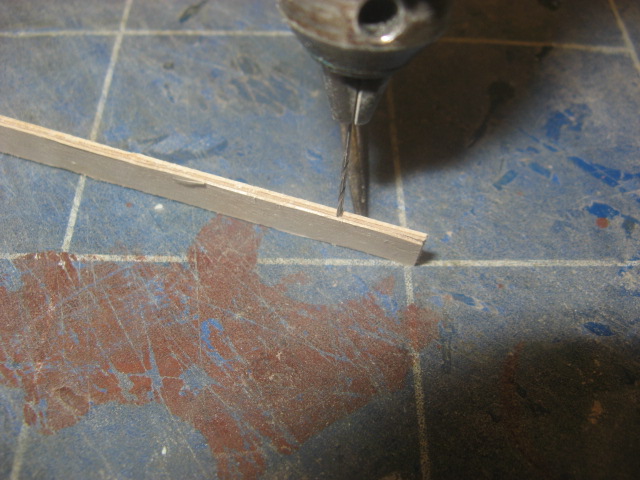 3. The pins have been set into the timber  4. The pin positions have been marked on the deck and drilled.  5. The kick boards set into position and the kick board brackets added.  . |
|
  | |
AlanP
Master


Posts : 278
Join date : 2011-06-11
Age : 80
Location : South Cumbria
 |  Subject: Re: A lifeboat build blog...........How a kit is made! Subject: Re: A lifeboat build blog...........How a kit is made!  Thu Feb 16, 2012 10:19 pm Thu Feb 16, 2012 10:19 pm | |
| Nice Neil, very nice. So, how many drills do you break  Alan | |
|
  | |
Guest
Guest
 |  Subject: Re: A lifeboat build blog...........How a kit is made! Subject: Re: A lifeboat build blog...........How a kit is made!  Thu Feb 16, 2012 10:24 pm Thu Feb 16, 2012 10:24 pm | |
| believe it or not alan........only 2.........mind you I've a packet full of them somewhere as spares...........and like everything else in my shed of sheds.......can't find em........so hanging on to this las one very carefully, lol |
|
  | |
Guest
Guest
 |  Subject: Re: A lifeboat build blog...........How a kit is made! Subject: Re: A lifeboat build blog...........How a kit is made!  Fri Feb 17, 2012 9:33 pm Fri Feb 17, 2012 9:33 pm | |
| Today I did very little except to "cobble " up the surrounds for the bow gobeye fairlead. It is the fairlead that ropes would be passed through for such practices as veering down on a casualty and as such is quite a heafty fitting made from bronze in real life.....but here it is a generic fitting with the Anne Letitia Russell, however it will have to be modified before it is finally set into place, and also the whole assembly will be filled and faired in to make a smooth entity in it's own right before passing "muster" 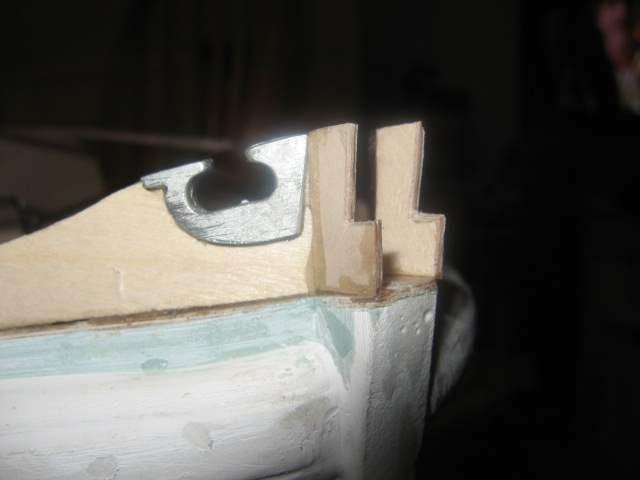 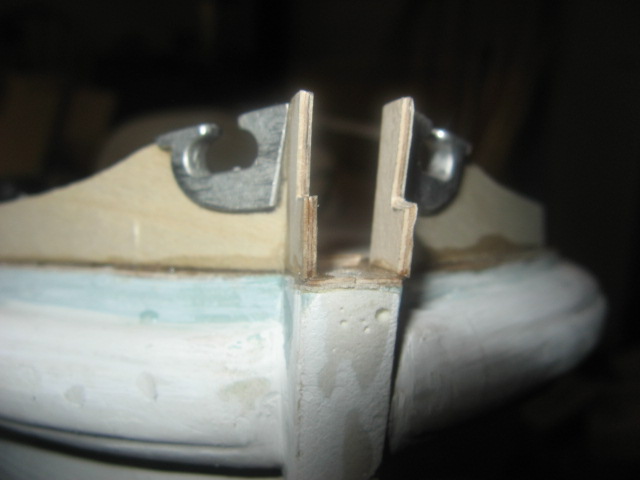 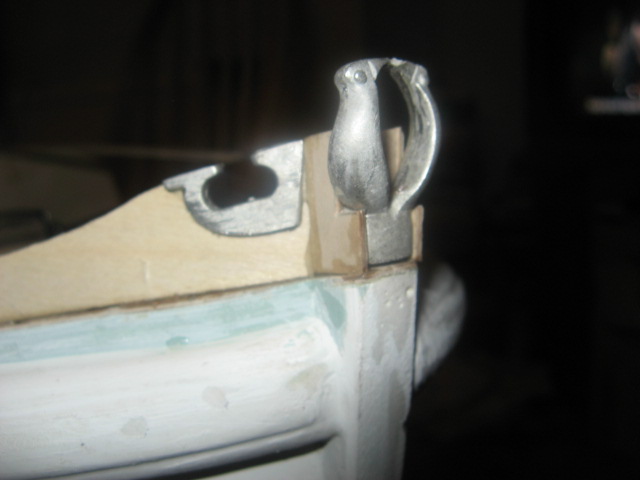  . |
|
  | |
Guest
Guest
 |  Subject: Re: A lifeboat build blog...........How a kit is made! Subject: Re: A lifeboat build blog...........How a kit is made!  Sun Feb 19, 2012 9:41 pm Sun Feb 19, 2012 9:41 pm | |
| today, been cleaning up the edges of the printed decks to the kick boards and readying them for the kickboard brackets..........also been making up the bow fairlead for the Mary Stanford. unlike the two Watsons which have a white metal fitting, the M.S. is just made up from two printed pieces of 1.8mm ply with a final addition of a bow roller ( not yet fitted) inbetween the two upright flanges of the fairlead. Also I have been filling the small gaps between the edges of the deck overlays ready for spraying the areas of none slip grey onto the decks and gunwales before also painting the kick boards and finally the decks. for filling these small gaps I use knifing putty from any car accessory shop, which is cellulose based and covers light scratches and gaps well. tomorrow's job will be to sand down and fair in with milliput , the white metal fairleads, the Mary Stanford fairlead and the decks,and then adding a few brackets and such for the fenders, grab ropes and rudder before possibly painting the hulls later this week.   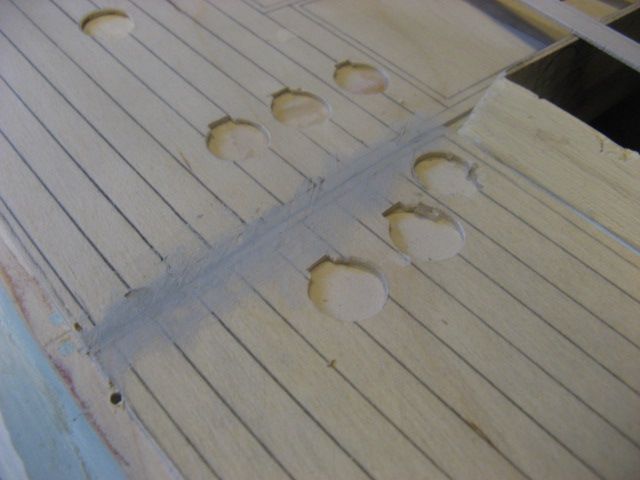  . |
|
  | |
Guest
Guest
 |  Subject: Re: A lifeboat build blog...........How a kit is made! Subject: Re: A lifeboat build blog...........How a kit is made!  Mon Feb 20, 2012 10:34 pm Mon Feb 20, 2012 10:34 pm | |
| you would not believe how long it has taken today, just to mask up the decks of three models ready for spraying the antislip areas to the decks, and the deck surrounds..........just unbeleivable, but now it's done, some colour on the models will encourage me to get on with the topside cabins and detailing. I sprayed the antislip to the parts of the deck needed with a textured paint which dries with a gritty type look, and although not the colour I need for a classic lifeboat, the texture isn't far from what I need, so, not being a true purist, I'll settle for it, with a colour wash later to the lighter grey that I want to match the kick boards. Masking up.  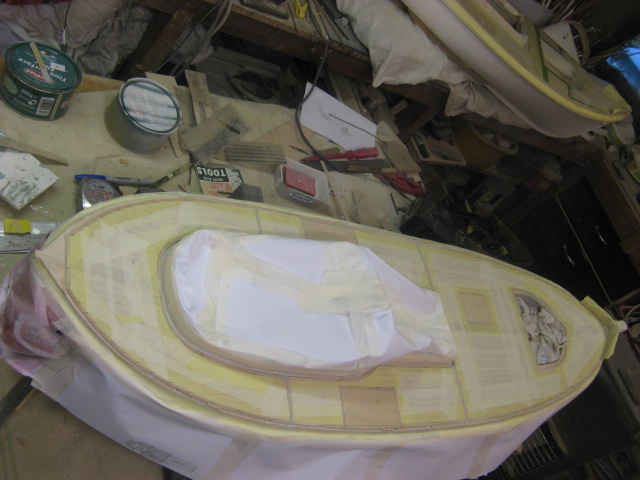 the inner parts of the front cabins of the H F Bailey and the Mary Stanford posed a little dilemma as I had no combings to stick the tape too......so I coated the inner walls with masking tape and then shoved an old rag into the well to cover the floors.....hope it works, lol 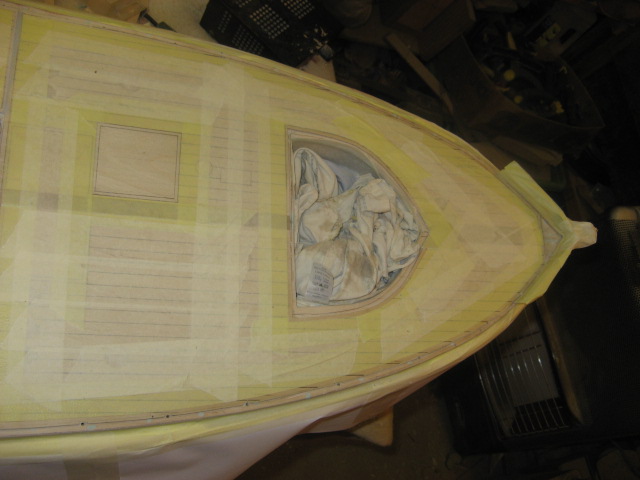  And before I sprayed the textured paint which would almost certainly bung up the small 0.5mm holes that I had drilled to take the pins for the kick boards I inserted some longer brass rod into the start and finish holes to locate the kick boards once the paint had dried. 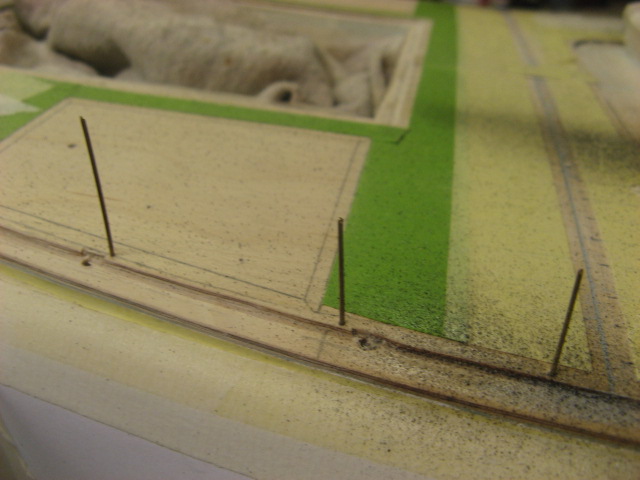 And then using the textured paint and here is a picture of the textured paint can I use for the none slip deck coatings I did a little shaking and then got down to the serious stuff, and added my first colour. OOOOHHH.can feel the sap rising, lol 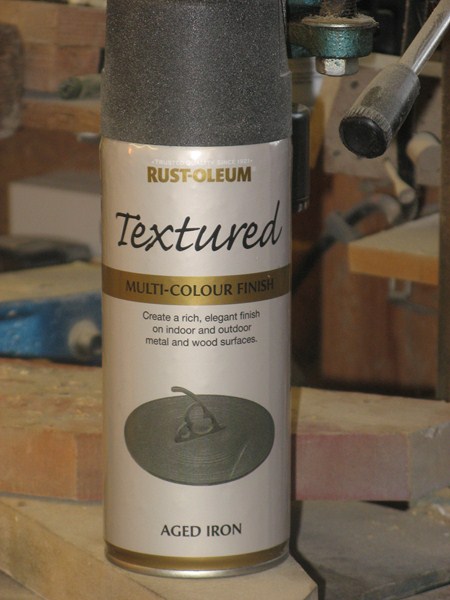 With the end result.    . |
|
  | |
Footski
Master


Posts : 548
Join date : 2011-06-11
Age : 66
Location : Malaga, Spain
 | |
  | |
Guest
Guest
 |  Subject: Re: A lifeboat build blog...........How a kit is made! Subject: Re: A lifeboat build blog...........How a kit is made!  Tue Feb 21, 2012 8:25 am Tue Feb 21, 2012 8:25 am | |
| |
|
  | |
Footski
Master


Posts : 548
Join date : 2011-06-11
Age : 66
Location : Malaga, Spain
 |  Subject: Re: A lifeboat build blog...........How a kit is made! Subject: Re: A lifeboat build blog...........How a kit is made!  Tue Feb 21, 2012 11:12 am Tue Feb 21, 2012 11:12 am | |
| You have to peel all that tape off and hope it did its job....I know I am always nervous when removing masking tape... | |
|
  | |
Guest
Guest
 |  Subject: Re: A lifeboat build blog...........How a kit is made! Subject: Re: A lifeboat build blog...........How a kit is made!  Tue Feb 21, 2012 11:24 am Tue Feb 21, 2012 11:24 am | |
| yeh, but the excitement when it goes well, lol....mind you.......I've had some incredible disasters over the years, lol |
|
  | |
Guest
Guest
 |  Subject: Re: A lifeboat build blog...........How a kit is made! Subject: Re: A lifeboat build blog...........How a kit is made!  Tue Feb 21, 2012 9:32 pm Tue Feb 21, 2012 9:32 pm | |
| today's job, after clearing a little space for working on the 3 boats was to seal the kickboards with cellulose sanding sealer.....3 coats were given and then rubbed down with fine grade wire wool. Finally I painted them with humbrol enamels.the mary Stanford and the field Marshall and Mrs Smuts were painted a light shade of matt brown tan. (which will be given a coat of satin varnish later)......whilst the H F Bailey boards were painted in a mid satin grey.     . |
|
  | |
Guest
Guest
 |  Subject: Re: A lifeboat build blog...........How a kit is made! Subject: Re: A lifeboat build blog...........How a kit is made!  Tue Feb 21, 2012 10:01 pm Tue Feb 21, 2012 10:01 pm | |
| also whilst I was looking at the paint drying........very theraputic and avoids boredom, I dug out some pieces that I had made some time ago for the boats to see if they were still there and not lost.........luckily I had made double sets for both the watson and the Barnett class boats, and as the watson has changed in design for the second boat somewhat, I was lucky in that I had only lost one piece which was nort needed on the second boat.......the pieces........oh yes..........the timber gratings for the bottom of the floor for the well decks. The original 5mm square grating was made as an A4 sheet for me by a mate in his woodworking shop where he had access to a radial arm cross cut saw.we riged a jig to lock into each spur in turn to make the grating "teath" (The crossed halving joints that make up the joints) absolutely square and interlocking into the cross members. It was a fete of woodworking and took hours to cut..........we used Obeche to make it, and I was going to use it on a 1:12 scale model of the Duke of Northumberland water jet drive lifeboat of 1886 vintage. However after producing a mould and a hull for the boat about 18 years ago I lost interest and my mate dumped the mould and moulding, so the only thing that ever got made for that lifeboat was the grating.......so it came in very usefull for the new boats, being the same scale. I cut sections off the A4 sheet and then edged it with some mahogany "L" shaped banding that I made, also from two pieces of timber. the smaller section gratings are for another section of the boat and were bought from an ebay supplier. They will eventually be varnished with a gloss finish ( possibly satin.............yet to decide). The last of my A4 sheet of grating. 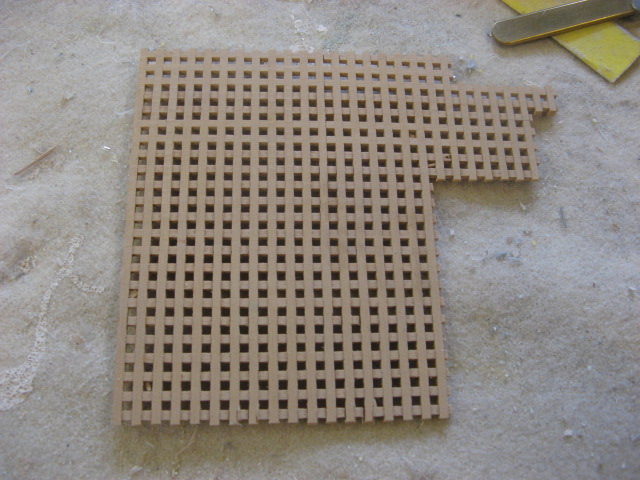 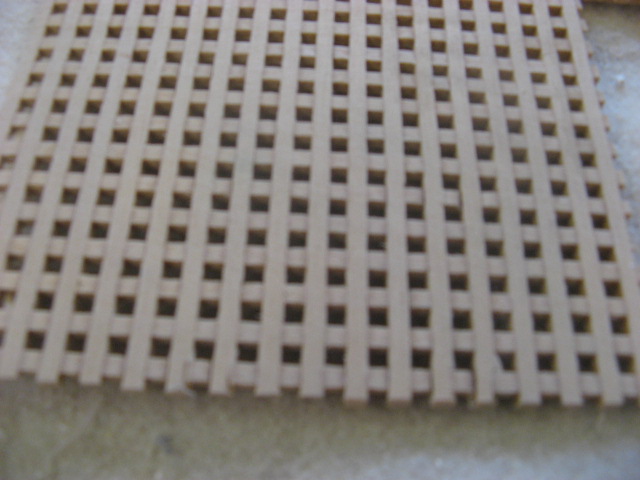 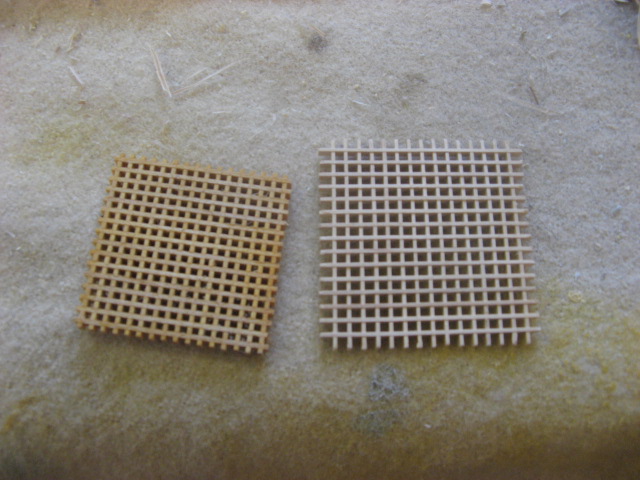   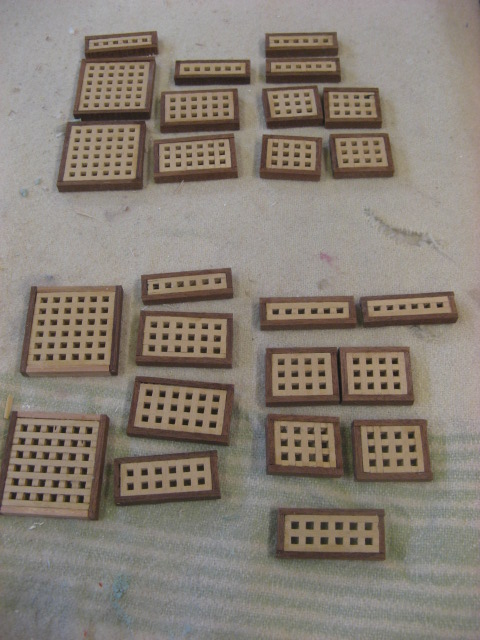  . |
|
  | |
Guest
Guest
 |  Subject: Re: A lifeboat build blog...........How a kit is made! Subject: Re: A lifeboat build blog...........How a kit is made!  Wed Feb 22, 2012 11:33 am Wed Feb 22, 2012 11:33 am | |
| |
|
  | |
HS93
Lost But Never Forgotten R.I.P

Posts : 69
Join date : 2011-06-11
Location : merseyside
 |  Subject: Re: A lifeboat build blog...........How a kit is made! Subject: Re: A lifeboat build blog...........How a kit is made!  Wed Feb 22, 2012 4:47 pm Wed Feb 22, 2012 4:47 pm | |
| there looking great , dont you get a day off ?
by the way where do you get the A4 size grating or did I read it wrong
by the way what are you going to power them with ?
Peter | |
|
  | |
Guest
Guest
 |  Subject: Re: A lifeboat build blog...........How a kit is made! Subject: Re: A lifeboat build blog...........How a kit is made!  Wed Feb 22, 2012 7:44 pm Wed Feb 22, 2012 7:44 pm | |
| Hi Peter.....the A4 grating.....me and a mate madeit on a radial arm say....mounted a blade in it, checked the width of cut and then we cut a thin plank of Obeche....thicknessed it on his thicknesser/planer to the same width as the cut of the blade, and then he made a jig, that would lock into consequative groves as the cross cut made it's cut into the plank, half way through, each time a cut was made, the jig with a swinging arm to the same thickness as the cut, (in steel) was lifted, the timber plang was moved one notch along and then the jig was lowered to lock the plank in place.....it was a slow process cutting one grove at a time.....but we knew that each grove was equally spaced. the plank of obeche was about 8" long and around 3 ' long.
Once all the groves were cut across the plank, the plank was then cut into strips the same width as the width of groves on a very sharp band saw with a fence to guide it.........in that way, all the strips and groves interlocked to make the grating.............but that whole length made just the one A4 size grating.
I'm sure now adays with lazer or water jet cutters the process would be far far easier.....but this was going back at least 18 years, in a home workshop type place.
as for days off...............I am enjoying these builds so much, I can't wait for the next day to come..........for the first time in about 8 years I am making something for myself......and it's great.
I'll be powering them with some big Buhler motors that I have had for years.......but will need a few more of them, so if anyone out there has some going spare for sale, give me a shout please.
They are slowish revving and great torque.......these don't sail any faster than about 4 -5 mph what ever motors you put in them....just liker the real boats the tunnels restrict the speed of them to a maximum...they would never plane or go any faster than physics will allow.
cheers, neil. |
|
  | |
Guest
Guest
 | |
  | |
Footski
Master


Posts : 548
Join date : 2011-06-11
Age : 66
Location : Malaga, Spain
 |  Subject: Re: A lifeboat build blog...........How a kit is made! Subject: Re: A lifeboat build blog...........How a kit is made!  Thu Feb 23, 2012 7:13 am Thu Feb 23, 2012 7:13 am | |
| I told you I was nervous of that masking tape!!!!   They really are starting to look the business Neil. | |
|
  | |
Guest
Guest
 |  Subject: Re: A lifeboat build blog...........How a kit is made! Subject: Re: A lifeboat build blog...........How a kit is made!  Thu Feb 23, 2012 7:48 am Thu Feb 23, 2012 7:48 am | |
| thanks barry...this is the part I now start enjoying......all the bits start adding to the joy. |
|
  | |
Guest
Guest
 |  Subject: Re: A lifeboat build blog...........How a kit is made! Subject: Re: A lifeboat build blog...........How a kit is made!  Thu Feb 23, 2012 9:49 pm Thu Feb 23, 2012 9:49 pm | |
| Seem to have made one step forward and two steps back today. I made a set of moulds yesterday for making some grab rails for the deck, but for some unknown reason ( and I've never had it happen before) the both halves set (at different times) with humps in the centres of the mould........so that when I sandwich them between two pieces of ply the outer edges of the moulds don't clamp up properly and they weep any resin that is poured into the moulds. So I have had to make the boxes again to fit the mould halves and tomorrow I'll mix some rubber and catylist and pour the rubber into the moulding box, and then place one half at a time over that rubber.......this will then give me some "flat" surfaces that when sandwiched between the ply backing sheets will give equal pressure all around the mould. But that wasn't the end of the story..........I bought on line some Polyurethane quick set resin a few weeks ago. now this stuff is supposed (as I have always found in the past when casting) to remain subtle and not crack or shatter, and is actually carvable even when months old and fully cured. Well this pack of stuff that I bought from a new supplier ( to me...They've been around some time though) is possibly a bad batch, as the resin shatters even when splitting the two haves of the mould.........it is more brittle than polyester grp resin........ so hopefully the company will be able to give me some hints as to what is wrong with the stuff when I phone them tomorrow....don't know what's wrong with it though.......not the norm as far as I know from past experience. but at least I managed to get all the kick boards fitted this afternoon...which, after the disappointment of the moulds and resin cheered me up a little ..ggrrrrrr 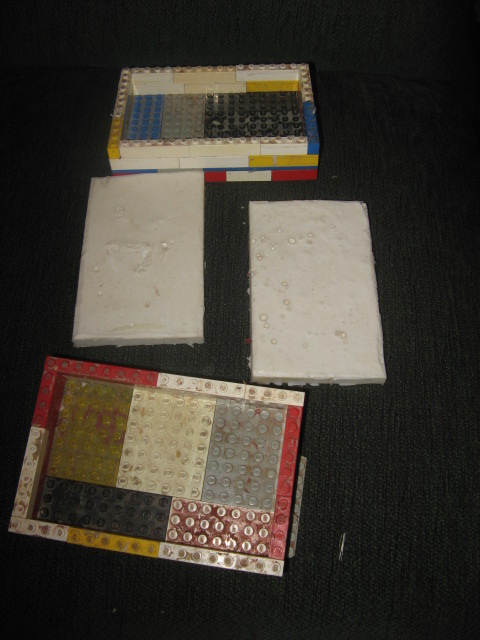 . |
|
  | |
Windy
Gunner

Posts : 132
Join date : 2011-12-11
Age : 58
Location : Always at work...
 |  Subject: Re: A lifeboat build blog...........How a kit is made! Subject: Re: A lifeboat build blog...........How a kit is made!  Thu Feb 23, 2012 10:14 pm Thu Feb 23, 2012 10:14 pm | |
| Hi Neil, there are different grades of Polyurethane resin, some stay flexible and some don't.... Did you check the product code? PU 365 is quite brittle where as PU 364 has a bit more flexibility...
W.. | |
|
  | |
Guest
Guest
 |  Subject: Re: A lifeboat build blog...........How a kit is made! Subject: Re: A lifeboat build blog...........How a kit is made!  Thu Feb 23, 2012 10:19 pm Thu Feb 23, 2012 10:19 pm | |
| no |I didn't windy........actually didn't know that there were two different types................bummer.......and sod's law that they sent me the wrong stuff.
neil. |
|
  | |
Guest
Guest
 |  Subject: Re: A lifeboat build blog...........How a kit is made! Subject: Re: A lifeboat build blog...........How a kit is made!  Thu Feb 23, 2012 10:21 pm Thu Feb 23, 2012 10:21 pm | |
| I'm going out to the workshop to check which stuff I got. lol |
|
  | |
Windy
Gunner

Posts : 132
Join date : 2011-12-11
Age : 58
Location : Always at work...
 |  Subject: Re: A lifeboat build blog...........How a kit is made! Subject: Re: A lifeboat build blog...........How a kit is made!  Thu Feb 23, 2012 10:23 pm Thu Feb 23, 2012 10:23 pm | |
| There is actually a lot more than 2 types. Have a look here.... http://www.alchemie.com/category/products/polyurethane-resin/
W. | |
|
  | |
Guest
Guest
 |  Subject: Re: A lifeboat build blog...........How a kit is made! Subject: Re: A lifeboat build blog...........How a kit is made!  Thu Feb 23, 2012 10:25 pm Thu Feb 23, 2012 10:25 pm | |
| yes......just checked and it's EPCU3652 that they sent me.........trust me......... |
|
  | |
Guest
Guest
 |  Subject: Re: A lifeboat build blog...........How a kit is made! Subject: Re: A lifeboat build blog...........How a kit is made!  Thu Feb 23, 2012 10:35 pm Thu Feb 23, 2012 10:35 pm | |
| - Windy wrote:
- There is actually a lot more than 2 types. Have a look here.... http://www.alchemie.com/category/products/polyurethane-resin/
W. OMG.......now that has really complicated matters, lol............sort of baffles the brain on which one to pick. cheers, neil. |
|
  | |
Guest
Guest
 |  Subject: Re: A lifeboat build blog...........How a kit is made! Subject: Re: A lifeboat build blog...........How a kit is made!  Thu Feb 23, 2012 11:09 pm Thu Feb 23, 2012 11:09 pm | |
| |
|
  | |
Guest
Guest
 |  Subject: Re: A lifeboat build blog...........How a kit is made! Subject: Re: A lifeboat build blog...........How a kit is made!  Fri Feb 24, 2012 10:52 am Fri Feb 24, 2012 10:52 am | |
| Well Windy, many thanks for all your help and advice regarding polyurethane resin.
the problem is now sorted.
I rang East Coast glass fibre supplies this morning and spoke to the technical advisor called Martin......and he couldn't have been more helpfull and apologetic for my dilhema and totally understood what I was trying to do..........in their defence the technical data sheet says that the minimum thickness for a mould is 3mm, and I was trying to mould 4mm thickness so was right on the edge.
Martin agreed with me that the resin was not suitable for what I was wanting to do, and as such said that if I reurned the twin pack of resin to him he would give me a full refund for the product, even though I had opened the tins and used a little.
I CANNOT ASK FOR BETTER SERVICE THAN THAT, and my thanks and praise go out to East coast fibreglass supplies....many thanks.
neil. |
|
  | |
Guest
Guest
 |  Subject: Re: A lifeboat build blog...........How a kit is made! Subject: Re: A lifeboat build blog...........How a kit is made!  Fri Feb 24, 2012 11:13 am Fri Feb 24, 2012 11:13 am | |
| That's great service Neil.
|
|
  | |
Guest
Guest
 |  Subject: Re: A lifeboat build blog...........How a kit is made! Subject: Re: A lifeboat build blog...........How a kit is made!  Fri Feb 24, 2012 1:18 pm Fri Feb 24, 2012 1:18 pm | |
| yes it is, Damien, and it's nice to be able to tell people of such good service in these days of "the business is always right, as opposed to the customer". after sorting out my resin and rectifying my mould( I hope so anyway), I spent an hour cleaning up the "gobeye" faileads on all three boats....all a little different, and this one in the picture has a roller set outside similar to the old Anne Letitia Russell. Also added the bracket to hold the rope fender in place. The photo behind is from the bow of the H F Bailey.  |
|
  | |
Guest
Guest
 |  Subject: Re: A lifeboat build blog...........How a kit is made! Subject: Re: A lifeboat build blog...........How a kit is made!  Fri Feb 24, 2012 8:11 pm Fri Feb 24, 2012 8:11 pm | |
| I have never known one single mould cause me so much hassle and bother..........firstly as I said in a previous posting yesterday, the mould for the hand rails came out with a hump on each reverse side (i.e. the back of both halves.) and when I tried clamping together the outer edges sprang open..the only way to correct these was to make a box for each half...lay some rubber into the bottom of the boxes and them lay each half back into the box with the back face making contact with the new rubber............and no release agent between the new rubber and the mould..........the idea being thet the new rubber would adhere to the old mould...........normally without rubber this would happen..............not with this mould for some reason. firstly the rubber, which had set yesterday within a couple of hours...............took the heat from the radiator all day to go off...........and then when I took the lego away from the newly "repaired" moulds, sod me if the rubber had stuck to the lego but not to the old mould...........I just can't believe that the same rubber from the same tin, with the same amount of catylist can behave totally diferent on two separate days............ I have made hundreds of these rubber moulds over the past 20 years, and never ever have I had so many problems in such a short time.........it has stumped me..............if it don't work this time then it'll be the bin and start again.   |
|
  | |
Footski
Master


Posts : 548
Join date : 2011-06-11
Age : 66
Location : Malaga, Spain
 |  Subject: Re: A lifeboat build blog...........How a kit is made! Subject: Re: A lifeboat build blog...........How a kit is made!  Fri Feb 24, 2012 8:37 pm Fri Feb 24, 2012 8:37 pm | |
| | |
|
  | |
Guest
Guest
 |  Subject: Re: A lifeboat build blog...........How a kit is made! Subject: Re: A lifeboat build blog...........How a kit is made!  Fri Feb 24, 2012 8:42 pm Fri Feb 24, 2012 8:42 pm | |
| Barry........it'd have been quicker making a new mould lol. |
|
  | |
Windy
Gunner

Posts : 132
Join date : 2011-12-11
Age : 58
Location : Always at work...
 |  Subject: Re: A lifeboat build blog...........How a kit is made! Subject: Re: A lifeboat build blog...........How a kit is made!  Sat Feb 25, 2012 12:15 pm Sat Feb 25, 2012 12:15 pm | |
| Hi Neil, bet you wished you hadn't got out of bed, especially with the cost of RTV silicone rubber.....
Nice chatting with you the other day and pleased you sorted the resin issues....
W... | |
|
  | |
Guest
Guest
 |  Subject: Re: A lifeboat build blog...........How a kit is made! Subject: Re: A lifeboat build blog...........How a kit is made!  Sat Feb 25, 2012 4:49 pm Sat Feb 25, 2012 4:49 pm | |
| I bounced back, having had a chat with you windy.............good to talk. |
|
  | |
Guest
Guest
 |  Subject: Re: A lifeboat build blog...........How a kit is made! Subject: Re: A lifeboat build blog...........How a kit is made!  Sat Feb 25, 2012 5:35 pm Sat Feb 25, 2012 5:35 pm | |
| to today's little foray into modelling. spent some of the afternoon sorting out some deck fittings that I cast earlier last year for the three boats.....some fairleads, cleats and some filler caps and bilge pump caps..........also made up three compass binacles and wheel sets, but the initial coat of primer is drying at the moment. here are the fittings which now need cleaning up, and a little sanding and getting rid of resin globules formed by bubbles in the rubber. Roller cleats 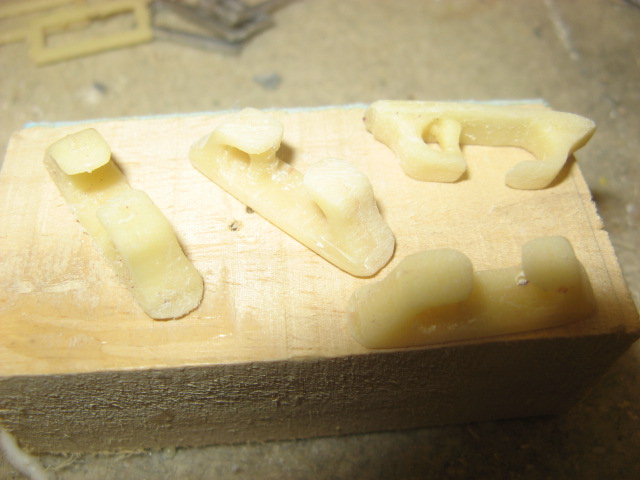 Deck light surrounds 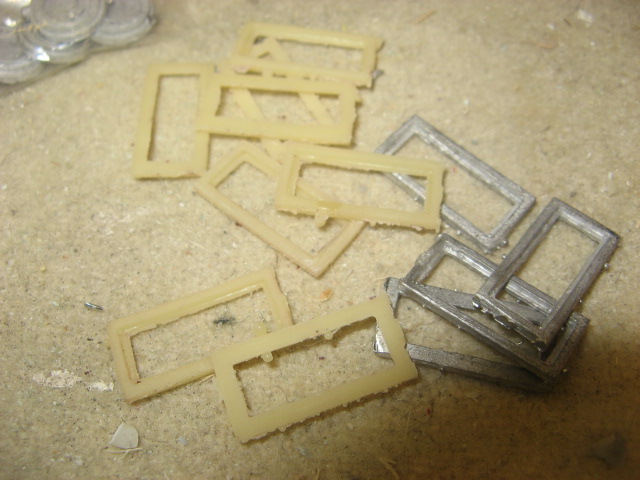 Deck filler caps 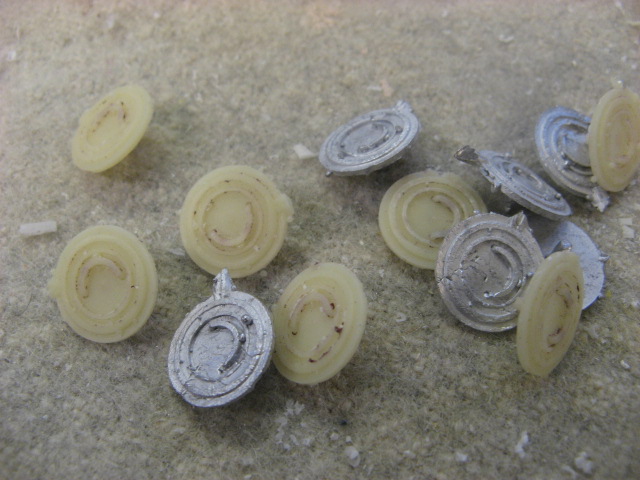 single cleat 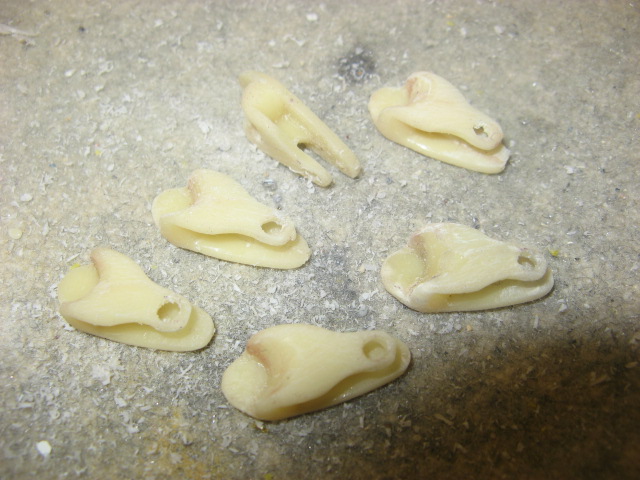 splayed cleats, port and starboard  bilge pump and filler caps 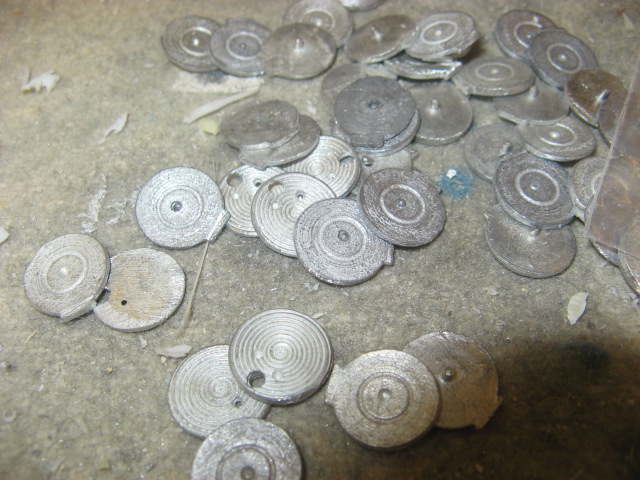 |
|
  | |
Sponsored content
 |  Subject: Re: A lifeboat build blog...........How a kit is made! Subject: Re: A lifeboat build blog...........How a kit is made!  | |
| |
|
  | |
| | A lifeboat build blog...........How a kit is made! |  |
|
