| | A lifeboat build blog...........How a kit is made! |  |
|
+10tattooed Tug--Kenny scalloway41 phil winks pugwash AlanP HS93 intrepid75 Windy Footski 14 posters |
|
| Author | Message |
|---|
Guest
Guest
 |  Subject: Re: A lifeboat build blog...........How a kit is made! Subject: Re: A lifeboat build blog...........How a kit is made!  Sun Apr 22, 2012 9:58 pm Sun Apr 22, 2012 9:58 pm | |
| Thanks matey........ and I hope you are well on the mend, and back into the modelling soon. Been brush painting the well decks and engine casings recently with Humbrol enamel and my nice new sable hair brushes......getting a reasonable finish, but running out of enamel rapidly.........so today decided to tidy up the lower edge of the engine casing of the Mary Stanford with a rivet strip.........did this in 120 gram paper and an artists paint stopper which blobs out rivet sized paint blobs in rapid succession.........this gets rid of the ragged moulded edge of the casing and cleans it all up nicely. Next bit is to fit the rudder assembly onto the Mary Stanford.  |
|
  | |
Guest
Guest
 |  Subject: Re: A lifeboat build blog...........How a kit is made! Subject: Re: A lifeboat build blog...........How a kit is made!  Sun Apr 22, 2012 10:52 pm Sun Apr 22, 2012 10:52 pm | |
| So, down to the making of the rudder and assembly for the Mary Stanford..... Unlike the other two boats that have their rudders set into the deadwood of the Keel, this boat had the rudder hung onto a square section rudder bar which runs through a series of brackets on the stern of the boat, including a hefty bracket at the top, a "shoe" at the bottom and a mid spaced bracket to set the rudder at it's required possition on the rudder bar.. These brackets would be made from cast iron/steel on the real boats, and/or even bronze, but on the model the fittings are all made from cast white metal. There are also two brackets attached to the rudder which have square shaped holes cast into them on a fore/aft axis so that two points/corners of the square run longitudinally with the boat, and the rudder bar is therefore set at this same "diamond" position......and as such the brackets on the rudder have no chance of slipping around the rudder bar because of the square shape!....quite a simple idea by the builders of these old boats, and also easy to replicate needing no screws, bolts or pins to hold the rudder from slipping. I made the rudder as a seperate entity, and fitted the two white metal cast brackets and the strengtheners in 1.8mm ply and glued in place using epoxy for the w/m fittings and aliphatic resin for timber to timber. However before fitting the brakets I made sure that the square section bar slipped through the bracket holes freely and when O glued up I ran the bar through both brackets to make sure that they were glued in line and the bar freely able to move. I started by fitting the top bracket ( the bottom shoe had already been fitted when doing the hull some months ago. It was glued in place using epoxy and two steel pins to hold and secure it in place. I then silver soldered a length of 5mm threded rod into one end of the square section bar, to take a top locking nut. I next threaded a nut upto the joint between bar and threaded rod and locked in place using cyano. I glued the slider bar which takes the pin from the servo to operate the rudder into place upto the top locking nut, using epoxy and then drilled through that asembly and inserted a 2mm nut and bolt to hold it all in place.Under this would be fitted a brass washer to aid movement and reduce friction. I modified the bracket that is used on the Rother class lifeboat kit, and using a pin to hold it......fixed it to the stern post just below where to top bracket of the rudder will sit when the rudder is in it's correct position. Next was to insert a brass rod up into the bottom of the square section rudder bar and secure it wit lots of cyano. Now, ther is still no way to stop the whole rudder bar from lifting out of the shoe and flapping in the wind, so to make a tighter fit and impossible to lift upwards and out, I put two small diameter washers onto the bottom pin just before the square bare /round bar joint, and immediately under the top bracket I placed two brass washers onto the square rudder bar, and drilled imediately under them with a 1.0mm drill bit and inserted a split pin made from brass, wrapped it around the bar immediately under the washers, and this locked the whole assembly in place with a maximum of around 2mm up and down movement........Once it has all been painted the moving parts, metal to metal will be greased as a precaution.      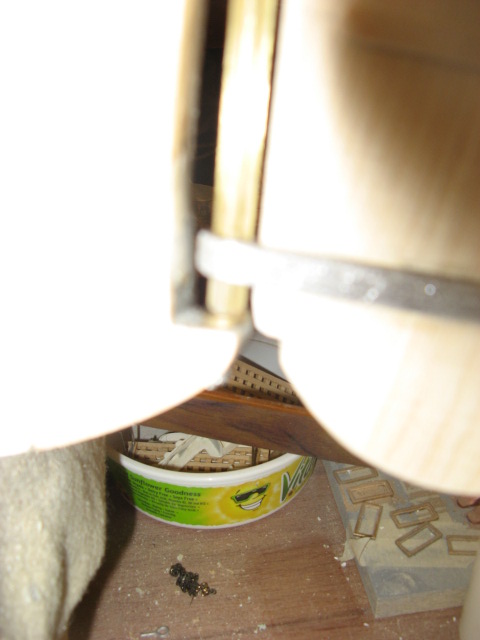      |
|
  | |
Guest
Guest
 |  Subject: Re: A lifeboat build blog...........How a kit is made! Subject: Re: A lifeboat build blog...........How a kit is made!  Mon Apr 23, 2012 1:01 pm Mon Apr 23, 2012 1:01 pm | |
| The fun's about to start.............cost me a small fortune at Halfords this morning. That's the trouble with building three boats at the same time, lol  |
|
  | |
Guest
Guest
 |  Subject: Re: A lifeboat build blog...........How a kit is made! Subject: Re: A lifeboat build blog...........How a kit is made!  Thu Apr 26, 2012 2:23 pm Thu Apr 26, 2012 2:23 pm | |
| |
|
  | |
Guest
Guest
 |  Subject: Re: A lifeboat build blog...........How a kit is made! Subject: Re: A lifeboat build blog...........How a kit is made!  Fri Apr 27, 2012 10:02 am Fri Apr 27, 2012 10:02 am | |
| Well.........I tried putting the end plates onto the support blocks yesterday, and used as I said, plasticard for them, using plasticweld to attach the plasticard to the obeche timber................mistake............ It has worked for me in the past, but sadly it wasn't playing ball yesterday, as every one I tried to trim off, just parted with ease!..... so I went back to basics and replaced the plasticard plates with 1.8mm ply and used aliphatic resin to bond the two together, and clamped them overnight.........success. they worked fine, and I trimmed them up using my bench sander. they'll now be liberally coated with sanding sealer and then glued onto the respective boats ready for painting in situ. so the moral of my story is, and I will repeat it 100 times......."I must try not to be to cleaver for my own good, and when using timber to plastic...don't...use timber to timber if possible and use a timber glue".  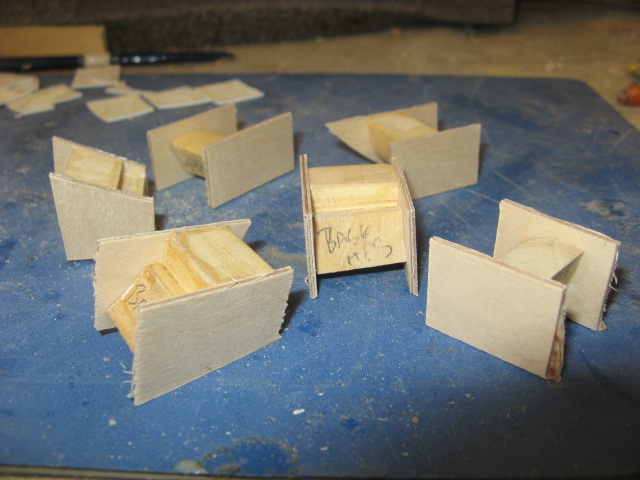   |
|
  | |
Footski
Master


Posts : 548
Join date : 2011-06-11
Age : 66
Location : Malaga, Spain
 |  Subject: Re: A lifeboat build blog...........How a kit is made! Subject: Re: A lifeboat build blog...........How a kit is made!  Fri Apr 27, 2012 12:13 pm Fri Apr 27, 2012 12:13 pm | |
| A nice bit of wood work there Neil.. | |
|
  | |
Guest
Guest
 |  Subject: Re: A lifeboat build blog...........How a kit is made! Subject: Re: A lifeboat build blog...........How a kit is made!  Fri Apr 27, 2012 12:23 pm Fri Apr 27, 2012 12:23 pm | |
| cheers Barry.......back in the medium that I love most.
neil. |
|
  | |
Guest
Guest
 |  Subject: Re: A lifeboat build blog...........How a kit is made! Subject: Re: A lifeboat build blog...........How a kit is made!  Sun Apr 29, 2012 4:28 pm Sun Apr 29, 2012 4:28 pm | |
| |
|
  | |
Guest
Guest
 |  Subject: Re: A lifeboat build blog...........How a kit is made! Subject: Re: A lifeboat build blog...........How a kit is made!  Sun Apr 29, 2012 4:40 pm Sun Apr 29, 2012 4:40 pm | |
| SPOT THE DIFERENCE!! Recently I have been in contact with the son of the ex coxs'n who served on the Field Marshall and Mrs Smuts and who was also a crew member from an early age. Apart from the little niggles about certain parts for the boat that now and then get pointed out, one of the main concerns was/is the colour for the steel engine casing just forward of the rear cockpit which carries the funnel on the "Smuts".............they were usually painted a grey similar to the H F Bailey and the Mary Stanford........but Glyn seemed to think that it was varnished timber from memory to begin with. I pointed out that this part was an integral part of the watertightness of the boat as the steel casing including the water tight door had to stay intact......just at it did in the famous picture of the wreckage of the Fraserbourgh lifeboat after her disaster ........so Glyn went off to hunt for photos in colour, and found two of the "Smuts".....showing the sides of the steel casing a medium brown colour..............so we ( between us) have decided that the top of the casing of the boat is brown......and so I gave it it's first coat of No. 9 Humbrol this afternoon, to match with the edging plates of the forward cabin.  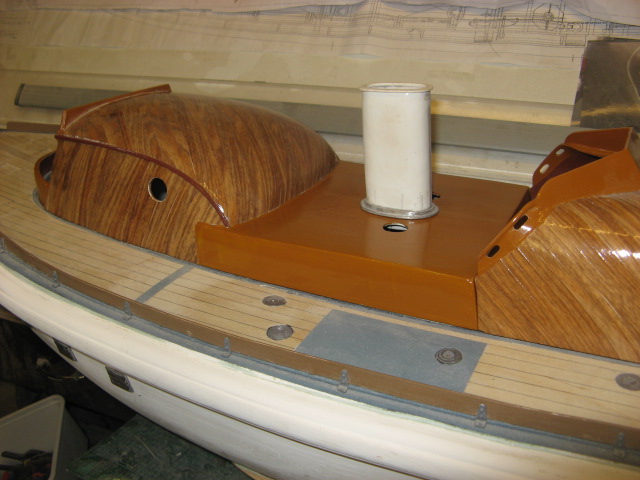 It will need a few more coats, but closely matches the very small areas visible of the engine casing on the colour photos. |
|
  | |
intrepid75
Master


Posts : 271
Join date : 2011-06-11
Age : 68
Location : Bristol, West country
 |  Subject: Re: A lifeboat build blog...........How a kit is made! Subject: Re: A lifeboat build blog...........How a kit is made!  Sun Apr 29, 2012 7:37 pm Sun Apr 29, 2012 7:37 pm | |
| That looks more and more lovely with each photo. Superb. | |
|
  | |
Guest
Guest
 |  Subject: Re: A lifeboat build blog...........How a kit is made! Subject: Re: A lifeboat build blog...........How a kit is made!  Sun Apr 29, 2012 7:41 pm Sun Apr 29, 2012 7:41 pm | |
| cheers matey.we are just in conflab between myself and the old coxs'ns son as to exactly what shade that brown should be?? no decision as yet. |
|
  | |
Guest
Guest
 |  Subject: Re: A lifeboat build blog...........How a kit is made! Subject: Re: A lifeboat build blog...........How a kit is made!  Mon Apr 30, 2012 9:07 am Mon Apr 30, 2012 9:07 am | |
| mark 3 version.....she'll have had more face lifts and slap than Joan Collins before |I've finished, lol I'll get the colour right one of these days.  |
|
  | |
Guest
Guest
 |  Subject: Re: A lifeboat build blog...........How a kit is made! Subject: Re: A lifeboat build blog...........How a kit is made!  Mon Apr 30, 2012 8:59 pm Mon Apr 30, 2012 8:59 pm | |
| |
|
  | |
Footski
Master


Posts : 548
Join date : 2011-06-11
Age : 66
Location : Malaga, Spain
 |  Subject: Re: A lifeboat build blog...........How a kit is made! Subject: Re: A lifeboat build blog...........How a kit is made!  Tue May 01, 2012 7:37 am Tue May 01, 2012 7:37 am | |
| Now come on Neil, watching Countdown while trying to concentrate is not good for the model   !! | |
|
  | |
Guest
Guest
 |  Subject: Re: A lifeboat build blog...........How a kit is made! Subject: Re: A lifeboat build blog...........How a kit is made!  Tue May 01, 2012 7:47 am Tue May 01, 2012 7:47 am | |
| that's the first time I've watched it since Mr Whitely died..........and won't be watching it again.....that chap at the head of the table should stick to firing people .......he was so wooden and stuffy I cringed every time he opened his uppercrust gob...............If that's what Sugar and his croneys are like....thank god I did my apprenticeship 45 years ago, lol |
|
  | |
Guest
Guest
 |  Subject: Re: A lifeboat build blog...........How a kit is made! Subject: Re: A lifeboat build blog...........How a kit is made!  Tue May 01, 2012 9:29 pm Tue May 01, 2012 9:29 pm | |
| |
|
  | |
Guest
Guest
 |  Subject: Re: A lifeboat build blog...........How a kit is made! Subject: Re: A lifeboat build blog...........How a kit is made!  Wed May 02, 2012 9:35 pm Wed May 02, 2012 9:35 pm | |
| |
|
  | |
James_H
Midshipman

Posts : 62
Join date : 2012-04-01
Age : 52
Location : Amsterdam
 |  Subject: Re: A lifeboat build blog...........How a kit is made! Subject: Re: A lifeboat build blog...........How a kit is made!  Thu May 03, 2012 9:26 am Thu May 03, 2012 9:26 am | |
| Looking good Neil.
I love the detail on those sprung hatches. The springs themselves look stunning.
And the uniformity is amazing - looks like you have a machine that stamps out identical
hatches. Good stuff! | |
|
  | |
Guest
Guest
 |  Subject: Re: A lifeboat build blog...........How a kit is made! Subject: Re: A lifeboat build blog...........How a kit is made!  Thu May 03, 2012 10:10 am Thu May 03, 2012 10:10 am | |
| I was actually thinking at one time of making moulds to cast the w/t doors in resin, but then thought that it was actually taking a lot of the build process away from the modeller and then it would just become a kit like an Airfix kit, which I don't want, so decided against it........
They are made from diferent thicknesses of plasticard, white metal/resin fittings and a little fine brass wire bent around a heavier guage wire to form the springs, and look reasonably effective, and something that even a learner could do, given the easy instructions that I will be writing.
Neil. |
|
  | |
Guest
Guest
 |  Subject: Re: A lifeboat build blog...........How a kit is made! Subject: Re: A lifeboat build blog...........How a kit is made!  Thu May 03, 2012 8:40 pm Thu May 03, 2012 8:40 pm | |
| Well, I decided to get away from the painting of fittings this afternoon and get down to some "decorative" woodwork for a change, and so decided to make the rope bins for the "Smuts". This consisted of a framework at deck level to attach the sides too...I doubt wether this was anything like a feature on the real boats as no positive photo is available of the bins at deck level but to aid the structure I have used a little modellers liscense or the thing wouldn't have stood a chance of remaining together. For the base I used some mahogany strip of 6 x 3mm and for the uprights some 3 x 3mm mahogany. For the rails I used some 4 x 2mm obeche that I had cut many years ago for some reason or other. I started off by glueing the rectangular frame ( mitred at the corners) onto a piece of 1/64th ply to hold it all together, and left to set under a 12v battery. Whilst these were setting(using quick grab aliphatic resin) I set about making the sides using the mahogany and obeshe strip........these were also left to set for an hour or so. To fit the sides via the uprights to the bottom frames I cut recess slots into the frame for the uprights to glue into, before leaving them to set in the upright position. Next was to glue the end rails in place to make the whole construction rigid. A capping rail was glued to the top of the uppermost rail and left to set. Tomorrow there will be a section cut out of the rope bin on the inner sides next to where the cowl vents go for access to the bins and the rope inside. Finally they'll be sanded and stained teak in colour before varnishing. 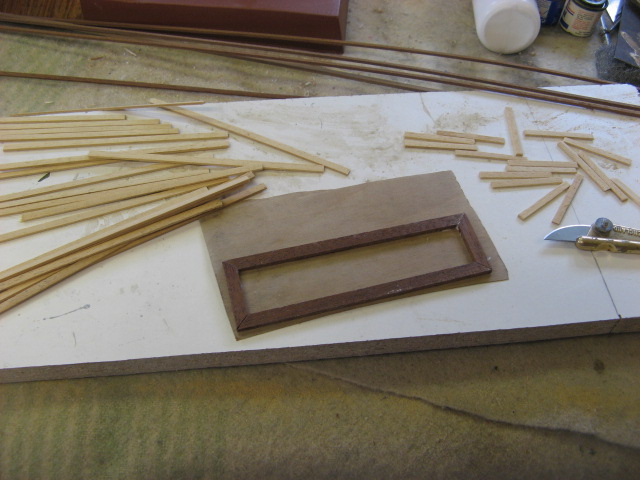 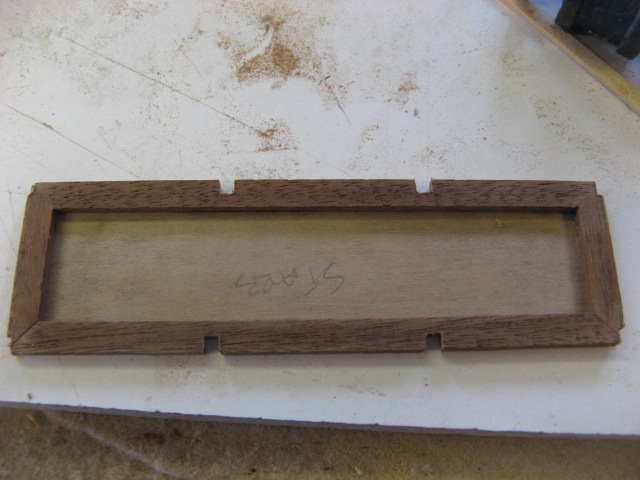     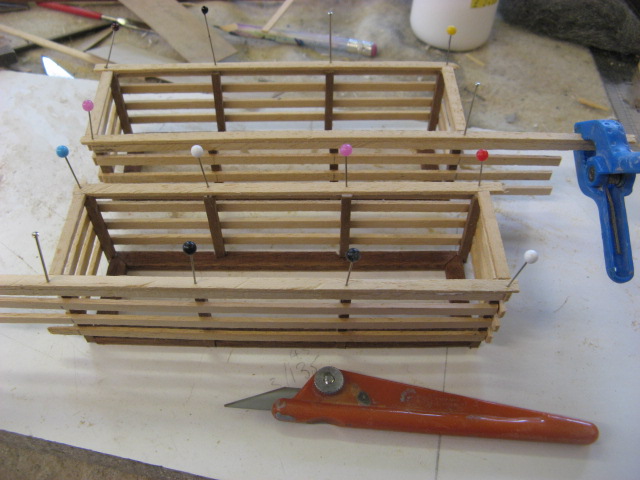    |
|
  | |
Guest
Guest
 |  Subject: Re: A lifeboat build blog...........How a kit is made! Subject: Re: A lifeboat build blog...........How a kit is made!  Fri May 04, 2012 8:34 pm Fri May 04, 2012 8:34 pm | |
| |
|
  | |
Guest
Guest
 |  Subject: Re: A lifeboat build blog...........How a kit is made! Subject: Re: A lifeboat build blog...........How a kit is made!  Sat May 05, 2012 9:32 pm Sat May 05, 2012 9:32 pm | |
| I have now come to the stage where I have to make the stands for my boats so that I can protect the hulls once I have painted them this week. I have to admit that of all the models I have ever built, no two stands have ever been made the same way, or have ever looked the same. However the best stand that I ever made was for a 57" model of the old WW1 HMS Kent, County Class cruiser. At the time I hadn't a car but had reverted back to my carefree days and was riding a BMW r100s motorcycle.....it had a carrier rack on the rear, and I needed a stand that would sit on that. It didn't concern me in those younger days that the model would have to sit crosswise across the bike, nor did I count the number of wing mirrors on cars that I took out.....wooops......it was the fact that I could still ride like a maniac and that my model wouldn't slip off the stand. So I devised a stand that would support the model via rubber straps..............these tended to grip the hull rather than let it slide, and I could go round a bend or roundabout at 45* and the boat would still be there when I got to the lake......more than can be said for many things I carried on my bikes....lol. Also in all the times I carried the model, the hull never got one scratch from being carried, and the whole stand acted like one huge shock absorber. So today ( not that I am going to carry these models on a motorcycle, unless I get a Harley donated from some kind benefactor) I decided to make the stands for my lifeboats in a similar way......using pedal cycle innertubes for the rubber supports, and pine for the frames....I also left enough space under neath for the R/C gear, batteries etc, plus the odd tinny or two ..... And I have to say that they look snug and safe cocooned within the frames, to boot. simple to make, take all the shocks from motoring especially if the boats are put in a trailer for transport and they get there without scratches.....tried and tested in the most hairiest of ways, 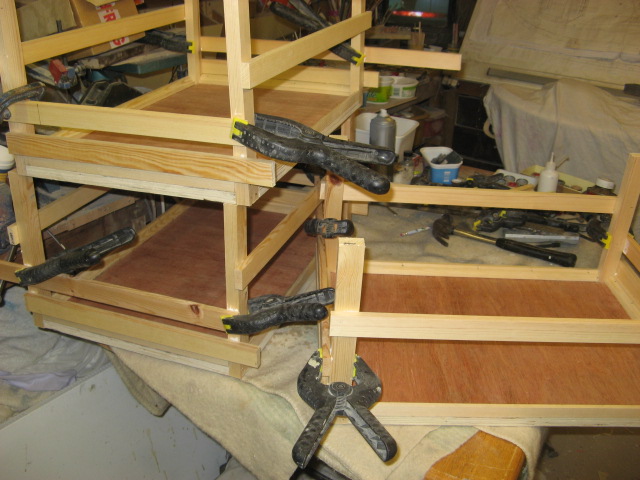 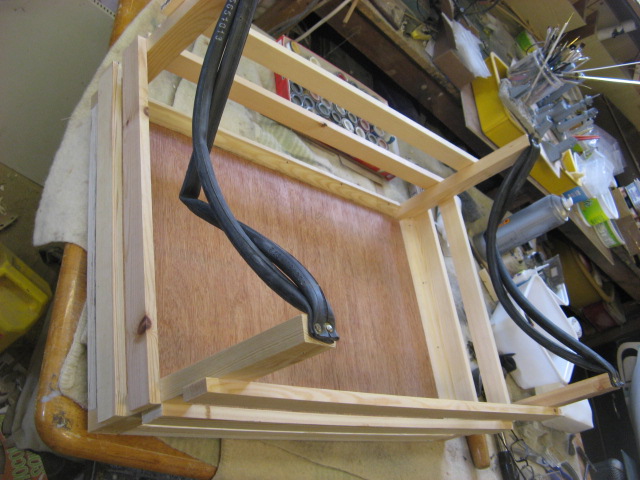   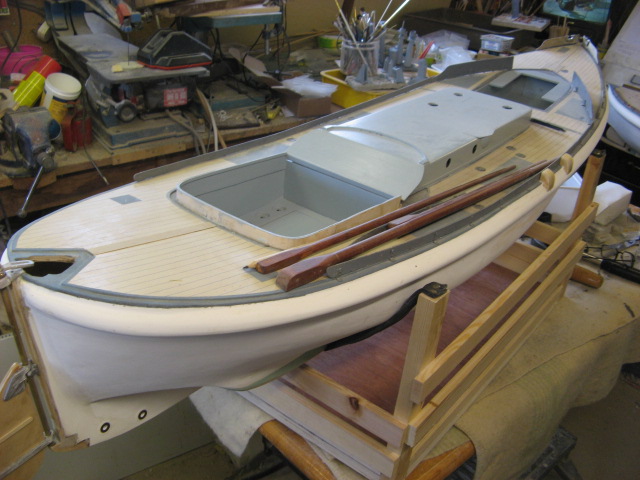   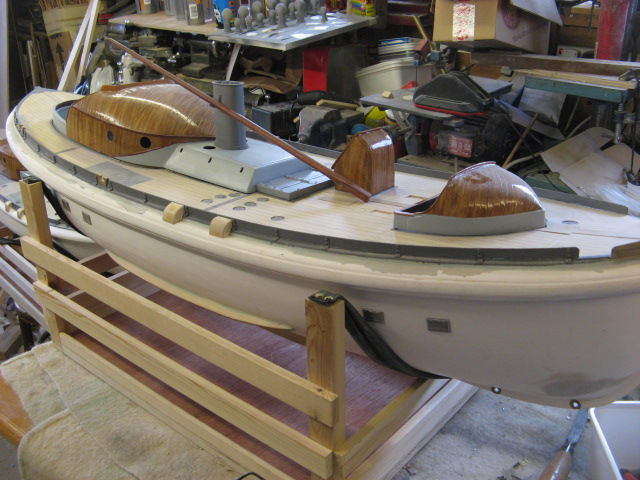  |
|
  | |
Guest
Guest
 |  Subject: Re: A lifeboat build blog...........How a kit is made! Subject: Re: A lifeboat build blog...........How a kit is made!  Sun May 06, 2012 8:21 pm Sun May 06, 2012 8:21 pm | |
| Anyway, back to reality..and down to some work today ( well last night to be more exact, for the firsat thing......... I got round to doing another of those little detailing parts.....remember the item on the main mast...the black tube that operated with the mast when upright or folded down. It turns out that (as one mayhem member suggested) it is a conduit for wiring and electrical gear up to the mast head. I made this from some black silicon tubing, a base fitting which came from the Clyde class lifeboat, and a piece of brass tubing. And to set it all in place, the tabernackle was fixed onto the cabin top using a thin layer of polyester filler which allowed the tabernackle to set level and without gaps, on to the curvature of the cabin. You can see in the last clse up shot of the tabernackle, the filler oozing out from under the fitting, which was cleaned off as it was going rubbery but not yet set. It also located into the cabin top using 4 pre fit brass pins that set into pre drilled holes in the cabin. The brass tubing acts as a guide for the silicon tube to slide up and down when the mast is raised and lowered. Incedentally, Dave Metcalf told me when we were having a chat last night on the phone, that he has passed on the moulds and rights for the Clyde Lifeboat that I built last year to Andy Grigg at Models By Design, so if anyone is wanting that model........a real brute, but will take any weather, then Andy Grigg is the one to see.Good luck to him.   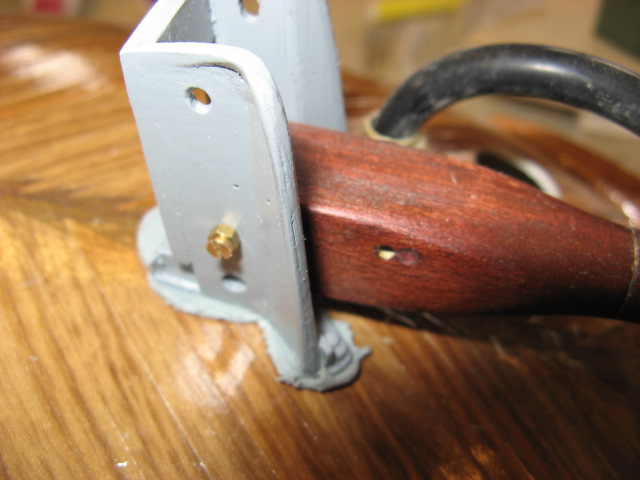 |
|
  | |
Guest
Guest
 |  Subject: Re: A lifeboat build blog...........How a kit is made! Subject: Re: A lifeboat build blog...........How a kit is made!  Sun May 06, 2012 10:14 pm Sun May 06, 2012 10:14 pm | |
| Today, I began to prepare for spraying the hulls of the three boats, by giving a coat of etching primer, to key into the grp without blooming. I am by no means anywhere near a decent painter, and tend to muddle through, and I tend to become impatient when painting, but have said to myself, this time, I'll spend some tme and take my time, leaving coats to dry, and rub down with wet and dry well.............ummmmm!!!. hopefully I'll reach a desired effect that will be pleaseing to the eye. So, I got down to it, and even after the first coat, things didn't go well at all......first I found a small area on the belting of the H F Bailey that was hollow underneath the gell coat, so painting stopped whilst I cut out the gell coat and filled, then sanded down, before giving another coat around the area with primer. However, on the Mary Stanford, there was an even bigger cockup to cover........... After spraying up with the coar of etching primer, I was looking at it and watching the preverbial paint to dry when I realised that I hadn't put into the two anchor recesses, the hawse pipes from the anchor/rope recesses to the deck..............so I then had to work that out, using brass tubing, and filler to hold it in place, so after drilling the holes to take the hawse pipe, that was sorted, and after cleaning up the mess created it was back to a covering coat of etching primer. However, for the opening where the hawse pipe comes through the deck, I used bulwark hawse plates ( moulded for the Clyde lifeboat) as the deck housing surrounds, bedded in with polyester filler, and trimmed up just as it was going off.. 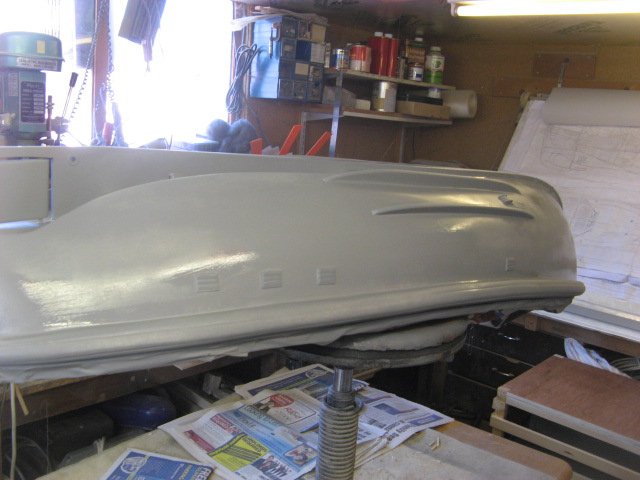       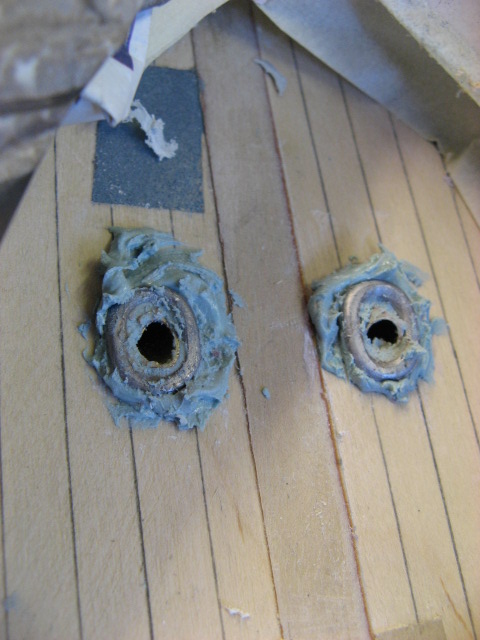  |
|
  | |
Footski
Master


Posts : 548
Join date : 2011-06-11
Age : 66
Location : Malaga, Spain
 |  Subject: Re: A lifeboat build blog...........How a kit is made! Subject: Re: A lifeboat build blog...........How a kit is made!  Mon May 07, 2012 8:04 am Mon May 07, 2012 8:04 am | |
| You are not lone!!!!! I too am having difficulty with the painting of my hull.....Masking tape tearing paint off underneath for one. Rain landing on the newly painted surface for another, oh and like you i forgot to cut the hawse holes first.......Must be an age thing as I don't remember having these problems before..  | |
|
  | |
Guest
Guest
 |  Subject: Re: A lifeboat build blog...........How a kit is made! Subject: Re: A lifeboat build blog...........How a kit is made!  Mon May 07, 2012 9:08 am Mon May 07, 2012 9:08 am | |
| It must be, Barry...as for masking tape.....have you tried the new line called Frogtape.............it ia absolutely marvelous..and they have released a diritvitive of low tack that won't pull the paint off called Frog tape delicate.....marvelous stuff even if expensive..saves a lot of time and haassle in the end.
neil. |
|
  | |
Guest
Guest
 | |
  | |
Guest
Guest
 |  Subject: Re: A lifeboat build blog...........How a kit is made! Subject: Re: A lifeboat build blog...........How a kit is made!  Tue May 08, 2012 8:57 am Tue May 08, 2012 8:57 am | |
| Primary coloured primers now added.......will need a couple more coats before rubbing down with 800 grade wet and dry. Wht the different colours......?? Well, the Grey primer on the Mary Stanford is because her anti fouling is a green lead colour, as she was an "afloat" boat in Ballycotton Harbour, and topside is ford Galaxy Blue....a slightly darker shade of blue to the other two boats, and therefore will take a darker under primer. The H F Bailey and the "Smuts" both have a white underhull as they were both slipway launched and boat house stored, and with a lighter Oxford Blue hull they will take a white under primer. All boats will be given more coats of under primer before the final colours are added.   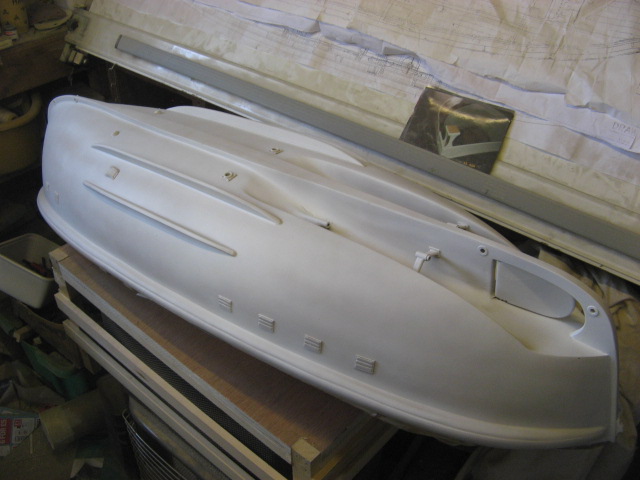 |
|
  | |
Guest
Guest
 |  Subject: Re: A lifeboat build blog...........How a kit is made! Subject: Re: A lifeboat build blog...........How a kit is made!  Wed May 09, 2012 2:10 pm Wed May 09, 2012 2:10 pm | |
| |
|
  | |
James_H
Midshipman

Posts : 62
Join date : 2012-04-01
Age : 52
Location : Amsterdam
 |  Subject: Re: A lifeboat build blog...........How a kit is made! Subject: Re: A lifeboat build blog...........How a kit is made!  Wed May 09, 2012 4:02 pm Wed May 09, 2012 4:02 pm | |
| Not going to be defeated by hell or high water eh? Looking beautiful as always!
What's that filler-primer like in practise? I've always worried that it might hide detail,
so I've faffed about at length with hugely expensive 1k stopper-filler and what seems like hundreds
of coats of normal primer to check progress.
But times are hard (as they say) and it's just cost me about £10 to put a single coat of standard grey Halfords
primer on Manhattan - ouch!
can you tell me what sort of thing filler-primer will fill and what it wont and if you are happy with it?
Thanks
James | |
|
  | |
Guest
Guest
 |  Subject: Re: A lifeboat build blog...........How a kit is made! Subject: Re: A lifeboat build blog...........How a kit is made!  Thu May 10, 2012 8:59 am Thu May 10, 2012 8:59 am | |
| Hi James.......it WON'T fill deep scratches unless you put on a minimum of 3 coats......but will cover faint sanding scratches......it just gives a good base to wet and dry to and a nice smooth finish once cut back on..........you would still need stopper putty ( not filler.but fine scratch filler) to fill those deeper scratches.........it doesn't have a hardener and is cellulose based to dries and sets being left to open air.
sadly rain has stopped play..........left the gazebo up last night and it has p'd it down all night....three of the legs have bent and broken......so am going to have to rig a jury rig using the top and washing line when it stops raining, lol.....Oh well........was a good idea while it lasted, lol |
|
  | |
Guest
Guest
 |  Subject: Re: A lifeboat build blog...........How a kit is made! Subject: Re: A lifeboat build blog...........How a kit is made!  Thu May 10, 2012 2:01 pm Thu May 10, 2012 2:01 pm | |
| |
|
  | |
Footski
Master


Posts : 548
Join date : 2011-06-11
Age : 66
Location : Malaga, Spain
 | |
  | |
Guest
Guest
 |  Subject: Re: A lifeboat build blog...........How a kit is made! Subject: Re: A lifeboat build blog...........How a kit is made!  Thu May 10, 2012 10:11 pm Thu May 10, 2012 10:11 pm | |
| now the drainage pump has packed in barry..never rains but what it pours, lol..you makwe me feel very envious of that thought...blue skies.what are they, lol |
|
  | |
Guest
Guest
 |  Subject: Re: A lifeboat build blog...........How a kit is made! Subject: Re: A lifeboat build blog...........How a kit is made!  Fri May 11, 2012 12:58 pm Fri May 11, 2012 12:58 pm | |
| Whilst I have been in conversation of the ex crew member of "Smuts" he told me that there was a rear pen to the rope bins, and so have added that. Whilst doing the measuring up for this, I found that my preliminary position for the funnel,vents and decklights were too far forward by around 15mm and so, whilst waiting for better weather, I set about doing the changes yesterday.......made the rear pen front rails, and re positioned the holes for the deck lights and funnel, by filling the originals by putting a strip of plasticard inside the grp moulding , held to the moulding with polyester resin, and then sanding smooth before re painting and here are the results. there is some slight disagreement about the inner longitudinal rails and their length, going back to the cockpit, but looking at photos, I can't see this. also the short rear rails of the bins..........should they be there or shouldn't they............well, for structural purposes on the model, they'll have to stay there (even if not on the real boat) for if I were to take them out, I feer the whole structure would be very much weakened, and so using modellers license, they are staying put.  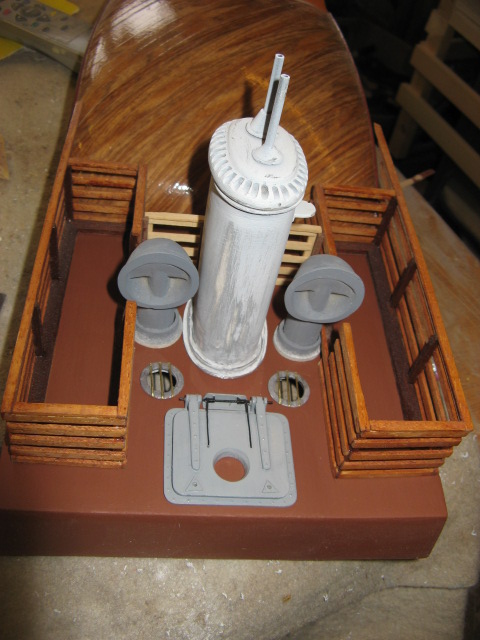 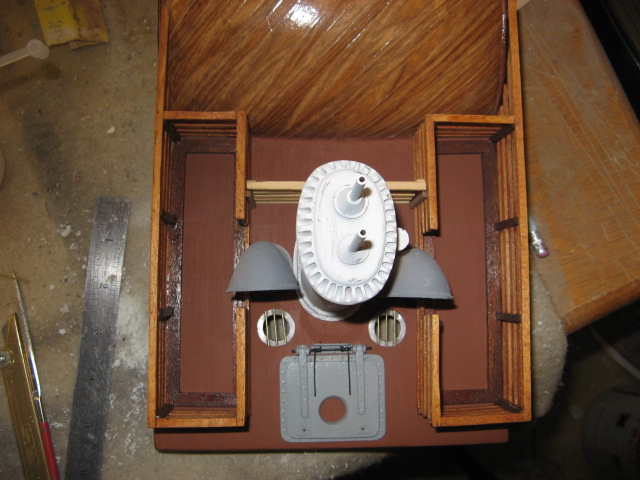 |
|
  | |
James_H
Midshipman

Posts : 62
Join date : 2012-04-01
Age : 52
Location : Amsterdam
 |  Subject: Re: A lifeboat build blog...........How a kit is made! Subject: Re: A lifeboat build blog...........How a kit is made!  Sat May 12, 2012 9:35 am Sat May 12, 2012 9:35 am | |
| Well, modeller's license or not, it looks absolutely stunning. I've just noticed you posted that at one o'clock in the morning! Do you never sleep? I am starting to doubt that you are human, and are in fact some sort of relentless unstoppable boat-building machine.  | |
|
  | |
Guest
Guest
 |  Subject: Re: A lifeboat build blog...........How a kit is made! Subject: Re: A lifeboat build blog...........How a kit is made!  Sat May 12, 2012 10:05 am Sat May 12, 2012 10:05 am | |
| I certainly stopped last night..spent it in A & E having all sorts of tests for my kidney stones..........turns out not to be........but was /is in fact accute constipation because of all the pills I've been popping..........gordon bennett.
the rest is unrepeatable, lol |
|
  | |
Guest
Guest
 |  Subject: Re: A lifeboat build blog...........How a kit is made! Subject: Re: A lifeboat build blog...........How a kit is made!  Sun May 13, 2012 6:50 pm Sun May 13, 2012 6:50 pm | |
| well! I've given up on this british summer already......a drought order in most parts of the country, and it's done nothing but persist itself for the last few days since I decided to spray outside......just can't believe it. So after a brief spell of decent weather between downpours I today wet and dried the two Watson hulls ready for spraying. Then I had the brainwave ( not common for me) that my mate has a large very clean and tidy garage where he used to restore and spray his Austin 7's, and after a phone call I am taking them down to his place tomorrow morning for spraying over the next few days.........hopefully without any drama. So this afternoon I also masked off the lower hull of the Mary Stanford ready for spraying the upper hull with Oxford blue. I used Frog tape delicate for the actual masking, so will see what sort of line this gives once removed. 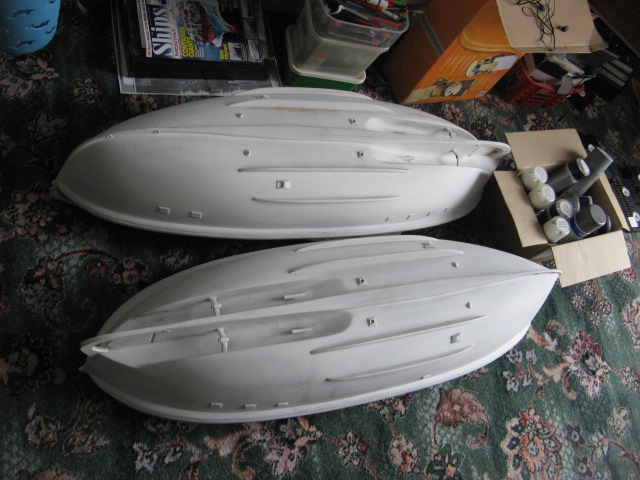  |
|
  | |
Footski
Master


Posts : 548
Join date : 2011-06-11
Age : 66
Location : Malaga, Spain
 |  Subject: Re: A lifeboat build blog...........How a kit is made! Subject: Re: A lifeboat build blog...........How a kit is made!  Sun May 13, 2012 9:36 pm Sun May 13, 2012 9:36 pm | |
| | |
|
  | |
Guest
Guest
 |  Subject: Re: A lifeboat build blog...........How a kit is made! Subject: Re: A lifeboat build blog...........How a kit is made!  Sun May 13, 2012 9:40 pm Sun May 13, 2012 9:40 pm | |
|
Last edited by nhp651 on Mon May 14, 2012 8:34 am; edited 1 time in total |
|
  | |
Footski
Master


Posts : 548
Join date : 2011-06-11
Age : 66
Location : Malaga, Spain
 |  Subject: Re: A lifeboat build blog...........How a kit is made! Subject: Re: A lifeboat build blog...........How a kit is made!  Mon May 14, 2012 8:02 am Mon May 14, 2012 8:02 am | |
| | |
|
  | |
Guest
Guest
 |  Subject: Re: A lifeboat build blog...........How a kit is made! Subject: Re: A lifeboat build blog...........How a kit is made!  Mon May 14, 2012 8:34 am Mon May 14, 2012 8:34 am | |
| Will do Barry...seems as no one else is around, lol.have a good holiday and enjoy yourself.
hopefully my boats'll be in glorious technicolour by the time you get back, lol
neil. |
|
  | |
Guest
Guest
 |  Subject: Re: A lifeboat build blog...........How a kit is made! Subject: Re: A lifeboat build blog...........How a kit is made!  Mon May 14, 2012 10:54 am Mon May 14, 2012 10:54 am | |
| |
|
  | |
Guest
Guest
 |  Subject: Re: A lifeboat build blog...........How a kit is made! Subject: Re: A lifeboat build blog...........How a kit is made!  Wed May 16, 2012 2:19 pm Wed May 16, 2012 2:19 pm | |
| |
|
  | |
James_H
Midshipman

Posts : 62
Join date : 2012-04-01
Age : 52
Location : Amsterdam
 |  Subject: Re: A lifeboat build blog...........How a kit is made! Subject: Re: A lifeboat build blog...........How a kit is made!  Thu May 17, 2012 11:31 am Thu May 17, 2012 11:31 am | |
| That is indeed a very crispy-sharp line Neil. Nice! You obviously weren't nervous about getting the camera really close to that one.  Beautiful trawler too! | |
|
  | |
Guest
Guest
 |  Subject: Re: A lifeboat build blog...........How a kit is made! Subject: Re: A lifeboat build blog...........How a kit is made!  Thu May 17, 2012 12:40 pm Thu May 17, 2012 12:40 pm | |
| Yes, James..The tape is super.Will post some pics of the white hulled boats later but had a bit of a disaster last night with one.
as to the trawler.......Rod, my mate who builds them has actually never ever seen a trawler in his life, "in the flesh" so to speak....he came to the local area long after the last of the deep sea trawlers had left the town, but his execution of detail on them is so correct and so superb, you would have thought he's spent a lifetime onboard that type of ship........his attention to detail really is brilliant.
neil. |
|
  | |
James_H
Midshipman

Posts : 62
Join date : 2012-04-01
Age : 52
Location : Amsterdam
 |  Subject: Re: A lifeboat build blog...........How a kit is made! Subject: Re: A lifeboat build blog...........How a kit is made!  Thu May 17, 2012 2:40 pm Thu May 17, 2012 2:40 pm | |
| It is really irksome when people are that talented. Love to see some pics of it on the water if you have any.
As to the disaster, I'm sorry to hear that, but I seriously doubt that fixing it is going to be beyond your talents.
'Tis always annoying to take a step backwards as I know only too well. | |
|
  | |
Guest
Guest
 |  Subject: Re: A lifeboat build blog...........How a kit is made! Subject: Re: A lifeboat build blog...........How a kit is made!  Thu May 17, 2012 5:17 pm Thu May 17, 2012 5:17 pm | |
| - James_H wrote:
- It is really irksome when people are that talented. Love to see some pics of it on the water if you have any.
As to the disaster, I'm sorry to hear that, but I seriously doubt that fixing it is going to be beyond your talents.
'Tis always annoying to take a step backwards as I know only too well. repairs already done James....just annoying that I never learn, lol. as for the trawler......it hasn't got it's bum wet yet, but will post some when it's finished. neil. |
|
  | |
Guest
Guest
 |  Subject: Re: A lifeboat build blog...........How a kit is made! Subject: Re: A lifeboat build blog...........How a kit is made!  Thu May 17, 2012 9:40 pm Thu May 17, 2012 9:40 pm | |
| |
|
  | |
HS93
Lost But Never Forgotten R.I.P

Posts : 69
Join date : 2011-06-11
Location : merseyside
 |  Subject: Re: A lifeboat build blog...........How a kit is made! Subject: Re: A lifeboat build blog...........How a kit is made!  Sat May 19, 2012 12:20 am Sat May 19, 2012 12:20 am | |
| Dave Norsman is offering one of his boats and his prized action man ( all dressed in pink for some reason) for your grand launch of your boats ,so you can have something to rescue .so I hope I can make it. it should be a great day, I would offer one of my boats but as dave will tell you they are all un painted shelf queens.
Peter | |
|
  | |
Sponsored content
 |  Subject: Re: A lifeboat build blog...........How a kit is made! Subject: Re: A lifeboat build blog...........How a kit is made!  | |
| |
|
  | |
| | A lifeboat build blog...........How a kit is made! |  |
|
